


avr-gcc 4.9.2 and avr-libc 1.8.1 compiled for Windows
It’s been about 3 years now since I last compiled up avr-gcc and avr-libc for Windows and it proved surprisingly popular with you so I’m now bringing you the latest, as of March 2015, versions of avr-gcc and avr-libc. I’ve also included avrdude 6.1 for completeness even though I didn’t build that one from source.
The binaries are 32-bit and are all built from source using mingw/msys. Here’s the version list:
| Tool | Version | Configuration |
|---|---|---|
| avr-gcc | 4.9.2 | –prefix=/c/avr-gcc –target=avr –enable-languages=c,c++ –disable-nls –disable-libssp –with-dwarf2 –disable-shared –enable-static –with-gmp=/usr/local –with-mpfr=/usr/local –with-mpc=/usr/local |
| avr-libc | 1.8.1 | –prefix=/c/avr-gcc –build= –host=avr –disable-shared –enable-static |
Dependencies
There is one dependency, libiconv-2.dll. It’s included in the avr-gcc/bin directory so you shouldn’t need to know about it but if you plan to relocate any of the gcc binaries then be aware of this dependent dll.
Download the package
Go to my downloads page and download it from the Arduino section.
How to install and use it
Since you’re here and displaying an interest in a set of command-line tools I’m going to assume that you’re already up and running with a command-line development environment such as cygwin or to a lesser degree, mingw.
- Extract the zip file to a location on your hard disk. These command-line tools are not happy to see pathnames with spaces in them so I recommend that you extract to the root directory of your C: drive. That will result in everything being installed into
c:\avr-gcc. - It’ll be most convenient to add
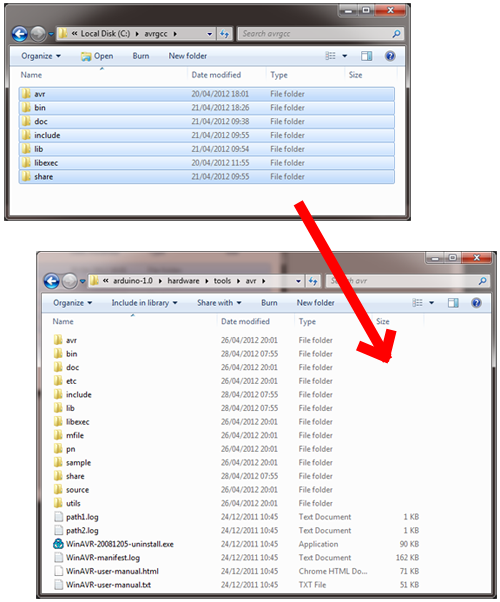
c:\avr-gcc\binto yourPATHenvironment variable. - Navigate into the c:\avr-gcc directory and select everything in it.
- Navigate a new window to the
arduino-1.0\hardware\tools\avrsubdirectory. - Drag and drop the entire contents of the avr-gcc directory as a copy (not a move!) into the arduino directory. Say yes to all prompts from Windows about merges and overwrites.
- Download the
avr-g++-forwarderarchive from my downloads page. - Navigate to
C:\Program Files (x86)\arduino\arduino-1.0.6\hardware\tools\avr\binand renameavr-g++.exetoavr-g++-real.exe. - Copy the fake forwarding
avr-g++.exefrom the zip file that you downloaded in step (1) into thebindirectory.
Eclipse integration
Your new toolchain can be integrated into your Eclipse projects if you’re using the AVR Eclipse Plugin.
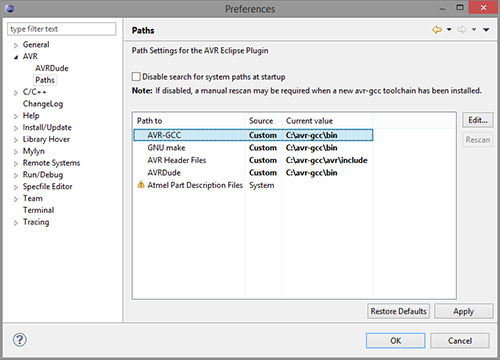
Simply open up the Eclipse preferences editor, locate the AVR/Paths section and change the paths to point to your new directory as shown in the image above.
Arduino Integration
It’s scarcely believable that we’re in 2015 and the Arduino IDE, despite it’s runaway popularity is still using gcc 4.3.2 from back in 2008. I do strongly advise you to migrate away from the IDE to a makefile or Eclipse-based development environment but I know many people are perfectly happy with the simplicity of the Arduino environment and would like to do this upgrade so here we go.
If you’d like to integrate your new toolchain into the Arduino IDE then you can do it but you have to treat this advice as experimental because obviously I haven’t checked out the whole Arduino ecosystem to verify that they all compile OK. I tested this procedure using version 1.0.6 of the Arduino IDE.
Step 1: Backup the old tools
Navigate to the hardware/tools subdirectory of the Arduino installation and make a copy of the avr subdirectory like this.

Make a backup
Step 2: Drag and drop the new tools
Enabling C++11 support
One of the primary reasons to be upgrading to this new version of gcc is so that you can get to use all the exciting new features offered by C++11. To enable these features you need to pass the -std=c++11 option on the gcc command line. Believe it or not the Arduino IDE offers no way to customise the compiler options so we’re going to have to hack it.
Our hack will be to create a simple forwarding program that takes the place of avr-g++.exe and simply prepends -std=c++11 to the command line before passing the call to the real avr-g++.exe executable. Here’s the source code to the forwarding program:
#include <windows.h>

int CALLBACK WinMain(
  HINSTANCE hInstance,
  HINSTANCE hPrevInstance,
  LPSTR lpCmdLine,
  int nCmdShow) {

  TCHAR *buf;
  STARTUPINFO si;
  PROCESS_INFORMATION pi;

  buf=(char *)malloc(40000);
  lstrcpy(buf,"-std=c++11 ");
  lstrcat(buf,lpCmdLine);

  ZeroMemory(&si,sizeof(si));
  si.cb=sizeof(si);

  CreateProcess("avr-g++-real.exe",buf,NULL,NULL,TRUE,0,NULL,NULL,&si,&pi);
  return 0;
}
I’ve done the work of compiling this with Visual Studio and have uploaded it in a zip file for you to use. Here’s how to install it into the IDE.
That’s it. You should be able to compile C++11 programs in the Arduino IDE but really I hope that all this hackery has gently nudged you towards adopting a real development environment for your projects.