avr-gcc 4.7.0 and avr-libc 1.8.0 compiled for Windows
At the time of writing, April 2012, the gcc team have released version 4.7.0 of the compiler package and the avr-libc developers have also released version 1.8.0 of the avr-libc library.
Version list
| Tool | Version | Configuration |
|---|---|---|
| avr-gcc | 4.7.0 | –with-gmp=/usr/local –with-mpfr=/usr/local –with-mpc=/usr/local –prefix=/c/avrgcc –target=avr –enable-languages=c,c++ –with-dwarf2 –enable-doc –disable-shared –disable-libada –disable-libssp |
| avr-libc | 1.8.0 | –host=avr –prefix=/c/avrgcc –enable-doc –disable-versioned-doc –enable-html-doc –enable-man-doc –mandir=/c/avrgcc/share/man –datadir=/c/avrgcc –build=i686-pc-mingw32 build_alias=i686-pc-mingw32 |
| avrdude | 5.1.1 | –prefix=/c/avrgcc –datadir=/c/avrgcc –sysconfdir=/c/avrgcc/bin –enable-doc –disable-versioned-doc
Update 24 Feb 2013: now includes libusb support. |
Built from source
Both of these packages are open-source and are available to download and build from their official repositories. For me with my Linux development hat on that’s a relatively easy task but swapping hats for my Windows developer attire I have to set up a rather specialised toolchain that can emulate enough of a Unix-like system to build the source packages and particularly the documentation.
Well I’ve done all that for you and now you can download and extract a single zip file that will give you the whole lot, ready to run. The binaries were built under the msys environment which means they have no external dependencies and will just run as-is.
Important bug fixes
The most important bug fix that I can see concerns Arduino Mega users. Earlier versions of avr-libc contained buggy code for global constructor initialisation. If your program is larger than 64Kb and the linker locates a class constructor in the upper 64Kb and you instantiate that class at global scope then your program will crash on startup. The bug fix seems to also include the problem where register r20 would be corrupted during the constructor call. This is good.
On a less important note the annoying and wrong warning only initialized variables can be placed into program memory area is removed. Thank goodness for that!
Integrated with the Arduino IDE
Furthermore, I’ve done the necessary hackery to integrate these new tools into the Arduino IDE so that IDE users can benefit from the improvements and bug fixes offered in the new releases.
So without further ado, let’s get on with the instructions.
Download it
Click here to go to my downloads page and get the 77Mb zip package.
Extract it to your hard disk
I recommend extracting to your root directory (C:/). This will result in an avrgcc directory being created with everything in it.
If you don’t have administrator access to your PC then you can install to another location. However, do not install to a directory that has spaces in it such as c:\Program Files or the Windows XP home directory root (c:\Documents and Settings\username). The Windows Vista and Windows 7 home directory (c:\Users\username) root is safe however.
Referencing the compiler
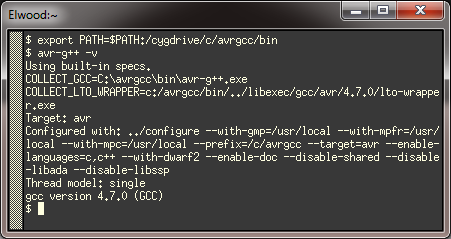
If you want to compile from the command line then you can update your PATH variable to the avrgcc/bin directory, for example under Cygwin I can do this:

Updating the cygwin PATH variable
If you’re a Makefile person then no doubt you have variables set to where your compiler, its includes and its libraries are located. Just update those and you’re off.
Upgrading Arduino IDE 1.0
Note: This is an advanced option that may have side effects that have not yet been discovered. The official status is “works for me”. You may find issues that I have not come across yet.
The procedure is quite straightforward, surprisingly so given that the compiler and library shipped with the IDE is ancient (gcc 4.3.3). Nevertheless upgrading the IDE should be considered an advanced option that you probably don’t want to do unless you are having issues with it that you believe the upgrade will solve.
Step 1: Backup the old tools
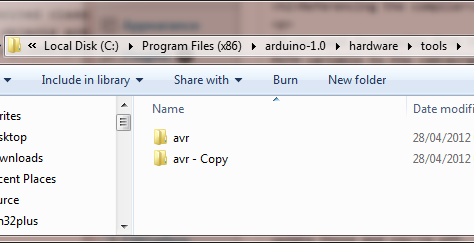
Navigate to hardware/tools subdirectory of the Arduino installation and make a copy of the avr subdirectory like this.

Make a backup
Step 2: Drag and drop the new tools
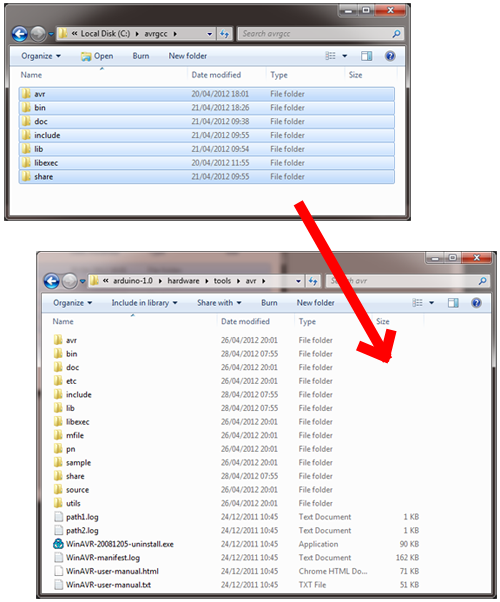
- Navigate into the c:\avrgcc directory and select everything in it.
- Navigate a new window to the arduino-1.0\hardware\tools\avr subdirectory.
- Drag and drop the entire contents of the avrgcc directory as a copy (not a move!) into the arduino directory. Say yes to all prompts from Windows about merges and overwrites.

Step 3: Backup the Arduino library
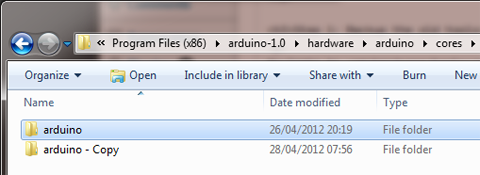
Navigate to the hardware\arduino\cores subdirectory of your arduino installation and make a copy of the arduino subdirectory.

Step 4: Fix problems in the Arduino library
The final step is to fix up some problems with the Arduino library. Some are due to the library being written for the old avr-libc and others are just sloppy coding that we need to clean up.
Navigate into the hardware\arduino\cores\arduino directory that we just backed up and download and overwrite the files therein with those in the following table.
| File | Reason for fix |
|---|---|
| HardwareSerial.cpp | The USART macros have changed and old macros deprecated. Rather than rewrite HardwareSerial.cpp we enable support for the old macros with the __AVR_LIBC_DEPRECATED_ENABLE__ preprocessor symbol. |
|
IPAddress.cpp and IPAddress.h |
Poor code quality here. The 4-octet class member is forcibly type-punned to an incompatible type in several places. This hack forces gcc to disable an entire class of optimisations. The new compiler automatically enables strict-aliasing when size optimisations are selected so we get told about this. The fix is to declare the 4-octet member as a union so it can be used in a type-safe manner. |
| Print.cpp | The old prog_char et al. typedefs are no longer supported. The correct way to declare something to be in flash is with __attribute__((progmem)) on the variable name, not the type. There is one place in Print.cpp where I had to do this. |
| WString.h | The F(string_literal) macro is incorrectly declared. reinterpret_cast can never cast away cv-qualifiers as it is being asked to do in this file. The fix is to keep the const qualifier in the cast target. |
Done!
That’s it. You should now be able to launch the IDE and compile using the new compiler.


Pingback: DCF77 vs. GPS | Blinkenlight()