512Kb SRAM expansion for the Arduino Mega (software)
The final part of this series of blog posts will present some open source software that you can use to exploit the new memory space. You can download the library source code from my downloads page.
The xmem library
I’ve put together a collection of functions into a library that you can use to manage access to the extended memory. The aim of the library is to enable the existing memory allocation functions such as malloc, free, new and delete to work with the extended memory.
The xmem functions are contained in a namespace called xmem so you need to prefix your calls to these functions with xmem::, for example xmem::begin(…). The functions are declared in xmem.h, so you must include that header file like this:
#include "xmem.h"
Installation instructions for the Arduino IDE
- Download the library zip file from my downloads page.
- Browse to the libraries subdirectory of your Arduino installation. For example, for me that would be C:\Program Files (x86)\arduino-1.0.1\libraries.
- Unzip the download into that directory. It should create a new folder called xmem with two files in it.
- Start up the Arduino IDE and use the Tools -> Import Library -> xmem option to add the library to your project
xmem functions
void begin(bool heapInXmem_)
This function must be called before you do anything with the extended memory. It sets up the AVR registers for external memory access and selects bank zero as the current bank.
If you set the heapInXmem_ parameter to true (recommended) then the heap used by malloc et. al. will be located in external memory should you use it.
xmem::begin(true);
void setMemoryBank(uint8_t bank_,bool switchHeap_=true);
Use this function to switch to another memory bank. bank_ must be a number between zero and seven. If switchHeap_ is true (the default) then the current state of the heap is saved before the bank is switched and the saved state of the new bank is made active. This heap management means that you can freely switch between banks calling malloc et. al. to make optimum use of the external memory.
xmem::begin(true);

// use the memory in bank zero

xmem::setMemoryBank(1,true);

// use the memory in bank one
SelfTestResults selfTest();
This is a diagnostic function that can be used to check that the hardware is functioning correctly. It will write a bit pattern to every byte in every bank and will then read back those bytes to ensure that all is OK. Because it overwrites the entire external memory space you do not want to call it during normal program operation.
This function returns a structure that contains the results of the self test. The structure is defined as follows.
struct SelfTestResults {
  bool succeeded;
  volatile uint8_t *failedAddress;
  uint8_t failedBank;
};
If the self-test succeeded then succeeded is set to true. If it fails it is set to false and the failed memory location is stored in failedAddress together with the failed bank number in failedBank.
  xmem::SelfTestResults results;

  xmem::begin(true);
  results=xmem::selfTest();

  if(!results.succeeded)
    fail();
Some common scenarios
In this section I’ll outline some common scenarios and how you can configure the external memory to achieve them.
Default heap, default global data, external memory directly controlled
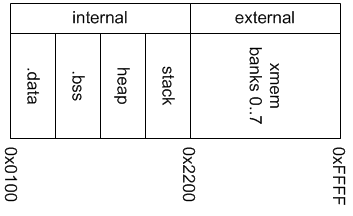
In this scenario the malloc heap and global data remain in internal memory and you take direct control over the external memory by declaring pointers into it.

Memory layout for direct access
Your code could declare pointers into the external memory and use them directly. This is the simplest scenario.
#include <xmem.h>

void setup() {
  // initialise the memory
  xmem::begin(false);
}

void loop() {
  // declare some pointers into external memory
  int *intptr=reinterpret_cast<int *>(0x2200);
  char *charptr=reinterpret_cast<char *>(0x2200);

  // store integers in bank 0
  xmem::setMemoryBank(0,false);
  intptr[0]=1;
  intptr[10000]=2;
  intptr[20000]=3;

  // store characters in bank 1
  xmem::setMemoryBank(1,false);
  charptr[0]='a';
  charptr[10000]='b';
  charptr[20000]='c';

  delay(1000);
}
Default global data, heaps in external memory
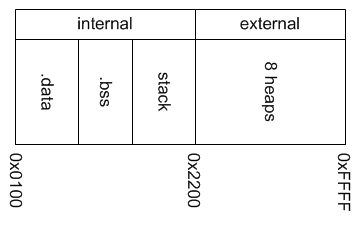
In this scenario we move the malloc heap into external memory. Furthermore we maintain separate heap states when switching banks so you effectively have eight independent 56Kb heaps that you can play with.

Memory layout for external heaps
This is a powerful scenario that opens up the possibility of using memory-hungry libraries such as the STL that I ported to the Arduino.
Example 1, using c-style malloc and free to store data in the external memory.
#include <xmem.h>

byte *buffers[8];

void setup() {
  uint8_t i;

  xmem::begin(true);

  // setup 8 50K buffers, one per bank

  for(i=0;i<8;i++) {
    xmem::setMemoryBank(i,true);
    buffers[i]=(byte *)malloc(50000);
  }
}

void loop() {

  uint16_t i,j;

  // fill each allocated bank with some data

  for(i=0;i<8;i++) {

    xmem::setMemoryBank(i,true);

    for(j=0;j<50000;j++)
      buffers[i][j]=0xaa+i;
  }

  delay(1000);
}
Example 2. Using the standard template library to store some vectors in external memory. This is the slowest option but undoubtedly the most flexible. vectors only scratch the surface of what’s possible. maps and sets are all perfectly feasible with all this memory available.
#include <xmem.h>
#include <iterator>
#include <vector>
#include <new.cpp>

byte *buffers[8];

void setup() {
  xmem::begin(true);
}

void loop() {

  std::vector<byte> *testVectors[8];
  uint16_t i,j;

  for(i=0;i<8;i++) {

    xmem::setMemoryBank(i,true);
    testVectors[i]=new std::vector<byte>();

    for(j=0;j<10000;j++)
      testVectors[i]->push_back(i+0xaa);
  }

  for(i=0;i<8;i++) {

    xmem::setMemoryBank(i,true);
    for(j=0;j<10000;j++)
      if((*testVectors[i])[j]!=0xaa+i)
        fail();

    delete testVectors[i];
  }

  delay(1000);
}

/*
 * flash the on-board LED if something goes wrong
 */

void fail() {
  pinMode(13,OUTPUT);
  for(;;) {
    digitalWrite(13,HIGH);
    delay(200);
    digitalWrite(13,LOW);
    delay(200);
  }
}
Other articles in this series
| 512Kb SRAM expansion for the Arduino Mega (design) |
| 512Kb SRAM expansion for the Arduino Mega (build) |
Schematics, PCB CAD and Gerbers
I don’t have any more boards left to sell, but you can now print and build your own by downloading the package from my downloads page. Good luck!


