Animation on the Arduino with easing functions
In this article I’ll show you how to do advanced animation techniques on the Arduino using what are known as easing functions.
What’s an easing function?
Computer animation of motion involves making an object appear to move from A to B over some time period T. The simple way to do this is to change the object’s position at fixed intervals over time so that it appears to move from A to B as the clock ticks from 0 to T. This is known as linear motion and while it works it appears unnatural because in the natural world objects accelerate and decelerate as they move away from and towards their resting positions.
To simulate acceleration and deceleration on the computer we can apply a transformation to the object’s position as it moves to ease it in and out of its resting positions. The result is a natural looking animation that is pleasing to watch and looks slick and professional when applied to your application.
Possible applications of this library might include LCD gauges that move smoothly from one position to another or bar charts that animate up to their desired values.
If you’d like to see what the easing functions look like in an interactive demonstration, click here to go to a web page hosting a Silverlight applet that demonstrates all the easing formulae and modes. Scroll down about half way to the demo.
This library is an AVR port of the open source ActionScript easing functions written by Robert Penner. There is a book that goes along with his code and I would encourage anyone who is interested in the theory behind the animation to download and read the ‘tweening’ chapter that is published as a PDF on his website.
Motion graphs
Move your mouse over the entries in the table below to see the graph that plots the position of an object over time.
| Easing function | |
|---|---|
Back Back Ease |
Bounce Bounce Ease |
Circular Circular Ease |
Cubic Cubic Ease |
Elastic Elastic Ease |
Exponential Exponential Ease |
Quadratic Quadratic Ease |
Quartic Quartic Ease |
Quintic Quintic Ease |
Sine Sine Ease |
The Arduino easing library
To use the library you need to include the API header file.
#include "EasingLibrary.h"
Next you need to declare an instance of an object to perform the type of easing that you require.
	BackEase back;
	BounceEase bounce;
	CircularEase circular;
	CubicEase cubic;
	ElasticEase elastic;
	ExponentialEase exponential;
	LinearEase linear;
	QuadraticEase quadratic;
	QuarticEase quartic;
	QuinticEase quintic;
	SineEase sine;
The code above shows all the possible easing functions, pick whichever one you need to use.
Now you need to initialise the object with the parameters that define your animation. There are two basic parameters that apply to every easing function that you must consider. They are both floating point numbers.
- Duration. This is the total time that your animation will run for. It doesn’t matter what units you use. It could be seconds, milliseconds, whatever.
- Total change in position.. This is how far your object will move during the animation. Again, the units are up to you. The upper bound in values returned from the easing function is determined by the value you decide here.
For example,
easingMethod.setDuration(2);	// 2 units, which we will interpret as seconds
easingMethod.setTotalChangeInPosition(32);
Here I have decided to run a two second animation that will move my object across 32 units.
Decide whether to ease in, ease out or do both. Easing in will apply acceleration, out will apply deceleration and both will apply acceleration and deceleration. The corresponding methods are easeIn, easeOut and easeInOut.
Now you can run the animation over your time period, using the easing function to generate positions.
double easedPosition,t=0;
for(int i=0;i<=40;i++)
{
	easedPosition=easingMethod.easeIn(t);
	t+=0.05;
}
The above code generates 41 positions for our object starting at time t=0 and ending at t=2, stepping 0.05 each time. easedPosition will range between 0 and 32 using the formula defined by the easing function. 40 was an arbitrary number that I picked. I could have looped more times with smaller time increments to generate a smoother animation but at some point I would exceed the resolution and speed of my output device (an LCD).
You can download the library from my downloads page. The library comes with full source code as well as the compiled .a binary that you can link directly against.
Some special cases to be aware of
Some of the easing functions have special behaviour or additional configuration that is required in order to use them.
BackEase and ElasticEase will generate position values outside of the TotalChangeInPosition parameter. That is because their animation path involves exceeding or retracting from the start/finish position. You code will almost certainly need to be aware of that.
backEase has an overshoot parameter that you can change. The greater the value for overshoot, the greater the overshoot.
elasticEase has period and amplitude parameters that you can use to customise the elasticity of the animation.
Test circuit and code
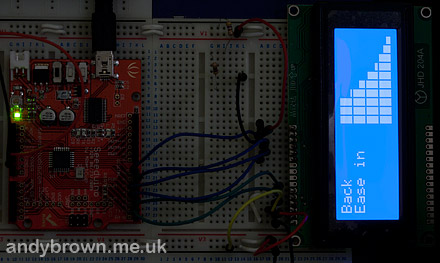
Our test circuit will involve a 20×4 LCD that is compatible with the HD44780 controller. The library that we will use to control the LCD is the popular LiquidCrystal library found in the arduino playground. I will use an Arduino Duemilanova clone (ATmega328P), although the library is agnostic to the type of AVR that you use as long as it has sufficient flash memory (about 8K).
click to enlarge
Wire up the LCD using the following pin assignments.
| Arduino | LCD |
|---|---|
| 2 | RS |
| 3 | EN |
| 4 | DB4 |
| 5 | DB5 |
| 6 | DB6 |
| 7 | DB7 |
Download the test code from my downloads page. If you’re an Eclipse developer you can import the project and compile it yourself. If you’d rather just load it up and let it run then I have included an ATmega328P .hex file in the download so you can flash it with Avrdude.
Watch the test video
The video shows the test code running in my development environment. All easing functions are demonstrated – including the Linear (null) function. Apologies for the lack of contrast during the animation of the line graph – it seems my camera’s video capture can’t handle it.
Updated: How to use with the Arduino IDE
It is possible to use this library with the Arduino IDE, here is a step-by-step guide of what to do.
- Download and install the library from my downloads page.
- Open an explorer window and browse to the libraries subdirectory of your Arduino installation directory. For me that is C:\Program Files (x86)\arduino-1.0.1\libraries. Create a new subdirectory in this libraries directory and call it Easing.
- Open another explorer window and browse to the easing library installation directory. For me that is C:\Program Files (x86)\Andy Brown\Easing Functions Library.
- Select all the .cpp and .h files in the easing library installation directory and copy them to the new Easing folder that you created in step 2.
That’s the library installed, if you’re running the Arduino IDE quit and restart. You should now see Easing as an option under the Sketch -> Import Library menu option. Unfortunately we’re not done yet because we need to work around two shortcomings in the Arduino IDE and the tools supplied with it.
- Open up the copy of SineEase.cpp that you just created in the Arduino libraries directory with a text editor and add a definition for M_PI_2 that is missing from the old version of math.h that ships with the Arduino IDE. You should make your change so that the top of the file looks like this:
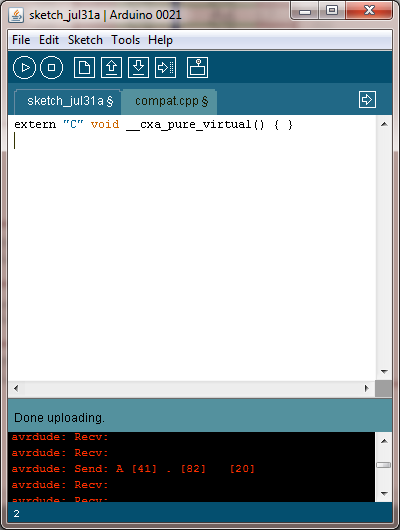
#include <math.h> #include "SineEase.h" #if !defined(M_PI_2) #define M_PI_2 1.57079632679489661923 #endif /* * Ease in */ NUMBER SineEase::easeIn(NUMBER time_) const { - When you come to create a sketch that uses the library you need to supply an empty implementation of __cxa_pure_virtual(). Unfortunately the limitations of the Arduino IDE mean that you cannot do this in your main .pde. Instead, add a new tab to your project and call it compat.cpp. You need to add just one line to this new tab:
extern "C" void __cxa_pure_virtual() { }Here’s a screenshot in case the above isn’t quite clear:

That’s it, you can go ahead and create sketches that use the library. For example, here’s the test that I created. It doesn’t do much except ease in a LED connected to the PWM pin 9.
#include "QuarticEase.h"

QuarticEase ease;

void setup() {
  ease.setDuration(2);
  ease.setTotalChangeInPosition(255);

  pinMode(9,OUTPUT);
}


void loop() {
  double easedPosition,t=0;

  for(int i=0;i<=100;i++) {
    easedPosition=ease.easeIn(t);
    analogWrite(9,(unsigned char)easedPosition);
    t+=0.02;
    delay(5);
  }

  delay(1000);
}


