Hacking the HP Z800 Xeon motherboard into a standard case

About four years ago now the company I work for were investing in some new servers for a project that we were working on and what turned up were quad LGA1366 socket Xeons with support for up to 192Gb of memory. In most cases two sockets were populated with Intel Xeon X5670 CPUs, hex core devices with 12Mb of cache memory. We ran Redhat Enterprise Linux on them and they were, and still are, extremely fast linux servers that could operate as physical boxes in our production environment or virtuals in development.

I wanted one. I still want one. I looked around and noticed that HP were doing a very similar board with two sockets and, crucially, it was packaged up into what looked like a normal PC tower case. And it was very expensive, much too expensive to justify forking out for one.

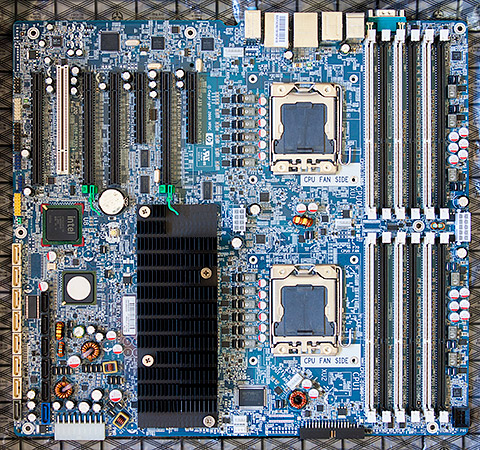
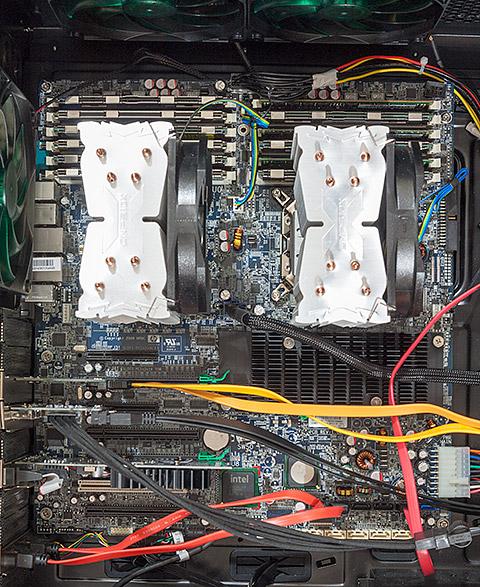
Fast forward four years and times have changed. You can now pick up a brand new replacement motherboard for an HP Z800 on ebay for £100. So that’s what I did, and here it is.


click for larger

Excitement quickly turned into a daunting realisation that I may have bitten off more than I could chew. The board is massive. It will not fit into any ‘normal’ PC case, not even an EATX tower case. The mounting screws will not mate with any of the ATX holes in a motherboard tray. The large ATX power connector is non-standard. The CPU fan headers are non-standard. There’s a separate power connector for the memory banks with a proprietary connector. The list goes on…

Clearly this is a server motherboard adapted only slightly to fit into HP’s proprietary case with HP’s proprietary power supply and cooling system. Buyers of the Z800 certainly received their money’s worth compared to an anonymous box filled with generic parts.

I’m not one to give up in the face of a technical challenge and besides I’d just forked out a hundred notes on the board so the rest of this article will go through all the steps in detail that you would have to do in order to get one of these beasts up and running yourself. There’s no cheaper way to get 12 cores of Xeon power under your desk.

The BIOS and CPU compatibility

The Z800 board comes in three different revisions, indicated by the AS# number printed on the white sticker located directly below the big black chipset heatsink.
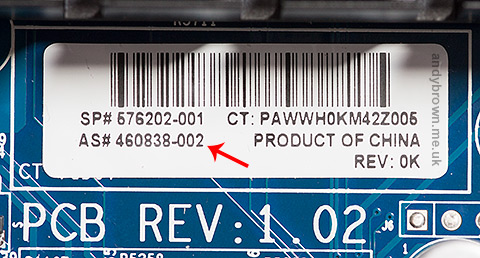
The revisions are indicated by 001, 002 or 003. As you can see from the image this board is an 002 revision. The executive summary to what I’m about to explain is that if you have revision 001 or 002 then you can officially use only Xeon X55xx CPUs. If you have the later 003 revision then you can use either X55xx or X56xx CPUs.

The issue is the BIOS bootblock. It’s physically write-protected within the BIOS and does not get upgraded when you flash the BIOS. So if you have one of the earlier revisions and you flash your BIOS then the X56xx CPUs will be recognised but the bootblock may fail to get that far and you could be presented with a black screen and a POST failure when you power up.

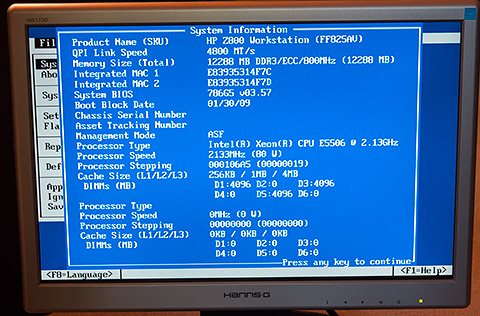
The key is the bootblock date shown in the BIOS System Information screen. A date of 11/10/09 is required to support X56xx CPUs.

Note how I’ve used the word officially a few times back there because the fact is that it might work. Word on the HP forums is that the behaviour of an earlier revision flashed up to the latest BIOS and used with X56xx CPUs ranges from ‘works for me’ to ‘sometimes won’t boot’ to ‘total failure to POST’. The worst issues seem to be with dual-CPU configurations. Later on this article I’ll go through my own setup and experiences.

The case

We need to start with a case for this thing and like I said, even the largest ‘normal’ tower case will be too small. You need an HPTX format case. There aren’t many of these and the one I chose was the Nanoxia Deep Silence 6.
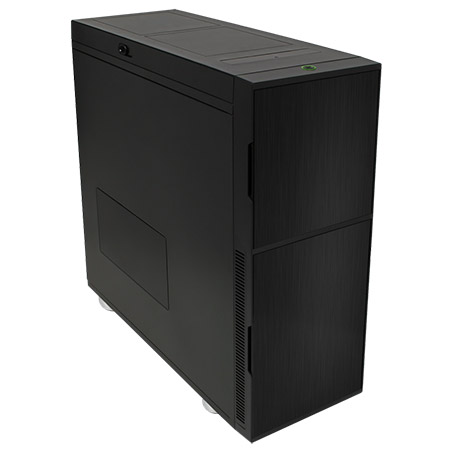
I got it from Quiet PC in the UK and managed to grab a B-grade bargain at £139, that’s a £50 reduction on the full price and I couldn’t tell what made it B-grade because it looks perfect to me. Maybe I have lower standards than most.

I can confirm what the online reviews say when they describe this case as being massive. It is indeed, truly huge. I expect that if it were hollowed out then I could fit my current Fractal Design tower case inside it. It swallows the Z800 motherboard as if it were designed for it. Result.

Modifying the case to hold the motherboard

I mentioned before that the motherboard mounting holes do not match up with the corresponding holes in the case’s motherboard tray. I had to drill and tap new holes for enough screws to hold the board safely with its heavy load of up to two CPUs with large heatsink/fans attached.

This is a fiddly process. Before starting I fitted a small random PCI card into the motherboard and used it to work out exactly where the board needed to be so that the cards lined up with their fixing holes on the side of the case. I used a 2.8mm drill and then tapped the holes out to the correct imperial 6/32 size for motherboard mounting posts.

The hardest part is offering up the motherboard to the tray and accurately marking where to drill. You have to be very accurate or the posts won’t line up with the holes and you only get one chance. A slow, controllable drill that won’t skid is essential and it needs to get into some confined spaces.

Eventually I got all the holes drilled that I thought I could get away with and the board is held securely clear of the base of the case.

This is by far the hardest part of the job and even with all my careful measurement and drilling my expansion cards are slightly bent in their slots due to a couple of millimetres of misalignment. Oh well, at least they’re held tight! If I were to do this again I would probably drill wider diameter holes in the motherboard tray to allow a small amount of adjustment. I’d then use wide washers on either side of the tray, a standoff above the upper washer, a screw through everything and a locking nut at the back of the tray.

The power supply

The original Z800 comes with a power supply engineered by HP to fit the genuine HP case. It is, of course, totally incompatible with a standard PC case so I needed a standard PC power supply that met the requirements of the board.
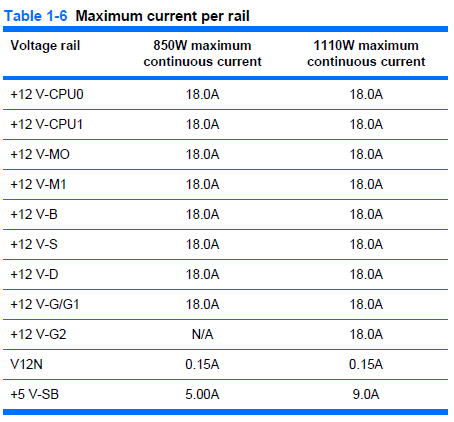
The HP power supply distributes the main 12V output across 8 different rails, each with a maximum delivery of 18A but with a combined output ceiling of 70A for the 850W unit and 92.5A for the 1110W option. I have no way of knowing how much will actually be drawn by each rail so it’s safest for me to buy a single rail unit with a nice high overall amperage.

I plugged my prospective peripherals into an online PSU amperage calculator and it came out with a recommended 750W supply for dual 130W TDP processors, four 15K SCSI drives, an SSD and an ATI 7970 graphics card. The power supply is so important to the overall stability of the system that I don’t skimp on it but, as usual, I’m determined to get the best deal I can. After much research I bought a SuperFlower Leadex 1000W (80+ gold) supply from Overclockers UK on one of their ‘this week only’ deals for £110. It’s very highly thought of and should be more than enough for this system.

Custom cabling

I mentioned before that some of the board power connectors are non-standard, in fact only the 8-pin EPS connector has a standard pinout and fitting. The main ATX power connector and the memory power connector are custom HP designs. Thankfully the Z800 service manual gives the pinout of these connectors so it’s not hard to make up some custom cables to do the job.

The main ATX cable
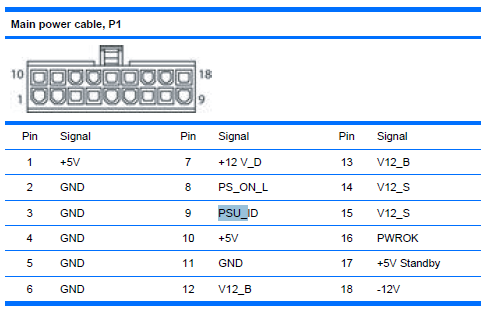
The above image is taken from HP’s service manual for the Z800. It shows the pinout of the power cable, taken as you hold the cable and look at the connector. The first issue is the physical cable itself. Each of the pins in the connector is physically keyed with either a square or a slightly rounded socket and there are only 18 pins.

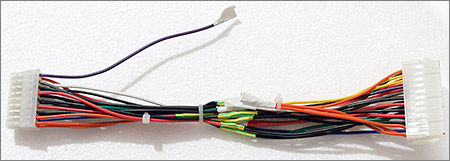
Luckily the order and shape of the pins is identical to a standard 24-pin ATX power cable leaving 6 pins unused at one of the ends. To solve the physical cable issue I bought an ATX power cable extender on ebay for a few pounds and simply sliced off the unwanted pins with a dremel and sanded it to leave a nice finish. The power supply’s standard connector will plug into the unmodified end of the extender and the modified end will go into the motherboard’s socket.

The second issue is the pinout. It’s not the same as the standard ATX pinout at all. To solve this issue I cut the wires of the extension cable around the center and simply remapped them to match the standard by soldering the ends together.

Most of the names in HP’s pinout have an obvious mapping to the ATX standard but there are some that need an explanation. The +12V and V12 lines are all the same and need connecting to the +12V ATX line.

When mapping the five Z800 12V pins to the two ATX PSU pins make sure that you either connect together all Z800 pins to both of the two ATX pins or you make sure that the two V12_S pins are not connected to a single ATX 12V pin. According to table 1-5 in the reference PDF V12_S is the line that powers the slots and high power graphics cards can draw up to 75W each from the slots. The second ATX 12V line was added to support these cards and if you were to connect the V12_S lines to a single wire and then add a high-power graphics card then it may not work, or you may start a fire.

The PSU_ID line is an unknown. My guess is that it was designed to allow HP to detect which of the PSU models were fitted and maybe display it somewhere. I’ve no idea whether this should float, or be pulled low or high so I started with the easiest option which was to let it float by simply tying it off with a piece of masking tape.


click for larger

The memory cable

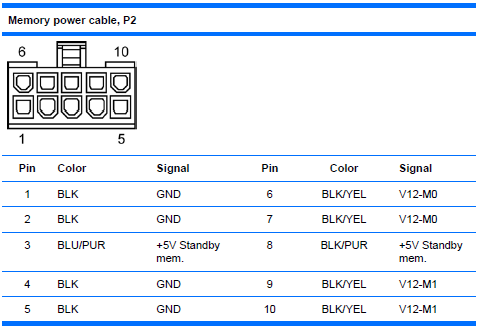
The Z800 has a whopping 12 banks of DDR3 memory available and the designers have, in common with many server motherboards where stability is paramount, opted to give it its own power supply. Again the HP service manual comes to the rescue with the pinout of the connector as you look at the cable.

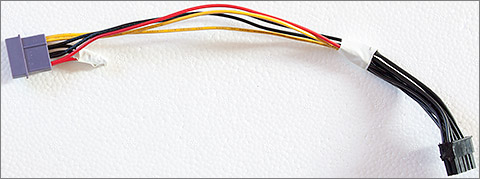
The connector type is the same as the main ATX power cable and again we are very lucky that the keying of the connector shape matches up to one end of the standard 24 pin ATX cable. I purchased another ATX extender cable and sliced off the part of the connector that was not required.


click for larger

To hook it up to the main power supply I took a Molex ‘Y’ splitter of the type that you often get for free when you buy case accessories and cut off one of the plug ends. Molex cables have GND, 12V and 5V lines which is all I needed to wire up my hacked cable. It doesn’t matter that many of the 12V wire into one from the Molex connector because these lines don’t carry a high current. The unused wires were tied off with insulating tape.

Since the publication of this article a reader sent me a link to a seller on the Chinese TaoBao shopping site who offers a custom made cable set that does everything all my hacking does. If you have access to TaoBao then I’d recommend that you buy one instead of going through the hassle of making one like I did.

Another update. The cables previously only available on TaoBao are now available on Ali Express. Search for “z800 power adaptor” on the Ali Express website to find them. I’ve bought a few things from Ali Express sellers in the past and have found the experience to be generally the same as buying from Chinese sellers on ebay.

The memory

Because this PC is so closely related to a server board it requires registered PC3-10600P 1333MHz DIMMs. A wide range of configuration options is available up to a massive 192Gb when in dual-CPU configuration, explaining the presence of a separate power socket on the board for the memory banks.
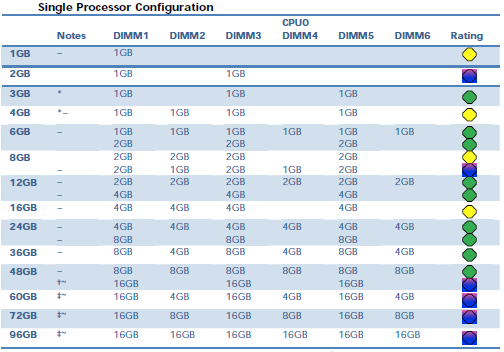

After much scouring of the internet I scored 24Gb of original HP memory for about £60.


click for larger

This first lot of 24Gb will do fine for my initial tests. When I come to install the full complement of two Xeon processors then this board’s design means that I can either keep the 24Gb configuration (12Gb will be installed per processor) or I can double up to 48Gb by populating every slot with a 4Gb DIMM.

The original HP design features a large heatsink/fan unit dedicated to just the memory banks. Obviously HP have to design a system that will cope with the full load of 192Gb of memory potentially sharing a case with dual graphics cards and dual 130W TDP processors and a whole raft of hard disks. My more modest target of 24Gb of RAM and a single graphics card means that I’m not going to need a dedicated memory cooling system.

The CPU

At this point it would be a fairly big risk for me to go out and buy the 3.33GHz X5680 hex-core Xeon that I actually want because there’s still a possibility that this whole system will not work and I’ll be left with an expensive CPU to sell on. So for testing purposes I did a bit of bottom-feeding on ebay and scored a brand new quad-core 2.13GHz E5506 for the princely sum of £1.43, less than the cost of a power cable extender. Crazy.
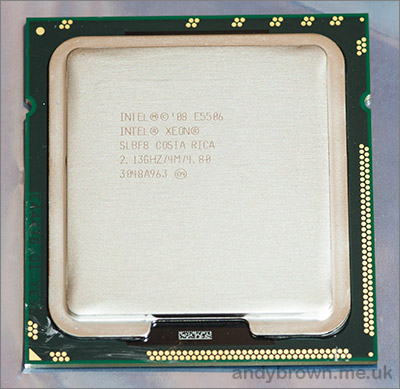

Unloved, the quad-core E5506

The heatsink & fan

HP’s designers must have fallen asleep here because the original HSF is actually rather close to being a standard fit. The only real problem is that it comes with an odd 5-pin fan connector instead of the usual 4-pin. The extra pin is labelled TACH2 and from doing a bit of research it seems that on many boards HP have just grounded the extra pin. The other issue is the price. Even used units are very expensive for what they are so I’m going to go with a standard unit.
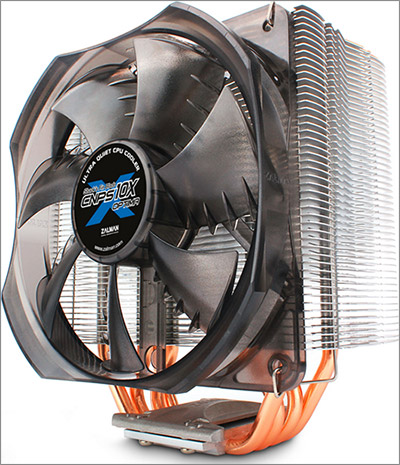
The HSF that I bought is the Zalman CNPS10X Optima, costing just £16.50 on Amazon. What’s really great is that no modifications are required to fit it to the board. The board already comes with a backplate ready to accept the screws that go into the fan assembly. All I have to do is screw it down on top of the CPU.

Or so I thought. The screws supplied with the Zalman are not the correct gauge for the thread on the backplate. It’s very close but if you pull on them then they’ll slip out. Not good and potentially fatal to the CPU if it were to let go in operation. I don’t know who to blame here because the thread on the backplate is a standard gauge – normal computer case screws are a perfect fit. Anyway I found some long-ish replacement screws and just fastened it down reasonably tight and as even as I could make it.
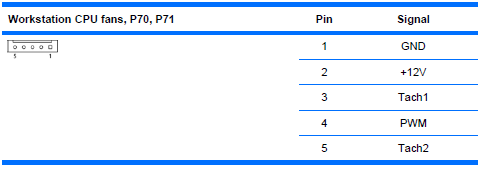
I connected the 4-pin Zalman fan connector to the first 4 pins on the CPU fan header, leaving the mysterious ‘TACH2’ pin floating. Hopefully the BIOS doesn’t care about this pin.

Edit: After upgrading to the X5680 Xeon I started to get a POST warning about having a high powered CPU and a low-powered CPU fan so maybe the fifth line is actively driven to a level by HP’s official high-speed fan to indicate that it’s compatible with the 130W Xeon’s. Anyway, there’s nothing low spec about the Zalman so that warning is duly ignored.

The front panel connectors

Every motherboard has a bank of pins for connecting up the power switch, hard disk LED, power LED etc and the Z800 is no different. On this board it’s the bank of pins labelled ‘P5’. Now here we have a problem because the service manual does not list the pinout for this bank.

I scanned the internet for clues, even searching google images to try to find an internal shot of the workstation where I could see the wiring. No luck. The nearest I came was this post on one of HPs forums that related to a similar but not the same workstation board. Just in case that post disappears off the internet, here’s the pinout:

Pin 1 = Hard drive clear plastic lens bottom LED  (which shows HD activity)… white wire
Pin 2 = Frosted lens top LED  (solid or blinking green LED)  (one wire of front panel dual-color LED)… red wire
Pin 3 = Hard drive clear plastic lens bottom LED (may be ground end)… green wire
Pin 4 = Frosted lens top LED Red (solid orange color LED)  (other wire of front panel dual-color LED)… black wire
Pin 5 = No wire attached in xw6400.  May be ground.
Pin 6 = Front panel switch for power on/off… thick white wire attached..  May be the positive.
Pin 7 = No wire attached in xw6400
Pin 8 = Front panel switch for power on/off… thick white wire attached.  May be the ground.
Pin 9 = No wire attached in my xw6400.  May be +5V
Pin 10 = Key (no pin on motherboard header; plastic filling the #10 hole in the receptacle)
Pin 11 = No wire attached in xw6400.  Has gray wire of ambient air temperature thermisitor attached in xw6600 cable
Pin 12 = No wire attached in xw6400.  Has brown wire ofambient air temperature thermisitor attached  in xw6600 cable
Pin 13 = Orange wire, but not used in my xw6400.  For hood sensor connector.  May be ground.
Pin 14 = Orange wire, but not used in my xw6400.  For hood sensor connector.
Pin 15 = Key (no pin on the motherboard; plastic filling the #15 hole in the receptacle)
Pin 16 = Blue wire, but not used in my xw6400.  For hood sensor connector.
Pin 17 = Internal speaker +… yellow wire
Pin 18 = Internal speaker - … yellow wire

In the absence of anything better to go on I decided to give that pinout a try. At the very least I need the power switch to work, everything else is a ‘nice to have’.

That’s what it looks like with the power switch, power LED and hard disk LED connectors in place. I’ve heard from someone else who’s working on one of these boards that the pinout for the internal speaker connector is also correct.

Testing

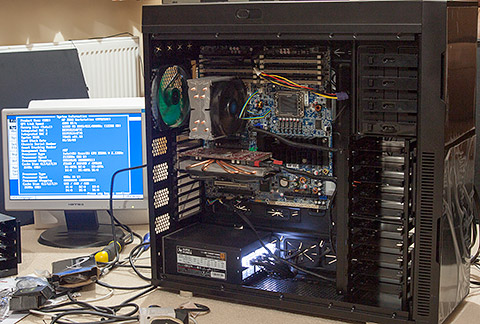
Now all my modifications are done, it’s time to put it all together in the case and do a quick test. You only need memory, a CPU and a graphics card to do a POST test on the board so I retrieved an old PCIe graphics card from storage in the garage and hooked it up to an old monitor for testing.


click for larger

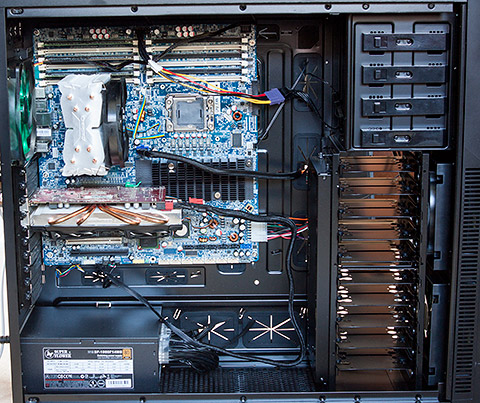
The board actually looks quite normal inside that case but I can assure you that both the case and the board are very large indeed.

The moment of truth. Switch it on and see what happens.


click for larger

It works!

Everything seems to be OK. The power button and power LED connections are correct, all the memory is detected, the CPU is detected and the CPU fan is spinning. I went straight into the BIOS settings screen and had a look around. I noticed that the BIOS revision was behind the latest so I upgraded it to the latest version via a USB stick.


click for larger

The BIOS is able to to detect the CPU fan speed so I guess it doesn’t need that mystery TACH2 pin. There doesn’t seem to be anything that shows the model of PSU that it thinks is connected so I’ve no idea what, if anything, that PSU_ID pin was for.

Now we’ve got a good system it’s time to get some storage in there.

Storage

The Z800 board comes with a ton of SATA connectors and a SAS RAID controller manages at least some of them. The thing is, they are all SATA-2 3Gb/s and I’m planning on connecting a Samsung EVO 840 240Gb SSD as my primary OS and programs disk.

The Samsung SSD is a SATA-3 6Gb/s device and although in practice nobody can honestly tell the difference between 3Gb/s and 6Gb/s in real-life usage it would be nice to have the primary SSD on a full-speed bus. The answer is a cheap PCIe card with a couple of SATA-3 connectors on it.
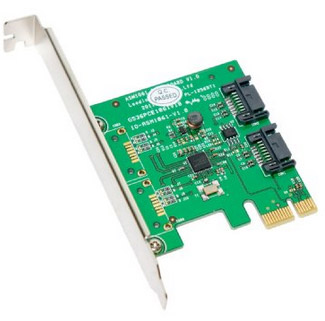
I picked this ‘Syba 2 Port SATA 6Gbps PCI-Express x1 2.0 Card’ up on Amazon for less than 20 quid. I picked it because in the reviews there was a Z800 user who’s using it successfully as a boot device which is exactly what I want to do.
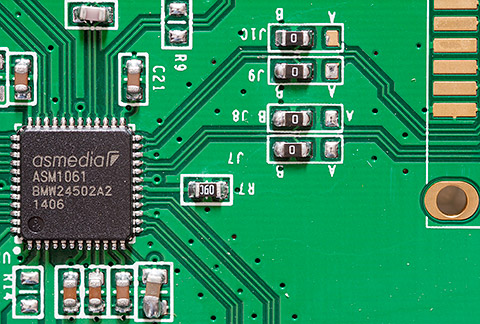
They’re using the popular Asmedia ASM1061 chip in a QFN package as the SATA controller. There’s a bit of wonky soldering on a few of the caps there but generally it looks fine. They’re using the same board layout for their SATA and eSATA products which explains the presence of the 0R bridging resistors being used as option selectors.

Working Specification

Now it’s all working I can move in all the rest of my peripheral ‘furniture’ and upgrade the CPU to the final specs. I picked up a Xeon X5680 on ebay for around £200 and thankfully it worked in my 002 revision board without any problems. I actually bought the X5680 before I found out about the issue with the BIOS bootblock and so I do consider myself one of the lucky ones. I think that if I hadn’t used the E5506 to upgrade the BIOS to the latest revision then I would have had a POST failure with the X5680 due to missing microcode for that newer CPU.


click for larger

I’ve got an 003 revision board on the way to me courtesy of ebay so when I do eventually decide to upgrade to dual Xeon’s then I’ll have a board that’s officially supported.

The rather ugly RAID configuration was ported over from my previous system. If anyone were building a new array today with this motherboard then it makes much more sense to use the onboard SAS RAID controller than the Ultra320 expansion card that I’m using.

Under Windows 8.1 with an ambient 20°C temperature all cores are idling at around 29°C. Stress testing with the prime95 application causes the cores to go up to about 58°C after which I got bored watching something that I’m never going to do in real usage and stopped it.

Notes, issues etc.

I did encounter some issues while assembling the full system with all my expansion cards. Here’s what I discovered and how I worked around each issue.

Attempting to install my XFX 7970 graphics card caused the biggest headache. It started OK then as soon as the Windows 8 start screen appeared the monitor signal was lost and I had to power off the computer. Worse, it would not POST afterwards. Worse than worse, restoring the previous graphics card also would not POST. I honestly thought I’d fried the entire motherboard.

However, some minutes later it all started working again with the previous card. I’m guessing that the XFX card somehow triggered a resettable overcurrent or heat-related fuse and a few minutes later the fuse reset. I’m now using a cheap Nvidia 210 single-slot card because I don’t play games so a power-hungry hot-running gaming card would do nothing except block useful expansion slots.

Installing the PERC 4e/DC RAID card caused the BIOS to complain on startup about being out of memory for option ROMs. This is another well documented complaint. The solution was to disable some of the unwanted onboard peripherals, something that also speeded up the POST process.

Samsung’s so called RAPID mode file system filter driver, which is actually just a write-back cache, causes random blue screens as-of version 4.4. Searching the internet shows that this is a common issue and since the SSD is plenty fast enough without dodgy drivers upsetting the stability I simply disabled RAPID mode.

Windows 8.1’s fast boot mode would sometimes cause the computer to do an immediate power-off as soon as the boot started. Fast-boot works a bit like hibernate mode where the previous state is restored from a disk file on boot. I couldn’t narrow this one down to any particular cause so I just disabled fast boot.

The PERC 4e/DC RAID BIOS screen uses the F10 key in some places to operate its menu system. It’s a well-documented problem that if F10 is used by your computer to enter its BIOS then F10 will not work inside option-ROM BIOS screens. The result was that I could not configure my RAID array. The solution was to use the megarc utility from LSI to configure the RAID options. For example, from an Administrator command prompt the megarc -newcfg -a0 -R5[1:1,1:2,1:3,1:4] -strpsz32 DIO WB RAA command would create a RAID-5 array using the SCSI disks on adaptor 0, channel 1, with SCSI ids of [1,2,3,4] using DirectIO, write-back and read-ahead-adaptive options.

You do get some warnings from the BIOS at the final stage of the peripheral initialisation.
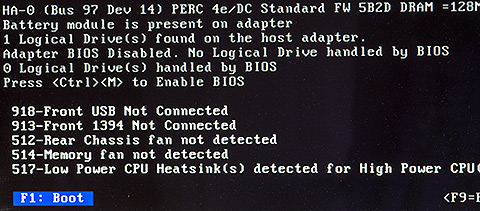
These warnings are just for informational purposes and do not affect the operation of the system. They can be ignored.

Update: the dual CPU upgrade

A month or so ago I replaced my 002 series motherboard with an 003 series that I found on ebay for a decent price. Given what we know about the limitations of the 001 and 002 AS# boards and dual-socket hex-core Xeon’s I thought it prudent to upgrade the board early with a future dual-socket X5680 configuration in mind.

That’s the bootblock date that you need to see in the BIOS system information screen if you want to install dual X56xx CPUs.
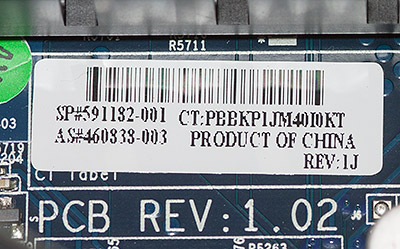
If you’re searching for boards to buy on ebay then make sure you get one that has the AS# number on the above sticker, the one that ends in 003.

The time had come for me to upgrade to dual X5680’s and so I lurked a bit on ebay and scored one for £175. That’s not exactly cheap; they seem to be priced better on the US ebay, but it was the best I could do. I also picked up a second Zalman CNPS10x Optima to match the first.

Fitting was quite easy. Instead of using the Zalman-supplied screws that I now know are a poor fit I screwed four standard motherboard mounting posts in to the board and then screwed the HSF ‘star’ shaped bracket down into the posts using normal motherboard screws. The posts provide just the right standoff from the board and screwing the fan bracket down into the posts is really easy.
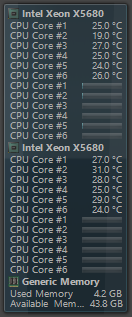
Open Hardware Monitor shows the loads and core temperatures.


click for larger

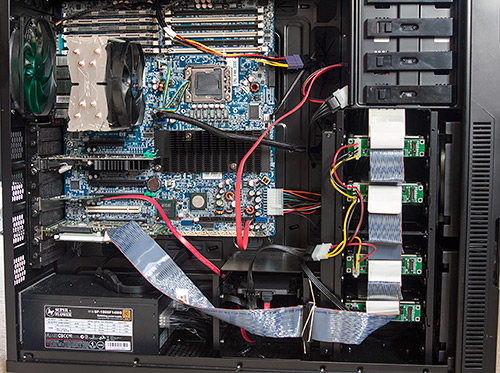
Here’s how it looks today. Dual X5680’s with 48Gb of RAM (I picked up another 24Gb for about £60 on ebay). Since I posted the original article I’ve made a few more changes to the configuration. The graphics card has been downgraded to a low power Nvidia 210. A USB 3.0 card has been added and hooked up to the case’s front ports.

That big black chipset heatsink gets very hot so I’ve mounted an internal 140mm fan blowing across it from the front to the back. You can’t quite see it in the above photograph unfortunately.

The hot and noisy SCSI array has been moved out into a cheap Dell 2850 server currently doing duty as a part-time NAS box with 4x146Gb and 2x72Gb drives that just happens to also have a pair of Xeons in it running Ubuntu Linux. In their place I now have a 240Gb Samsung and a 512Gb Crucial SSD for programs and data, respectively. They’re both hooked up to the internal SATA-3 PCI-e card. Being all solid-state is both quiet and power-efficient.
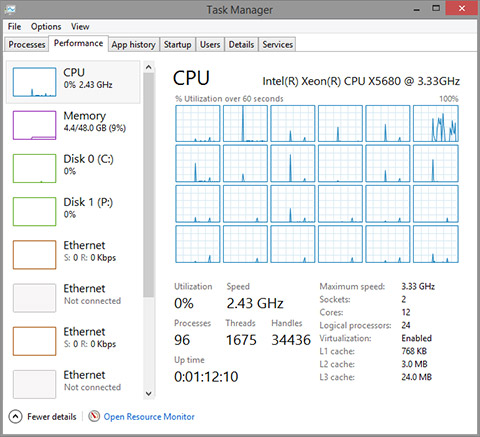
Hyperthreading is enabled so Windows task manager thinks that I’ve got 24 cores. I haven’t done any actual testing on the effectiveness of hyperthreading so I don’t have an opinion on it either way. Benchmarks on the internet seem to show a little gain in most circumstances so I’m leaving it on.

The Xeon series that I’m using supports Intel’s Turbo Boost technology which is an adaptive clock multiplier and divider combination that automatically raises the core clock frequency over the base by either 133MHz or 266MHz, depending on load. When idle it applies a clock divider of 2 to run the cores in ‘eco’ mode.
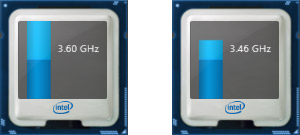
The images shows the two turbo modes of the X5680. If a single task is demanding high core utilisation then I’ll see 3.6GHz. Pretty much all other load causes it to run at 3.46GHz and doing nothing much, like typing this article, runs it in eco mode (1.6GHz).

It’s a testament to the cooling performance of aftermarket coolers such as the Zalman CNPS10x that even during a 12-core Premiere Pro video rendering session of one of my YouTube videos that the CPU cores never exceed the low to mid 60C range and therefore the entire rendering session is achieved at 3.46GHz. I don’t think I’ve ever seen it clock down to the standard 3.3GHz.

Feel free to leave a comment below, or maybe you’re building a Z800-based system yourself and would like to stop by the forum to share your experiences.

Update: 003 BIOS image available

Here’s one for the hardcore hackers out there that are willing to physically rework their board to attach an 003 BIOS chip. I’ve saved out my 003 BIOS image using the linux flashrom utility. If you’re interested in this level of hardware hackery then head on over to the forum where you can download the image.

The inevitable disclaimer applies here. It’s entirely up to you to verify that this image is all that you expect it to be. If it turns out to be bad then please don’t blame me, although I would like to know about it.

BIOS PCB layout

Here’s some more information that may help out the brave hackers amongst you. We now know that the BIOS is an SST (Microchip) SST25VF016B 16Mbit device and the datasheet is readily available. Here’s an image of the BIOS chip on my 002 board; it’s located down between the single PCI and the last PCIe slot.
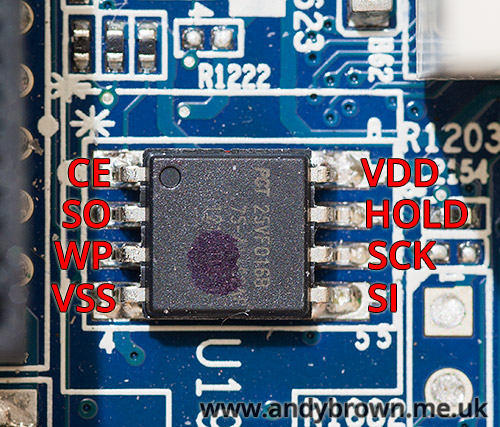
To save you digging out the datasheet I’ve labelled the function of each pin. If there’s to be any hope of reprogramming this IC in-circuit then pin 3 (WP = Write Protect) must read high. I tested the resistance of this pin between VSS and VDD and unfortunately it read about 13KΩ against both VSS and VDD so it’s not as simple as a straight pull-up or pull-down.

Further down on the board near the SAS connector there’s a soldered-in footprint labelled SPI Recovery Header header.
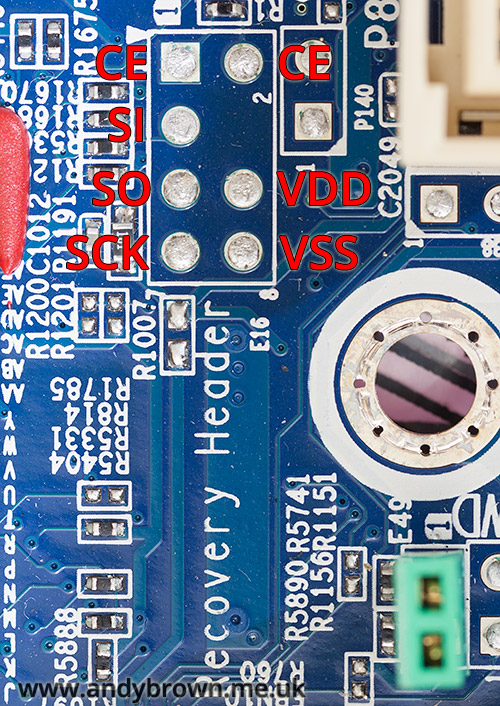
I got my multimeter out and tested continuity between the BIOS pins and the pins on the footprint and was able to determine the mapping labelled in the image above. Unfortunately WP was not mapped to any of these pins.

A reader over at this forum thread was interested to know if the green jumper E49 that you can see down at the bottom right removed the write protection from the BIOS. Unfortunately it’s not linked to BIOS write-protection, it does in fact clear the BIOS password.

Update Sep 2016: CPU fan replacement

My Zalman CPNS10x CPU fans have started to give up the ghost. I’ve noticed that they’re a bit noiser than they should be at idle and when Speedfan ramps them up they start to rattle. To give you an idea of what I’m talking about I made an audio recording.

Click here to listen to the Zalman fans

The recording device was placed close to the case and the microphone gain set on the highest setting. You’ll first hear the fans both ramp up from 30% to 100% in Speedfan and then the rattling starts. That’s the sound of the bearings wearing out. The deep resonance that you can hear on the recording is because of where I’ve placed the recording device on the case and is not audible in real use. Seriously, that would drive me crazy.

I decided to replace them with a pair of Nanoxia 1500rpm PWM fans because they get great reviews and don’t cost as much as Noctua’s which I consider to be great quality but overpriced for what they are. Today the replacement fans arrived.
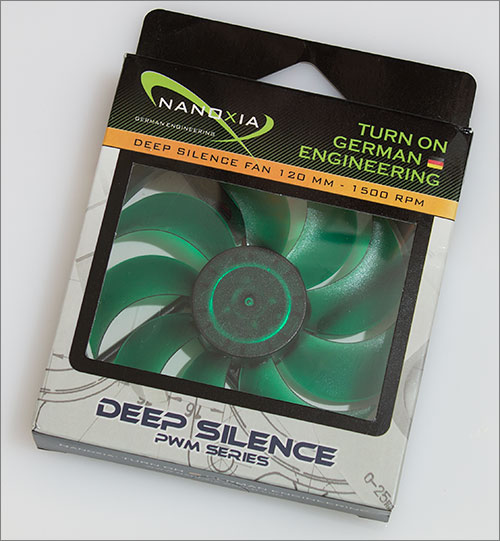
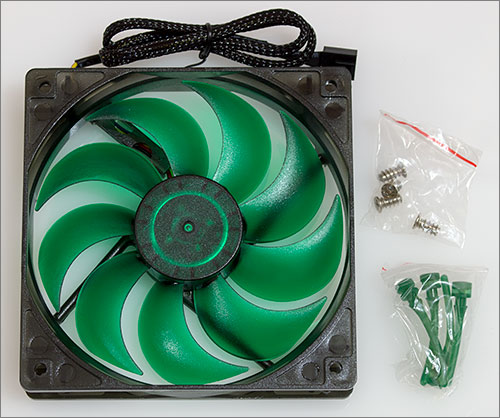
The box they arrive in is pretty much the same as every other fan you’ll ever buy. You get the obligatory set of four case screws and also a set of rubber anti-vibration mounts if you don’t want to use the screws. I have no use for any of those accessories so they’ll go in my parts drawer for future use.

Fitting the fans was a trivial matter, they’re held on to the heatsink with those slightly fiddly tension wire clips that go into two of the fan screw holes and then pull back into a slot on the heatsink.
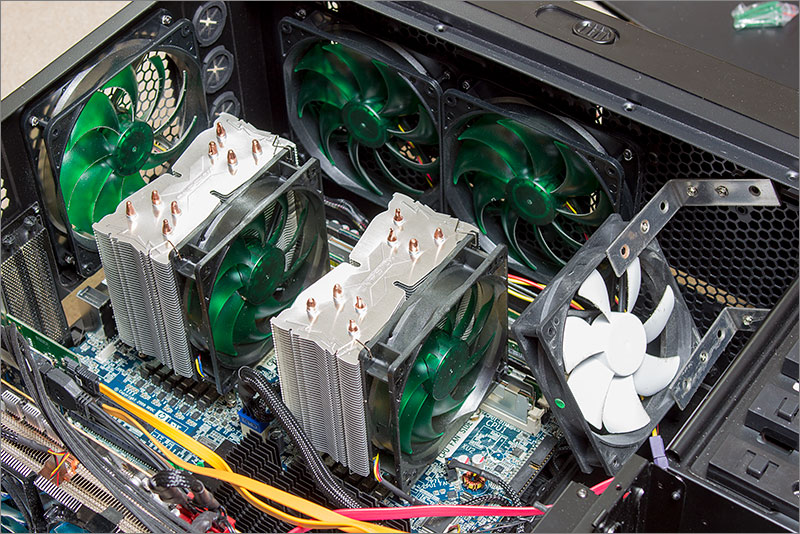
There they are, all nicely fitted and looking good with an almost full house of Nanoxia fans surrounding it except for that white interloper that I’ve rigged up to keep a breeze on the 48Gb of memory. Of course I took an audio recording after fitting the fans with the recording device in exactly the same place and with exactly the same levels as before.

Click here to listen to the Nanoxia fans

The difference is quite dramatic. Of course there’s no rattle from damaged bearings but the fans themselves are much quieter. You can hardly notice the ramp-up to 100%. The maximum RPM of these fans at 1500rpm is slightly lower than the Zalmans at 1700 but they are in the same ballpark so I think that the comparison is a fair one.

Update July 2020: Chinese PSU adapter cables

Earlier in this article I stated that pre-made adapter cables for connecting an ATX PSU to the Z800 motherboard were available on ebay and AliExpress. Recently I’ve been informed by a reader that some of these cables are incorrectly wired up. To quote from the email I received:

Could you consider adding a footnote in your article (for the more novice builders among us) that hints that some of these cables are wired incorrectly, with the purple +5VSB and gray PG/PWROK in the wrong place? Another user, lukew, has pointed this out in a post as well: ‘I bought them leads and the PS_OK and 5Vsb pins were reversed’. He hinted at the same issue in another post, but there wasn’t as much details on the problem: ‘I ended up adapting an ATX supply using some leads from China (which were made incorrectly)’.

I ended up trying a number of different PSUs of various wattages etc before I went back to checking the cable again, and it was indeed wired incorrectly as pointed out above. Just thought this might be helpful to stop some readers pulling their hair out, or worse: giving up on the project!

Thank you to Tom Ó Briain for pointing this out.

  • obnauticus

    I noticed that you considered yourself one of the lucky people who did not have compadibility issues with his z800 mobo + processor. I’m not so lucky…I’m actually working on hackthing this motherboard as well ( http://obnauticus.com/2014/09/fixing-my-z800/ ). Are you willing to dump the bootblock off of your SPIFLASH chip (using a commandline utility on linux…or windows probably) to help me out? I would greatly appreciate it!

    Also, I was doing this work a couple of months ago (i.e., hacking the PSU, etc) but I just ended up buying one of the PSU’s off of ebay. I thought it would be less risky.

    • Hi, I’d be happy to save my bootblock but won’t you be wanting a copy of the 003 bootblock? The one that I have up and running at the moment is the one pictured in the article, i.e. 002 with a date of 01/30/09.

      BTW the same bootblock issue exists with the Z820 and Ivy Bridge CPUs. Someone on the HP forums tried pulling WP high in the same way that you’re considering. It didn’t work. One of the HP tech guys confirmed that the write protection is much more complex than that. Let me see if I can find the forum post.

      • obnauticus

        You are probably right, I have a 001. Yours is still worth a try. Finding people willing to dump their SPIFLASH is pretty difficult. I’m in the process of burning a chip with the v3.19 BIOS firmware as we speak. It might not be necessary. I’ll keep you posted if I need it. Thanks : ).

        • Found that forum post. Yes it’s a different board but there are many things in common between all the ‘Z’ series.

          If you have a logic analyser you could try spying on the WP pin during flashing to see if it does get driven low at any point during an erase cycle. If you decide to measure Vcc and then apply it to WP# then I would do so through a current limiting source (e.g. a few K of resistance) because when the controller drives it to ground you are going to have an open circuit between your current source and whatever’s controlling it on the board and you could destroy it.

          • obnauticus

            That’s a good idea but I cannot boot at the moment so I’ll have to put that on hold until I get a different processor. I ordered a few extra flash chips and I’m flashing it with a buspirate (removed from the mobo). I’m going to drop the replacement chip in and hopefully it will “just work”.

            Edit: reading your link now. This is getting yucky really fast.

          • Ah I see. That would be a very good result if you can get that to work. I think that if I hadn’t started off with a cheapo E5506 to get in and flash the main BIOS up to the latest then my X5680 would not have POST’d with the early BIOS. Unfortunately it’ll probably be early next year when I get around to adding another X5680 at which point I’ll find out if I have to take out my 002 and replace it with the 003 because of the bootblock issue.

          • obnauticus

            My modification did not work :(! As an update to everyone who is curious, this post seems to be more hot than my short blurb which is why I am posting it here. I ended up getting a -003 rev motherboard instead.

            Also to anyone who is curious, the Z820 motherboard looks prime for hacking! It has PCIe3 while the Z800 mobo only has PCIe2 :*(.

      • Toothless_Snake

        Hello. do you use this as your day to day rig atm?

        • Yes. It’s been used for hours almost every day since I built it nearly a year ago.

          • Toothless_Snake

            i’m quite impressed by how fast you replied i expected to get a response in a few days but in fact it was instant. Thanks man 😀

          • Toothless_Snake

            so with this you can run 1 chip and test out if everything works right?

          • Yes you can. That’s what I did with my 002 board. Then I discovered that I’d need an 003 board to run dual Westmere CPUs so I bought both the 003 board and a second X5680. Even later I picked up another 24Gb to make a total of 48Gb. That may seem excessive but as well as the Windows 8.1 host I run a large Linux server VM and sometimes a Mac VM as well.

          • Toothless_Snake

            so i have this on my mind if i got that 5 dollar cpu and did the bios update then would that let it support the dual 6 cores? In the article you mentioned it worked with one. I’m just really interested in this killer of a rig here.

          • As long as you get an 003 board then your strategy should work. My 003 board actually came with the latest BIOS version installed but it was a refurb so the previous user may have upgraded it.

          • Toothless_Snake

            these rev 3 boards must be so darn rare man. Ebay has none right now that i can see just rev1 and 2

          • Toothless_Snake

            what’s the best card that you can put on this motherboard since the 7970 didn;t work for you?

          • The 7970 is working for me now. I don’t know why it didn’t work before – it could have been some other unrelated reason. Check out the forum thread. There’s at least one person running an SLI setup.

          • Toothless_Snake

            have you tried any gaming on this rig?

          • Late reply, sorry! I’m afraid it’s like I said in the article I don’t play games. I used to, and in fact I bought the 7970 to upgrade my gaming experience some years ago but then completely lost in interest in gaming.

          • Toothless_Snake

            have you ran Cinebench r15 btw?

          • Toothless_Snake

            have you ran cinebench r15 yet?

          • Toothless_Snake

            had the idea of maybe something like the gtx 960

  • What an article .. I was looking for exactly this ! Its time for shopping !

  • Marco

    Hello, really nice read.

    I’m about to make a very similar build only i will be using 2 cheap X5650. Should i risk in buying the 002 motherboard like yous? seller says it will work, so i guess i can always return it.

    many thanks

    • Hi Marco. If your seller guarantees it then you’ve nothing to lose. I’d certainly recommend installing one first and using it to flash the BIOS up to the latest revision before installing the second.

  • Marco

    I’ve already ordered the motherboard, let’s hope for the best. I also have an older Xeon E55xx to update the bios first.
    Now i’m looking for a suitable case, could you possibly post some measurements of the motherboard?
    Thank you

    • Hi Marco. Rounding up to the nearest cm, the board is 37x34cm. Very big 🙂

  • Marco

    Hi Andy,

    Thank you for taking the time to make the measurements.

    I was hoping it would fit in a NZXT phantom i have laying around, i’m not so sure right now 🙂
    It’s missing a couple of mills in height….only 36.8 CM, i guess i will have to wait for the motherboard to arrive before making further decisions.

    • Hi Marco, it’s not enough to just fit in the space available. The expansion slots must also align perfectly with the apertures on the side of the case and that’s what decides where the board will sit. The NZXT is a big case, you may get lucky.

    • Toothless_Snake

      how did size go for it mate?

  • Руслан Немцов

    hi
    read your article also decided to try to collect workstation …
    But there is a problem at startup I get the video.
    Processor (x5650) is heated , coolers cool. I Ati 6870 Gigabyte ( video card is 100% working )
    Just looking for about PC Speaker in order to understand what the problem is exactly, but did not find anything …
    Please help me to understand what was going on

    Apologies for the translation

  • Руслан Немцов

    Foto Workstation )

  • Hi Ruslan, which motherboard revision do you have? Is it the 001, 002 or 003? If you have an 001 or 002 then it is possible that the BIOS has not been flashed to a revision that supports the X56xx processors. I used an E5506 to flash my 002 BIOS up to the latest version and then it was fine with a single X5680.

    • Руслан Немцов

      Hi Andy, i have 002 version.
      i buy on http://www.ebay.com/itm/New-HP-Z800-Workstation-Motherboard-Dual-LGA-1366-Sockets-576202-001-460838-002-/161359869936?pt=Motherboards&hash=item2591cc37f0

      After flashing my BIOS i can use this processor ? or there is no warranty ?

      • Hi, there is no guarantee. Only the 003 board with the newest bootblock is guaranteed to work with the X56xx series. My 002 board worked fine with the 3.57 BIOS. Your board is new and unused. So was mine. When mine arrived it had a very early 1.xx BIOS. It’s likely that yours also has the same one. There is interesting info in this thread. The HP engineer says that you shouldn’t upgrade an 002 board to a v3.xx BIOS but that’s exactly what I’ve done and it was fine.

        • Руслан Немцов

          Thank you!
          i’ll try buy x5560, flash bios, inserted x5660.
          write the result )

        • Руслан Немцов

          hi!
          Today I tried to install the processor E5606 and update the BIOS to 3.57
          It worked 2 processor x5650

          • Great news, your experience will help others that have the same issue. Enjoy your 12 Xeon cores!

          • Руслан Немцов

            hello

            checked the bios with 2 processors

            he starts, but for the second processor heatsink I did not have because of this he had to pull out
            After cooling set but found after the launch automatic installation of the BIOS is not occurred
            result:
            with a single processor to run two does not work
            Bootblock problem again?

          • If you have verified that your CPUs both work in single-CPU configuration then yes, it’s probably a BIOS problem. There are other tweaks and settings you can try. See this thread. That user states that if he disables hyperthreading then dual CPU configuration will work.

  • Marco

    I may have found correct size atx connectors.
    I’ve tried to register on the forum to share them, but my ip is always reported as spam

    • Sorry about the registration issue Marco. I expect that a previous user of your currently assigned IP address was a spammer and that’s what was picked up by the anti-spam plugin that I use.

  • Rob

    Excellent write up!
    What was the total cost of this rig?
    I ask because I’ve seen quad core Z800’s going for £469.00 on ebay.
    No motherboards are up for sale except for the Z600 for around the £150 mark. (I’ve seen two Z600’s go for just over £200 each on ebay the last week but the obvious shill bidding put me off.
    Will keep my eyes peeled and see if I can get hold of a REV 2 or 3 motherboard or complete workstation.

    • Hi Rob. The total cost to do this is variable because it depends on the parts that you select. My own configuration has some higher costs because of the high-end case and top quality PSU. I paid about £100 for the board, £150 for the case, £110 for the PSU, £60 for 24Gb RAM and I chose an expensive £200 X5680 because I know they’ll fall in price when I come to add a second.

      If you’re considering a dual X56xx system then the 003 board revision is essential (I now have an 003 installed in mine ready for the dual CPU upgrade).

  • aprg(Madara)

    Hello, i have a question, i don’t know anything about the power supplying part , i’d like to know is ther any way that i can buy those cables, -.- i saw this link but it’s a chinese store, http://item.taobao.com/item.htm?spm=a230r.1.14.30.gZGz0F&id=40589333743&ns=1&abbucket=8#detail , and you recommend that power supply only or are there other that can be used? im noob and im trying to build my first workstation.

    • Hi, I only know about theTaobao site as a source for pre-made cables. If you visit the forum there is a post from someone who has found pre-made connectors. You still have to solder in the wires though.

      • aprg(Madara)

        oMG i still have to solder something, that’s the part that i don’t understand , but i’ll see if i can find someone to to it for me, and what about the power supply, do i have to buy that one you recommend or are there more options?

        • Hi, Soldering isn’t the only way to connect wires. You could buy some screw terminal blocks and connect together that way. It’ll be bulkier but should perform the same.

          You can buy any power supply you like as long as it meets the specification in the service guide PDF, table 1-6 “Power supply currents”. I always recommend getting the best power supply that you can afford because it underpins the stability of your entire system.

    • datoska

      one year has passed, but you can buy motherboard cable from ebay just search for : z800 motherboard cable
      it costs about 7$.

  • Dan

    Hi Andy. Thanks for the great writeup. I have an Apple G5 lying around which is a large case. Would you happen to have the measurements for the Z800 motherboard?
    Cheers,
    Dan.

    • Hi Dan, the board is 37x34cm (rounded up to the nearest cm). I’m not up to speed with Macs but if the G5 was a dual-CPU board then you may be in luck with the fitting.

  • nicholas esposito

    any advice to maximize performance by tweaking things in the bios? i haven’t been able to find much online about this

    • There are no BIOS options for performance tweaking. Basically you can switch hyperthreading on or off and that’s it. If you’re used to finding options to tweak voltages and bus frequencies then you’re out of luck. It’s just not the market these very expensive workstations were sold into.

  • karim

    Explain how the Memory cable, The main ATX cable step by step video

    • Hi Karim. Sorry but there is no video to accompany this post. If you’re having difficulty understanding any of the process then please ask over at the forum and I’ll be happy to help as much as I can.

      • karim

        Please I would like to produced these cables because I owned those motherboard, but I had the Power Supply last

      • karim

        Please I would like to produced these cables because I owned those motherboard, but I had the Power Supply last

      • karim

        That’s right?

    • datoska

      you can buy motherboard cable from ebay just search for : z800 motherboard cable
      it costs about 7$.

  • karim

    how to process it

  • Guest

    Is that so

  • Guest

    Is that so

  • Si Mo N

    Thank-you for this exceptional tutorial on adapting the Z800 to conventional components. I failed the effort a year back and ended up with a couple of basic Z800 systems off lease with regrets for not being capable of realizing your solutions. I still have a spare revision three board that I very first started with, and despite having complete OEM versions now, I am going to follow your guidance and complete my own FrankenZ800 in a Lian-Li case; my first fail was the PSU wiring followed with the CPU cooling solution. Your effort to share is very much appreciated, my thanks from over here in western canada, you have re-inspired me. I have picked up several Z800s recently, minus the CPU/heatsinks/RAM, and I will try to adapt the heatsink and SSD solution to the OEM units too (the last two went for $60 [sixty] CDN with version 003 mobos included which is a few hundred less than last summer so no risk on expenditure end now at all).

    • Hi, do you know which Lian-Li case you’re going to use? It’d be good to hear about alternatives to the DS6 that are known to accept this large board.

      “FrankenZ800”, I like it 🙂

      • Si Mo N

        Sorry, I don’t recall the model. I have kept it from 2006 or so since its massive and well ventilated with 100% metal construction. I did a quick search of current Lian-Li cases and did not see the same, though several are similar but seem limited to e-atx.

  • When I started this I sent the board measurements to Nanoxia and asked if they thought it would fit in the DS5. They told me to get the DS6. You can only place the board in the tray at the point where it lines up with where the cards screw into the slots. So a case with a smaller motherboard tray could end up in the situation where the board physically fits into the tray but there’s no room to move it into alignment with the slots.

    • Dan

      Thanks heaps, Andy. I’ll go with the DS6. It seems quite reasonably priced here in Australia anyway.
      I’ve bought a rev.002 board. What would your recommendations be for processor(s) on this board? I’m not averse to flashing a new SPI EEPROM with the 003 image and installing that on the board, if that will allow me more options, although I’m not sure if anyone has succeeded with this yet? Interestingly, the eBay seller reports that X56xx CPUs can be used on the board he sold me.

      • If the board has the original 1.x BIOS then it will boot with single or dual Nehalem Xeon’s.

        If it has been upgraded to the 3.x BIOS then it will additionally boot with the Westmere processors but it is reputed to require lots of tries to boot in dual Westmere configuration (see forum thread). With a single X5680 and BIOS 3.x I found it totally reliable but of course I had to have a Nehalem installed first to get it to boot far enough that I could upgrade the BIOS. Maybe the previous owner has already done this for you?

        In all cases I would cross reference the CPU choice with the HP datasheet as well as checking around to see if you can see existing Z800 systems with your CPU choice inside.

        The BIOS is surface mount SOIC so you’d need to be a dab hand with reworking boards if you wanted to replace it, even if you could find a replacement.

        • Dan

          http://obnauticus.com/2014/09/fixing-my-z800/
          The IC is cheap and plentiful. With only 8 pins I’m pretty confident I could pull it off (I’ve done TQFP-64 before). The hard part is getting an image of the latest bootblock to burn to the new chip.

          • I’m happy to save out my 003 bootblock. Do you know if it happens to get mapped into the physical address space anywhere?

          • Dan

            I would be surprised if the entire bootblock ROM got mapped byte-for-byte into the machine’s address space, although it’s not my area of expertise. What if the only way was to physically solder wires to the chip? Would you still be up for it?
            There’s no hurry from my perspective. I’m still taking my time piecing together a system.

          • Hi Dan, take a look at this forum post. I’ve saved out my 003 BIOS image.

  • Felix Bank

    Hi. Great article. I’ve picked up a Z800 with the revision 3 board and want to quieten down the fans a little. I’ve replaced the rear fans with Noctua’s and I’m about to replace the noisy RAM fans with the same make. I’m looking for the pinout for the RAM fan connector. Do you have that available? Thanks.

    • Hi Felix, I’m afraid the pinout for that funny looking 6-pin connector is not in the service guide. I would expect the pin values to be the same as P8 (which is in the guide) but you’d have to probe the fans with a bench power supply to find out which is which.

      One option would be to just ignore it and power your Noctua’s from a Molex connector and hook it to one of those drive-bay fan controllers for fine speed control.

  • Disces

    “Anyway, there’s nothing low spec about the Zalman so that [POST] warning is duly ignored.”

    How do you ignore a POST warning? I have a Z600 and I intended to run it headless, but POST prevented that and the computer beeped and flashed a red led (this happened before the USB was initialized).

    Are you able to run the Z800 headless?

    I’ve read that hyper-threading increases the performance by 30%, when the task is memory-intensive and all physical cores are working (don’t know how accurate this number is).

    • Hi Disces. As shown in the screenshot, after the POST warnings you just press F1 to boot. I’ve never had a use case for running headless but if I did I would use one of these dongles

      • Disces

        Hi. My intention was to remove the graphic card (Nvidia 210) completely, but that’s impossible due to the POST error. I can’t press F1 since it halts before the USB controller is initialized, hence the keyboard is inactive.

        I have it running 24/7 on full load and would like to save a few Watt by removing the graphic card.

  • RichardHurn

    Very Interesting Project, But I am wondering why you did not just buy a used Z800, the resellers are selling them so cheap now it does not really make a project like this financially viable.. I just picked up a Z800 on Ebay with 2x 5680 CPUS 96Gb RAM and a 4Gb Quadro5800 for £695. The parts for your hack must have come to more than that?. Although I still think its a great project.

  • jps

    Not sure my first comment made it so here goes again. Sorry if this is a duplicate. Has anyone found a uefi bios for the 591182-001 460838-003 HP Z800 motherboard? I am looking to load Win8, Server 2012 or Win10 in the future and want support for the new security features.

  • Menno

    I can confirm the motherboard of the Z800 will fit in a Nanoxia DS5 (five!) case. Actually I would say the case must have been designed for this mobo, it fits perfectly! No room for top fans is left, but otherwise no problems. The holes don’t line up though, but they are in the same position as for the DS6 (as I can see). I might post some pictures later on the forum when the whole thing is up and running…

    • Dan

      Thanks, that would be awesome!

  • xuandna

    Im newbie in Asia and im stuck at V12_B and V12_S rail is it the rail of PCI-e? Please help im trying to convert my psu cooler master RM850 to rescue 003 Hp z800 mothernoard

    • Nice PSU, I’ve got one of those. V12_B and V12_S are both +12V. Please consult Table 1-5 in the technical reference guide for the functionality of each rail. Please note that adaptor cables are now available on Ali Express if you want to buy a premade cable.

  • ZephyrStar

    This is fantastic. I’ve been wanting to do this exact same thing myself for a while now, but had hesitated because of the proprietary nature of this board. I have no problems hacking this kinda stuff, it’s just spending money I don’t have on crazy projects that gets in the way 🙂 I wanted to grab a couple of these to use as rendering computers, and now with your great breakdown of the pinouts for the boards, and the possibility of flashing a fresh rom chip, and swapping it with the one on an 002 revision board, I may just dive right in. I will post results if I can score some cheap 002 boards.

  • Eugene

    Hi! Nice guide you have!

    Memory 10 pin connector – it has a +5v Standby (purple), not the power +5v (red). But according to you picture, you added red wire to it. And it worked? With no problems?

  • Alex

    Hi, great article. A few months back I was attempting something similar to what you’ve done here, but life got in the way and my motherboard and cpus have sat in my closet since.

    I’m considering doing SLI with GeForce cards modded to grid K2s or something, or at least having one beefy graphics card along with 24gb of ram and two 95 watt cpus. In your article you say that the you were unable to get your radeon card working. Did you ever figure out your way around that? I was considering buying basically the same PSU you did (rebranded as EVGA for sale in the US), but now I’m thinking I should switch to the 1300 watt model, it’s only $40 more…

    Thank you very much for the tip on the power cables though.

    • Hi Alex, yes my 7970 is working fine now. I got annoyed with the nonadjustable and loud little fan on the Nvidia 210 so I tried my 7970 again and no problems. It must have been something unrelated during the early hacking and experimentation. My 7970 has a replacement Gelid Icy Vision cooler on it and I’m running that through a Zalman inline fan controller so it’s more or less silent at idle.

      For +$40 and with SLI in mind I’d go for the 1300W version if I were you. It’ll last you forever.

      • Alex

        Whelp. I did it. I got that EVGA 1300W power supply, put it all together with only one stick of 2gb non-ecc ram with 2 cpus and despite what the manual says, it works.

        I ended up using two stock intel 980x heatsinks (http://www.silentpcreview.com/intel-i7-hsf) which I got from ebay for about $16 each. I had to cut a small notch into the mounting legs of both heat sinks as when they were in their proper positions they touched some smt resistors on the motherboard. I also had to cut a notch in the fan cable so the 4 cable connectors coming from the heatsinks would fit on the 5 pin connectors on the motherboard.

        I got the power cable from aliexpress as somebody else in this thread suggested.

        My cpus are dual decapped x5550s (from a mac pro). I reach 95c occasionally, and I think that’s due to the lack of a cap. Sometime I’ll get around to putting some washers on the screws that attach the heatsink mount to the heatsink itself which should lower it the needed 1/2 a milliliter or whatever.

        I haven’t gotten a case yet, I don’t know if I ever will, unless I find an HPTX case at the local computer recyclery, which has happened before.

        Thanks for your help. I’ve got to say, despite this being an oem motherboard with which was certainly not indented to be used this way, it’s been a remarkably painless process.

        • Robert Stevens

          Hi Alex , i realise this is a couple years old , however i have a z800 and have ordered a additional x5690 chip , now the heatsink i need is a 463991-001 high perf which cost $300 , i also have a 980x chip and heatsink lying around so can you confirm that i can use the 980x heatsink on the hp z800 motherboard ? and any additional info is appreciated with your install of the 980x heatsink .

  • Odesos

    I was wondering if you can change the Base Clock at this motherboard??? AKA in a way to Overclock the CPU. I am asking this because I am thinking of building system around this motherboard but I am on tight budget to get x5675 and above, so if I can do that and boost say the x5650 to 2.8-3GHz would be great.

    • I don’t know of any way to do such a modification – you definitely can’t do it in the BIOS. The X5650 has turbo boost which will get you all cores at 2.8 or a single core at 3.06. I’ve found that with good cooling you will get the first level of boost (that’s 3.46Ghz for my X5680) all the time. Even with all 12 cores flat out rendering a video it never had to step back to the stock 3.3Ghz according to Intel’s desktop turbo boost monitor app. So if you get an X5650 and install a decent cooler you’ll be achieving 2.8 at least and 3.06 if only 1 core is used.

      • Odesos

        Thank you I had forgotten that technology ( I guess owning AMD at the moment helps to forget intel stuff ) . After short research I found a table that shows how will run the multiplier it seems that for the x5650/60/75 it will be 0.4 GHz + for all the six cores for the x5670/90 it will be 0.266GHz + and last x5680 only 0.133 GHz + as boost! The interesting is that a x5660 will preform the same if not better than x5670 with Turbo Boost on! This is the source http://www.siliconmechanics.com/files/WestmereInfo.pdf

        PS. It seems the best pick is x5675 after the x5690 when the turbo boost on!

  • SabuesoGnu

    I love this hack 😉 Congrats!

  • dev286

    I’m trying to install this with Xeon 5520 CPU and 24 gigs of pc3-8500r RAM (taken from dell c6100). I was able to boot only a few times after removing 2 sticks of RAM (6×4 originally) 4×4 gigs. I turned on the hyperthreading in BIOS and the motherboard stopped booting (turns on but no video, keyboard not active). I reset the BIOS but no change. I read that the MB supports 16 gigs of pc3-8500R, but not sure if it’s in one stick or max. Any ideas? Thanx!

    • Your memory and your CPU are matched (1066MHz) so no problem there. This is the memory configuration document. Your CPU is officially supported by HP so no problems there either. Boot problems can be due to the BIOS pre-dating the CPU. Have you upgraded the BIOS to the latest version (you can do that in the BIOS itself)? Are you confident that all your memory sticks are OK? Are you using a real Z800 with a real HP PSU? The first place I look for instability issues with anything at all is the power supply.

      • dev286

        I got one of those cables on ebay. Everything boots OK. RAM was pulled off of working c6100. I pulled one stick and it gave me an error saying something about DIMM5 – first boot. It did boot a couple of times, but only with 2 sticks of RAM (II think I had 2 CPUs installed). I was able to boot into Debian. But I installed a new video card and enabled hyperthreading. I tied resetting the BIOS after – no success. I’m not sure about the BIOS version. Should I try older CPU?

        • I don’t think you need a different CPU because the one you have is on the official support list but may require the BIOS to be updated because it hasn’t always been on that list.

          Are you locked out of the BIOS right now, i.e. you cannot get into the BIOS setup screen? If so then you are going to need to do a factory reset. Disconnect the power supply, take the battery out of the motherboard and wait a few minutes for any caps to discharge then put it back in again.

          Do you have a video signal? If not and you have a different video card, try it. The simpler the card the better at this stage. Also try the video card in different PCIe slots.

          It appears that there are combinatations of hyperthreading and CPU that can cause a hang on POST.

          • dev286

            Thanx for fast replies.
            I got new PSU and everything seems to be working fine. I think it was the PSU (500W old); maybe there was not enough power (850W new). Successfully updated the BIOS to 3.7. I can use both slots for video card.

            To summarize: I used 1 Xeon E5520 CPU (I think 2 will work no problem) and 12 Gig of pc3-8500R – everything from Dell c6100 node.

            Got stuck on installing OSX 10.9 and 10.10. I guess the MB doesn’t have ACHI support in OSX (waiting for root device).

          • dev286

            I’m still stuck on installation (1x 5520 CPU and 12 Gigs RAM). Tried 10.9 to 10.10. Can’t detect boot drive. It has something to do with ACHI. Anyone was successful in modifying DSDT. What tutorial did you use to install OS X?

          • I’m not booting directly into OS X. I boot into Windows 8 as the primary OS and run OS X in VMWare Player (I don’t need Mac OS that often).

  • Kuchiki Rukia

    I just got my Z800 motherboard running with a pair of X5560. Currently I’m having a heating issue of the LSI chipset which is very hot. Did you got that too?

    • I’ve never tested that chip for temperature though I note that on the internet LSI chipsets do seem to have a reputation for running hot. HP didn’t seem to think that a heatsink was necessary but if you’re having issues you can always fix one on to the exposed metal pad with thermal adhesive. It might extend the operating life of the chip.

      • Kuchiki Rukia

        I’m gonna get a chipset heatsink from it to try on the LSI. Hope this will help.

    • Alex

      I’ve also noticed that it’s remarkably hot, mostly by accidentally brushing against it. As Andy says, using some thermal epoxy or a thermal adhesive pad to attach a small heatsink is likely about the only thing you can do.

      • Kuchiki Rukia

        I’ll find a broken ATX motherboard then got the chipset heatsink from it to try on the LSI. Hope this will help.

  • luis

    Hello,

    When I boot, the following message appears: “invalid electronic serial number”.

    I have seen that you do not see this message.

    How did you have done?

    Thank you very much in advance for your answer.

    I’ve ridden all your recomendacones sigiendo system and everything went great.

    a greeting

    • This is mine: 2UA1210JMN. Someone posted it on an internet support forum. It has no actual use to us except to shut that startup warning up. I guess HP support would use it to link back to the actual unit that was shipped to the customer.

      • luis

        Thank you very much, had long been looking for one, but always told me that the number was in the chassis.

  • luis

    I’ve ridden the whole system following your recommendations and everything went great.

  • Stephen Cox

    Great write up. I have been looking for a way to get a dual processor Xeon system built to replace my aging Core 2 Quad Q6600 system, and I really want a lot of cores, but yet not spend a lot. This looks like a great way to attempt doing it, and plan to get started soon after I track down what parts I should get and which chips. I have located a seller on ebay selling new (old stock) revision 2 boards for under $90 each in the US with a 30 day warranty, so I want to get a basic Xeon quad core in the X55xx series, some RAM, and the power cable adapter and see what I can do with it before getting the hexacores and a case to put it in.

    But I just have one question – or more like a nitpick. You mention using a SATA 3 6/Gb card for your SSD to get the full speed since the board only has SATA 2 3/Gb. Wouldn’t the PCI Express 2.0 x1 slot bottleneck the card from hitting full 6Gb/sec? I believe each lane of PCIe 2.0 can do (theoretically) 500MB/sec, which is 4Gb/sec. Faster than SATA 2 for sure, but you still won’t be able to hit 6Gb unless you get a card that uses more than 1 lane. Same problem with USB 3.0 x1 cards, as I experience that problem with my current board.

    I’ve been perfectly content with SATA 2 with my SSD, but I was just wanted to ask if you actually noticed a difference in the 3Gb vs 4Gb of the SSD.

    I do appreciate all the info here, and these are the kind of “hacks” that I love to do… making something work in a way that it wasn’t meant to, and doing it cheap!

    • Hi Stephen. Your calculations look correct to me. In an x8 slot I’ll be “limited” to 4Gb/s. I also have a USB 3.0 add-in card and with that I seem to be limited to the speed of the attached devices (HDD, SD cards) rather than by the bandwidth of the slot.

      Note that you’ll need an 003 board to get a reliable boot with dual hex-cores. See the large thread that’s developing over in the forums for more info.

    • Kuchiki Rukia

      I think you got confused while calculate the speed. Base on Wiki, each lane of PCI-E 2.0 can provide 4Gb/s => 8x means 32Gb/s. Since SATA 3 have speed of 6Gb/s => 8x PCI-E 2.0 is more than enough to reach full speed of 5x SATA 3 drive (SSD).
      If you want to convert to HDD speed then each PCI-E 2.0 lane provide 4Gb/s ~ 500MB/s => nearly max speed of our current SSD (500-500MB/s)
      Please check the link of Wiki here:http://en.wikipedia.org/wiki/PCI_Express#History_and_revisions

      • It looks like there’s some misleading info out there on the internet. My reply to Stephen was based on reading off the 2.0 x8 line in this table. When in doubt, consult the standard: PCI Express Base Specification
        Revision 2.1
        . Thankfully there’s no need to deep dive into the document because there’s a summary quote in the definitions section at the beginning: An
        x8 Link represents an aggregate bandwidth of 20 Gigabits/second of raw bandwidth in each
        direction
        .

      • Stephen Cox

        Makes sense, so while the x1 card can’t provide true full SATA 3 speeds, it can provide enough speed for the SSD before the SSD maxes out… theoretically.

        Now I was reading something else in the forum… these boards can’t go over 2TB in hard drive size? Is that for any drives, or just the boot drive?

        • Kuchiki Rukia

          I’ll check on that when I have a spare 3 or 4Tb drive. For now all my 3 and 4Tb drives all storing data for me.

        • Kuchiki Rukia

          I just connect my 3 and 4Tb HDDs to my Z800 motherboard and it work just fine (not boot drive)

          • Did you connect them to the SATA or the SAS controller?

          • Kuchiki Rukia

            I connected them to the SATA. Will try the SAS when I got my new drive.

          • Stephen Cox

            Awesome! I like when the good news rolls in in regards to this project…. it makes me feel confident the $550 I am about to spend for all the parts are well worth it!

            Speaking of good news… check the forum thread. My buddy got a Z600 today and he mapped the 3-port USB header for me. I posted the diagram for everyone, but I can’t guarantee if it is correct or not until I get a board of my own.

          • Kuchiki Rukia

            What do you mean by 3-port USB?

          • Stephen Cox

            Those are SATA III drives, correct?

          • Kuchiki Rukia

            Correct

  • Kuchiki Rukia

    Hi Andy, I just noticed a pretty big issue on my Z800 – 002 motherboard.
    I got an Intel 1366 stock fan (the one with 4 pipeline) without the fan. After I tried to mod a 120mm fan on it and used Prime95 Version 28.5 to stress test my CPU to 100%, I noticed that even though my CPU is 100% loaded but the fan doesn’t speed up even a bit. I used a 120mm fan got from my old HP ML310 G5 which also have 5 pin connector.
    Did you encounter anything like this with your System?

    • My fans normally sit at 1100 RPM and don’t move either but I don’t know what the trigger temperature is for them to ramp up. I’m running Handbrake now with all 12 cores 95%+ utilised and the temps are 57-62C with speedstep quite happily overclocking them all to 3.46GHz.

      By fiddling around with the advanced settings in SpeedFan I can switch the PWM duty cycle for the CPU fans from automatic to manual and then manually speed them up and slow them down. That proves they are able to ramp up/down and I suspect that the sensors don’t think they need to go any faster.

      • Kuchiki Rukia

        Seems like I need more fan for my heatsink. For now I have difference fan for my heatsinks. One with as 120mm HP Fan (5 pin) and one with Delta 92mm (4 pin).
        This morning when I tried Prime95 Version 28.5 again, after 1 minute, the heatsink with 120mm hit 80 Celsius while the other one (92mm fan) hit 83 Celsius.
        Don’t know is it because of the bad heatsink or something else. Will revert to my old heatsink (100% allumium heatsink with 92mm fan) and test again.

        • Stephen Cox

          What settings did you use to get that to work? I tried yesterday and I couldn’t make the fans go faster with Speedfan.

    • Stephen Cox

      That’s funny, cause I just noticed the same thing yesterday. I have an 002 board using two of the Intel DBX-D heatsinks on top of W5590 processors. I turned on Prime95 and all 16 threads hit 100% and the processors got up to around 75C (day before they were hitting 85C, but I got better screws and reapplied the thermal paste and it knocked it down) but yet the fans still hum along at around 1300 rpm. Intel ARK says this processor shouldn’t go over 67C under load so I am kind of worried something is up.

      What’s even weirder… the first day I had the system running, I had the board sitting flat on my desk and running PC Mark 7 to try to stress test it. Well, at the time I didn’t have the nVidia drivers installed, so when it got to the DirectX9 test it caused the CPUs to hit 100%… and shortly there after, the fans started to creep up in speed faster and faster until I was convinced the fans were going to break off from going so fast. However, after I put it in the case I have yet to have the fans hit the same speed under load again. No other fans in the case are hooked up at the moment, and technically the air flow is even worse, so I am not sure what the hell is going on. I am convinced if I can get the fans to go higher, I can hit the sub 67C temps.

  • AbdulBaqi1

    Hi i found this on taobao http://item.taobao.com/item.htm?spm=a230r.1.14.107.avu2St&id=18910459523&ns=1&abbucket=15#detail compared to your setup this looks quite cheap. Configuration 3 = 3780 yuan, 1 year warranty

    Motherboard: HP SE1220 Motherboard (INTEL 5500 chipset / dual Gigabit Ethernet / 12 memory slots / 6 SATA2 /set was / 2 PCIE 16X)
    CPU: 2个genuine XEON X5650 = 12 core 24 thread, 2.66G / 12M L3, CINEBENCH R11.5 rendering score 14.15
    Memory: 16G DDR3 1333 ECC REG Memory (4G * 4)
    Hard disk: Optional additional
    Power: Mute LITEON rated 1100W modular power for any load and Graphics
    Chassis: custom vertical cooling cabinet, minimalist design, the bottom two 14CM fan with air filter
    Other accessories: two custom CPU heatsink and four first wife 6GB SATA cable
    sadly it doesn’t have a sound card.

  • AbdulBaqi1

    this another link http://item.taobao.com/item.htm?spm=a230r.1.14.11.DoDiDp&id=44183846682&ns=1&abbucket=6#detail via google translate: This original disassemble computers from Dell servers, 99 into a new, other parts are brand new. Board by the world’s largest foundry Quanta notebook production, Dell servers material, good quality, stable, far more than some large, some Kerry. Low power, low temperature, normal operating temperature is only 40 degrees. Bid farewell to the CPU fried egg, restart, crash

    i can’t decide if its better to buy used hardware like this or better buy xeon e3 thinkserver which is around 350 usd on amazon.

  • Kuchiki Rukia

    Hi Andy, I just found a pair of Xeon L5640 on eBay. Do you think they will work on Z800 motherboard? My board is 002 revision with latest BIOS version so I don’t know should I give it a try or not.

    • Stephen Cox

      Hmmm, a quad core Westmere chip… you might need the updated BIOS but I am not sure if the 002 board Westmere issue we see is because we try to cram two more cores per chip onto the system, or if its an issue with the Westmere architecture that doesn’t jive with the microcode or chipset revision. I would almost assume its the latter.

  • geomagnet

    Hi,
    Inspiring post, thanks for the insight. I bought 2 5679 processors. I bought the 460838-002 (only because they advertised it supported both 55xx and 56xx). I went through the hardest computer build of my life with all the case modifications and weeks waiting for various parts. I took your advice and bought a 5506 for testing.
    The moment of truth. I turned on the system…nothing. After days of pinout checking and wiring test, it finally came on. (It had to do with the CPU power plug, I used the wrong jack from the power supply). Got into the BIOS and learned that I had the older boot block 1/30/09. I tried one of the 5679 anyway. Nothing, not even POST. A seller on ebay said the boards have to have the BIOS updated and CMOS cleared before the board will recognize the chip change…so I flashed the BIOS using the 5506, update went perfectly. I then replace with one of the 5679 and it fired up. BIOS reported the CPU, hyperthreading enabled, turbo enabled, the whole ball of wax. So I added the second 5679 (and bank of RAM), turned it on…nothing. Fans came on but no POST. I removed both CPU’s and swapped CPU0 with CPU1 just to test if I had a bad CPU, nope, it fired up right into BIOS, confirming that both CPU’s are good. So at this point it will recognize only one 5679 at a time.

    Given the progression of success, is there anything I can do that will get the second CPU to operate with this motherboard? Its a shame to make it this far to have to tear this thing down.
    Thanks

    • Stephen Cox

      One person here had luck continuously switching their machine on and off until it actually booted. Otherwise, I think the only two options you have is either getting an 003 board (I found a place online outside of ebay selling them for $210) or selling the 5679 chips and getting some quad 55xx chips.

      I went into this wanting a dodecacore system myself also, but I looked at the price for performance factor of it all and decided I could live with the 55xx chips for the substantial savings, so I got two W5590 chips for a total of $100 and boy do they blaze. I feel like I built a hot rod of a computer.

      • geomagnet

        I got this to work by ordering a 460838-003. Everything seems fine, however I’m not to happy about the booting process. Wait to hit F9, Then F1, Then Boot from HDD. How do you set it up so that it just boots into the OS without all the dialog and keyboard interaction?

  • Luhgnut

    Why even put it in a case? Screw it down to a board and mount it in anything you want. Who needs a case?

  • Si Mo N

    Open to offers on cable sets that I collected out of working Z800 and put together for this type of project, you can view the listing on eBay and consider if this will save you some headache: http://www.ebay.ca/itm/151705908538?ssPageName=STRK:MESELX:IT&_trksid=p3984.m1555.l2649
    Good luck with your projects.

  • LORD ODIN

    Great Post! I ordered me the z800 Motherboard and 2 x5570s (~130 USD on ebay) Prices and extra items >> https://docs.google.com/spreadsheets/d/1cTje3fwv5rIccsng_Tw6_zCu9C6rcPkYwlCD6NPt8-c/pubhtml
    I stuck it in a Corsair Air 540 case.. not made for HPTX at all but a few little holes and the motherboard fit super snug but it looks about perfect

    • Thun der

      How are you going to get all the cables to the power supply on the other side?

      • LORD ODIN
        • Thun der

          Thanks for the reply mate. I looked at the two pictures you provided and thought how are you going to get the wires to the other side. If it’s not too much to ask, could you please provide some pictures off your finished beast 😀
          I’m 99% sure I’m going to do it the same way you did for my son. I want to make it a father and son project, so he can build his own best 🙂
          cheers mate.

          • LORD ODIN

            Well i currently have 2 GTX 970s in it so i will need to take 1 out before you can see anything. Ill do it tomorrow :3

          • Thun der

            OK, that will be very kind of you if you can do that. I am thinking off making a video while me and my son put it all together, hopefully that may help others out too. Also he’s been buggy me about how to make video to upload on to youtube. This way I can spend some quality time with him over the summer holidays and kill two brids with one stone 😀

  • Adil Qatine

    @andyworkshop Hi Andry can you help mehp z800 in standart case
    i choose 1-FULL TOWER cm stryker OR PHANTEKS PRIMO
    2-850 Watt Corsair RMi Series Modular 80 Gold OR SEASONIC 1050 GOLD
    3- Delock SATA 22 Pin auf mSATA Konverter für mSATA SSD )do i NEED SOME CABLE TO CONECT PSU ?
    MANY THANKS
    WHATSAPP viber : 004550182315
    MAIL: qatine1@gmail.com

    • Hi Adil, yes you need the adaptor cable to connect your ATX PSU to the proprietary sockets on the motherboard. I recommend the 1050W PSU from the two that you have listed.

      • Adil Qatine

        Can you discribe name adapter psu and usb 3 card
        Thanks a lot

        • Please search “z800 PSU adaptor” on ebay.

  • Adil Qatine

    Hi Andry and all ..can you tell me which model name adapter psu to motherboard ? and usb 3 card, any model than Syba 2 Port SATA 6Gbps PCI-Express x1 2.0
    i need to connect 4hdd 2 ssd sata
    many thanks
    qatine1@gmail.com

  • Bogdan Eugen Daja

    Hi
    Can you share the maping of ping for conversion 24pin to 18pin? Thank You

  • John Erik Krische

    Can I use a 6 pin PCI for the 3 12 volt pins that are missing from the atx connector. Just want to know it this will fry my mobo or if it is fine

  • John Erik Krische

    One more question. Can I wire the motherboards 5v standby to the memory adapter?

  • Xanti

    Hi, I’m planning to buy HP Z800 mobo and the HP Xeon L5640 DP 12 cores from here http://www.officespecialties.com/hp_588078_b21_xeon_dp_hexa_core_2.26ghz_processor_81889_prd1.htm
    Do you think it will work?

    • You’ll need a rev.3 motherboard for the 56xx series CPUs. Used Xeons on ebay are MUCH cheaper that that link you provided.

      • Xanti

        Thank you for the answer. I can’t find that processor on ebay.
        Also I’m confuse how many cores that processor has? from the tittle Hexa-core (6-core) but from the technical description Dodeca-core (12 Core)

        • It’s a Hex core (with hyperthreading enabled you get the illusion of 12 cores). Intel Ark is the ultimate reference source. $60 on ebay US

        • Stephen Cox

          I was going to go with a dodecacore but for the money of the extra 4 cores it didn’t seem worth it – at least starting out. A revision 3 motherboard and 2 of the fastest hexacore 56xx chips are outrageous in price (~$700) compared to a revision 002 board w/ 2x W5590’s (~$200). I wasn’t going to pay $500 more for 50% more cores.

  • bd

    Hi has anyone setup the Z800 with a PCI-e SSD as the boot device?

    • Bertrand

      Hello,

      Anyone try to setup PCIe M2P4S convert to boot M.2 super speed device (Over 1Go/s with read/write.)?
      Thanks,

    • Stephen Cox

      Actually, I am about to upgrade to one. I bought a Kingston HyperX Predator 240GB M.2 with the PCIe adapter. It’s sitting here next to me as I prepare to move my system from Win 8.1 to Win 10.

      I was going to go with a Samsung SM951 for its crazy speeds but I realized that the SM951 doesn’t have an option rom, so you can’t boot from it. The HyperX predator does (or the adapter card for it does, I haven’t tested it yet to see which it is).

      Edit: It’s installed. I had to fight with Windows 8 disk manager to format it, but the system had no problem getting it to work. The BIOS recognizes it as a boot option, although at the moment I’m not booting from it yet – I want to clean install 10 on it. But holy hell… is this thing fast. 1400MB/sec (1.2GB/sec) read and 650 write. That blows away anything I can get on SATA III, yet there are even faster ones. I can’t wait to move Windows to this thing.

  • Hello,
    Nice post, verry informative.
    Since reading your post , I bought a z800 mb , #2 (found it at 80€ on ebay) the ram ECC of course, and 2 procs e5540.
    I did all the drilling and cabling , but it won’t work.
    To be more precise , it powers up, and all fans spin but it won’t POST.

    Any ideea ?

  • Adil Qatine

    How I connect 3 pin to 5 pin cpu fan adapter or molex?
    What about m.2 like intel 750 in pci 2
    Thanks

  • Nicholas Sharples

    nice post. im about to take out my z800 board and put it into a decent case (thermaltake level 10). (im running out of room with graphic cards and liquid cooling – which works fantastically) you can now get the power cable adaptors off ebay (http://www.ebay.com.au/itm/10-18-to-24-Pins-HP-Z800-Workstation-PC-Power-Supply-PSU-Connector-Adapter-Cable-/400939145808?hash=item5d59d5da50) . one question, with the CPU power, is that just a standard pcie 6 pin plug? or do i have to mod that too.

  • Paolo Pericolo

    anybody found a fix for the POST warning about the low power fans?

    • Nicholas Sharples

      there isnt a fix for it hey, just have to hit f1. unless you feel like reprogramming the BIOS.. but i dont think that would be remotely easy or even possible.

      • Paolo Pericolo

        nope. not planning to do that. but the fix should be easy, does anybody here have a regular ran for 130W cpus with 5 pins? all we need to understand is what signal goes on that pin, if somebody would measure it with a tester it will be quite easy, it’s either a certan restistence or a secon 12v or 5v line for more powerful fan or backup, if we find out what it is we can replicate it.

        • The 5th pin is labelled TACH2. On some of the HP cables pin 5 is looped back to pin 1, grounding it. Might be worth trying this to see if dispenses with the warning.

          • Paolo Pericolo

            thank you, i’ll give it a try

        • Paolo Pericolo

          i Just measured the 5th pin and it gives me +3.33V (with the – probe on the chassis)

          • Davit Marmarashvili

            I recommend you to attach any kind of low power light emitting diode to 5th pin and ground.
            well at last I’m going to do that…

  • Paolo Pericolo

    Has anybody succesfully overclocked one of this? sometimes i need to use this software which only uses one single core and it’s speed it’s strictly related to clock speed, the calculations are very long and some extra Mhz would really help. i tried overclocking with SetFSB and i found one PLL that seams to work but i can only get the Fsb from 133mhz to 136mhz before it crashes…

  • Ahmed Nabil

    Andy, i followed ur footstep and successfully hacked the board inside the case and everything is working fine, EXCEPT, there is the F1 to boot which i cannot disable, it is complaining about the RAM & Chassis fan!!, i need to disable it as i’m using without a monitor as ESXI server.

    please need your help

    • No idea how to stop those warnings other than actually fitting something that convinces the BIOS that there’s a fan in place.

      • Ahmed Nabil

        what did you fit ? 😀

        • Nothing – I press F1 when prompted because I only use it as an interactive workstation. An actual fan would be the safest bet unless you’re prepared to experiment with grounding the sense (TACH) pins to see if that makes a difference. Whatever you do don’t ground the power pin 🙂

          • Ahmed Nabil

            where can i find the pinout for the memory and the chassis fans?

            http://h50146.www5.hp.com/lib/doc/manual/workstation/hp_workstation/504632_001.pdf

            i can’t find it in that PDF. can i hack 2 fans into the 6 pin memory fan slot?

          • Drop “BenGMan” from the forum a PM. If you look on page 7 you’ll see that he says he’s eliminated all fan warnings.

          • Ahmed Nabil

            GREAT, I’ve been able to fit fans into the ram & rear chassis, now no fan errors, did you find the pin out for the front USB, as I’ve hid the 1394 error by disabling/hiding it in the bios settings. and i really not into that time of buying anything else for this lab.

          • Ahmed Nabil

            i think the registration on the forum is broken, it complained about my user name & email with 127.0.0.1 spam something :D, also login with any social providers doesn’t work either.

          • Hi, thanks for reporting that. I think I’ve fixed the IP address detection issue now.

      • Ahmed Nabil

        Did you find anything to fit? its like baby sitting a PC with this F1 prompt

  • 360trev

    Hello Andy,

    Great work on this article!

    After doing some research on the ‘boot block’ problem I’ve found some information which may prove interesting (especially if you where not aware of it).

    Note: its not yet been tested by me – I’ve only just recently purchased a HP z820 and plan to do some more investigations soon. As you know the boot block is part of the BIOS image, stored within the system ROM for recovery purposes. It has its own date stamp and is distinctly separate for upgrade purposes. The HP z series motherboards actually have jumpers to lock/unlock the boot block to prevent it being ‘inadvertently upgraded’ during BIOS updates. Its described as the ‘ME/AMT flash override header’. So, why has HP added this physical jumper protection on the PCB? Well if the boot block was mistakenly flashed during normal BIOS updates, and it failed to upgrade or you stopped it midway [it would result in a corrupt BIOS] and the board would be ‘bricked’. You’d need to de-solder the flash chip and manually upgrade it (as you’ve discovered it is not socketed on the main PCB). Since HP does not officially support CPU upgrades the jumper is there to minimize the risks of a boot block flash failure and prevent any malware or viruses bricking the BIOS…

    Furthermore other information that needs to be located in your existing bootblock, the data segment contains board specific information like MAC addresses, UUID, serial number and so on, this needs transplanting into your new bootblock image before trying to flashing it.

    At least on a HP z820 (on the z800 ymmv) you must follow the procedure to change the jumper settings before proceed to perform a *bios update*. This should now upgrade the bootblock too, after doing it you’ll need to revert the changes before booting. Note different Main PCB board revisions have it in different locations:

    On the HP z820 (varies according to board revision);

    – Jumper E14 is under PCI express Slot 4.
    – Jumper E1 is under the first RAM location of CPU 0 (on the right side of the mother board).
    [**protection is now removed and you can now flash the boot block too**]
    – Revert jumper on E14
    – Revert jumper on E1 (Pin 1 and Pin 2)

    Good luck!

  • b348xyx

    Hi, just wanted to add this this post of yours , i added a Syba SATA III 4 Port PCI-e 2.0 x2 Card to my HP Z800, as it uses 2x PCIE Lanes which should be able to give max 1000mbs per second(500mbs Per lane) so the Samsung 850 Evo i am using has no bottlenecks. using a 1x Sata3 card like yours above will mean max you will get is 500mbs which on modern ssds will bottleneck a little. not end world but as the price diffrent between the 1x and 2x card is very little its worth the no bottleneck route.

    • Stephen Cox

      Ha its been a long, long, LONG time since I’ve been in this comment thread… but I want to add that you are 100% correct. I tried pointing this out 2 years ago (when you posted it) but I don’t think anyone understood me. x1 SATA cards are useless unless they are PCI Express 3.0. Anything older needs at least 2 lanes or you’re gonna hit a bottleneck before your drive maxes out.

      And I’ve been using this card for my build since it started and never had a problem. Its a great card.

  • Rubén

    Hi Andy Brown, thank you very much for your help … !!! HP Z800 hacked my server works perfect … !!!!

  • Mikael

    Hello! Very cool hack, im very tempted to do something similar for an ESXI gaming machine. Idea is to use a 4K tv in QUAD pip mode and ESXI to host 4 machines with 1 GPU each. I therefor wonder if you ever had a solution to your “powerful GPU problem”?

  • jaymemaurice

    Hey, did you ever suppress the fan warning? Is the TACH2 pin driven high constantly or is it like a speed pulse? I hate pressing F1 at boot…

    • jaymemaurice

      I wonder if I jumped pins 3 and 5 with a huge resistor, will it suppress the fan warning?

    • I never bothered because I don’t mind pressing F1. At least one of the guys in the forum thread has managed to eliminate all the warnings.

  • Norman Cunningham

    Hi Andy, What type of solder station did you use to work on the z800 motherboard? I am trying to repair a Z800 power supply but the solder won’t budge. I ran the temp to 850 degree’s Fahrenheit, nothing. I also used my hot air station to max but that just started to melt the board. I tried all the old tricks like melting new solder on then solder wick but cans seem to get it to the melting point. Any ideas you can think of that you ran into?

    Norm

    • I just used a normal iron (actually a Tenma station with Hakko tips). The solder on the board will be lead-free so you’ll need a higher temperature than for leaded. If the solder blob is large or is fixed to a large copper plane then you’ll need a bigger tip to get the heat into it before it wicks away down the copper. Also scrape the solder blob with something abrasive to remove oxidation and then apply some flux and you should be fine.

      • Norman Cunningham

        Thanks Andy, I’ll have a go at again then.

  • Oriaku Samuel

    Hello Andy,

    Please I have been checking up with your write up about the z800 workstation and presently putting one together, I have gotten the Motherboard which is a 002, x5570 Processor,8gb since stick Ram and gt 740 gpu. what is left is the power supply Unit and the Heat sink. I saw this specs on Amazon and was wondering if it would work out good for the Specs i have already gotten: The PSU is:

    KENTEK 850 Watt 850W 120mm Fan ATX Power Supply 12V 2.3 EPS12V 2.92 SLI-ready PCI-Express SATA 20/24 PIN Intel AMD by KENTEK

    While the Heat Sink is Zalman Copper CPU Cooling Fan CNPS10X OPTIMA.

    Please would they work good.

    Thank You.

    Really appreciative of your time and effort.

    • Hi there. Your heatsink is the same as mine I think – you should be good with that. If you read the forum thread you’ll see that this board can be picky about its power supplies. In general I would recommend 1000W+ and from a named brand that you’ve heard of. Yes they’re more expensive but they’re also very stable. If you do decide to go with a cheap PSU then make sure you can return it if your board won’t power up or is unstable.

      • Oriaku Samuel

        Thanks a million Andy, my order just arrived Nigeria, I would be trying it out will definitely return to give feed back and hopefully also help someone with the same issues. Thank You.

        • Oriaku Samuel

          Hello Andy,

          Please i have run into a fix. I have gotten the Power Supply and the Heat Sink. But i’m having some issues with the Power Supply. Please how do I fix the 10pins connector. I have sort of gotten my way around the 18pins for the Power but I’m a little confused with where the 10pins would go into. Like which cable would I modify for to fit the 10Pins. I have read your article Severally but still not really getting it.

          Would be very grateful if you can help as this is the only thing left for me to get the Z800 up and running.

          Warm Regards

          Thanks.

          • Did you miss the section titled “The memory cable” ?

          • Oriaku Samuel

            No I didn’t, I did read that part many times. Please how do I connect the 10pins cable to the 24pins. I think that’s where I lost it.

            I would like to buy a ready made cable as i found a few areas online where they sell them (http://www.moddiy.com/products/HP-Z800-Z600-PSU-Main-Power-24%252dPin-to-18%252b10%252dPin-Adapter-Cable-(30cm).html

            http://www.ebay.com/itm/10Pins-18Pins-to-24Pins-HP-Z800-Workstation-ATX-Power-Supply-PSU-Adapter-Cable-/171969331489?hash=item280a2bc121:g:2G8AAOSwBahVgHxo ) but they either to ship to Nigeria or the cost and the time it takes to ship is just too expensive. So i am left with no choice but to hack the cabling like you did.

            Thank you so very very much for your time and help.

          • The 10 pin memory cable requires 5V and GND as shown in the pinout diagram.
            You can get 5V and GND from a molex (IDE hard drive) power connector as mentioned in the text.
            I explain and show pictures of my hacked molex extension cable to 10pin memory cable.
            The other end of the cable is a hacked 24-pin ATX power connector with 14 of the pins sliced off, as mentioned in the text.

          • Oriaku Samuel

            Ok.

            Thank you so much. I perfectly understand now. But after the joining I guess i would be connecting the Molex part to a IDE Hard Drive connector of the PSU? As I have gotten a spare 24 Pin cable ripped from an old PSU and also 10pin cable.

          • Yes you connect the molex part to a hard drive PSU connector – that’s what I did. Basically you’re just supplying 5V and GND to the memory cable and the molex connector is a convenient way to get those voltage levels.

          • Oriaku Samuel

            Thank so so much.
            You are the best.
            I shall return with goodnews.
            🙂

          • Oriaku Samuel

            Hello Andy, i’m here again. I did the pins cabling and i guess it worked cause i tried the paperclip testing on the psu using the modified 18pin section and it powered it on. Then I connected the psu to the motherboard and a gt 740 gpu, then the heat sink and a monitor. The fan for the heat sink spinned, the gpu fan also spinned which i guess indicates that it is working. but nothing showed up on the screen. not sure what happened. Though i’m suspecting the RAM, it is 8gb single stick Fury Hyper X ddr3 1866mhz UDIMM ram. Or could it be the motherboard cause the psu was making this clicking sound because it was set on low voltage before i had to adjust the voltage to the right one. Please any suggestion is gold right now. You have helped me this far, not sure i would have gotten to this point if not through your assistance. I’m this close to making it work. I’m grateful. Thank You

          • Please read HP’s supported memory configurations table. You’ll also find the supported memory types in there.

  • datoska

    ok, so theoretically if zalman cpu cooler fitted motherboard like charm, other coolers which support 1366 socket will fit too ?

  • datoska

    so theoretically if zalman cpu cooler fitted motherboard like a charm, it means that other brand cpu coolers which support 1366 socket will fit that socket too ?

    • Theoretically yes. There are people using other coolers in the forum thread. Watch out for issues with it overhanging the memory slots – they are very close by. Online cooler reviews normally mention issues with clearance if there are any.

      • datoska

        ok, will use zalman cooler to not to waste money…
        I somewhat read out that ecc ram heats up more than non ecc… but thats not a big problem….
        I have another question, what memory will it support? ECC- REG ECC – Normal(unbuffered) ? or all above.. ?
        BTW – I’m going to build Costume wooden case, also will post it here!
        love your web!
        I’m building rendering rig, I’m on my own budget (about 140-150$) considering that i’m 19 years old and live in gods forgotten country…

        Z800 motherboard
        16 GB ram
        2x X5550 cpus
        Silencer 7500W 80+ psu 60A
        500GB HDD

  • Mark Hardwick

    Hi Andy. I was thinking of following this guide with a HP Z600 but it has a 6 pin and 4 pin and I was wondering if I’d have to do any modding or If I could just use a PCI psu cable and the CPU psu cable.

  • Peter Doane

    hi, i am wondering what are the dimensions of the motherboard? i am thinking of using it and i want to know how much bigger it is than e-atx motherboard because i want to mod it into my phanteks eentho pro case.

    • datoska

      37x34cm +-2cm….. Btw andy already posted those dimensions up there…

      • Peter Doane

        thanks, i must have missed it

  • I have a IWILL DNS-SATA that simply doesn’t turn on. The seller said it worked together with 2 X7460 (I also received 4 E7420), but the manufacturer closed its website one year before the release of these processors. Is possible that it is supported?

  • John Wright

    Hi Andy do you know if this board will fit in a Deep Silence 5 case

    • Apparently it does, just…

      • John Wright

        thanks for that Andy, do the memory banks require power full time

        • I would assume so, but I can’t say for sure.

          • David K

            not sure why my post aint showing. will try here.

            hey Andy, grate read. havent u tried z820 yet? ive gone through all available manuals for that board – nothing in regard of power pinouts/voltage could be found. the bord has diff power plugins for mem/cpuo/cpu1 etc. although my Sonic1200Platinum does fit all of those connections, am suspecting the z820boardspecific stuff going on – with 2670 and ECC ram installed (tested working) the board shown no led lights no signals, feels dead.. advise pls. cheers, david.
            P.S. could that just happend that the power suply is identical for 800/820 hence the haking is the 100% identical as well?

          • This comment has showed up OK. I won’t be looking at the Z820 until the motherboards fall to a bargain price. Currently they are way too high for me to consider.

          • David K

            thank you Andy for this reply. ive opened the new topic in the forum. hope it qualifies. cheers.

  • Vaggelis Dogas

    hell andy i have some questions for the front i/o pins can you please label each pin from where it is pin 1 until pin 15 because i can understand if let say the pin 2 is above or next to the pin .Thanks for your time and your article is great,thumbs up

    • On connector P5 pin 1 is down the bottom left, pin 2 is above it and then you count to the right. You can see the two pinless ‘key’ connections at positions 10 and 15 in the photograph to help verify that you are counting correctly.

      • Vaggelis Dogas

        thanks
        a lot andy

  • Vaggelis Dogas

    also it is a must to use a 850w power supply?

  • Miroslav Vassilev

    Can someone clearly state – what are the physical dimensions of this board 12 x 16 inches or bigger? I have a very nice big tower aluminum case, but I would like to check if it fits inside, before buying the board actually :).

    • 37x34cm (rounded up to the nearest cm). It’s in the comments further down, though you do have to load the next page to see it.

  • LambdaFox

    I have a Cooler Master RC810 case that I bought used off of Craigslist (online classified ads) for $25. The case is enormous, and I am trying to replace my old dual Opteron motherboard with this one. There are 3 screw holes in the case that match up to the Z800. The legs that appear to be designed to fall into slots in the original HP case hold it at what appears to be the proper height for the case. All of the card slots align with those in the back of the case. I had to remove the top screw on the serial port to get it in place. There will be no simple answer for the back-plate. I think duck tape will be my solution for that.

  • LambdaFox

    Learn from my mistake… Assuming that “any” LGA 1366 cooling solution would work, I bought one designed for the i7 made by Intel. This has angled riser legs. The only way I could get it even close to the CPU’s was to remove the back plate. When you do this, the front protective cover goes away also. I bent pins in one of the sockets. Grr. I just ordered another motherboard.

  • LambdaFox

    Last note for today. I wanted to let people know that I was able to cut the 4-pin plastic connector for my tiny internal PC speaker and use pins 17 & 18 for that. It beeps away telling me it can’t find my CPU (note bent pins comment…) I bought a predone power cable off ebay from Hong Kong. It seems to be working fine. If that changes I will post a follow-up.

  • ujt 80

    Has anyone here used a Hyper 212 Evo cooler on this board? it seems that the threading of the stand-off won’t fit in the back plate. I’ve used these coolers before and trust their performance so I would like to use them if I can. If all else fails, does anyone know how to get rid of the back plate so I can put the one supplied by the 212 Evo on?

    • You could try the approach I used under Update: the dual CPU upgrade in the article with the motherboard standoffs. Get the shortest standoffs you can find though so that there’s still enough downward pressure on the CPU.

      • ujt 80

        Ok. I have finally completed my build. Everything works like I hoped it would, aside from one thing, Andy, I noticed you were getting really good temps on your blog post. I can’t find out how to control my CPU fan speeds. Or any fan for that matter. (I did end up using two Hyper 212’s.) Using programs like speed fan is not helping and I cant find a setting in the BIOS that lets me adjust that. when my CPU goes under load I hit high temps fast. I know that I’ve got a solid mount on both CPU’s as I’ve re-done them both. Twice. Anyone know a way to control that? Would this have anything to do with motherboard revision? I’ve got an older one because I didn’t feel like I would be needing 12 cores. Any help would be wonderful. Thanks for all the help!

        • Hi, you can use speedfan to control the CPU fan speeds (see http://andybrown.me.uk/forum/index.php?topic=14.105). It does involve going into the advanced options…

          What do you call high temps? As I sit here typing all cores are at 27-30C. If I load up all the cores (Handbrake video recoding is a good way to do that) then the cores will hit about 65C with no CPU fan speed adjustment on my part. I can usually knock about 2-5C off that by increasing the speed of my case fans that are controlled by sliders on the front of the case. 65C is hot but still comfortably below the maximum operating temperature of 78.5C.

          • ujt 80

            Thanks for responding so quickly! I have gotten temps all the way up to 77C. But the odd thing is, one of my CPUs gets considerably hotter than the other. One gets max temps of 64 and the other 77 (I’ve got the x5560 Xeons). When using speedfan, I see my CPU fans running at about 800RPM all of the time regardless of CPU load. Even after configuring the settings in speed fan and assigning a fan to a temperature reading. Then adjusting the curve from there. The fans that are running 800ish RPM are labeled fan 1 and 2. However when I go to assign a fan to change speed, I have to guess on which one is the CPU fan because they are labeled PWM1,2,3 etc. Who knows, maybe I can’t seem to find the right setting. Thanks for all your help! This blog post was the biggest factor in helping me decide to use this motherboard. It’s a very cool machine at much cheaper than other options.

          • I see one CPU slightly hotter than the other and I put that down to one fan blowing hot air on to the other (side mounted fans) which then has the job of shifting two lots of hot air. I need to go in to replace a fan soon because one of them has noisy bearings and then I might turn the fan on #2 around so that it’s back to back with #1 blowing the opposite direction.

            The SpeedFan configuration has caused confusion for quite a few people so I put together a guide with pictures. Please see this forum thread.

          • ujt 80

            That worked! Thank you so much! Now I either need quieter fans or Bigger CPU coolers. Or both! But now I know that nothing is going to overheat even if it does get fairly loud.

          • grantts7

            Thanks so much for this Andy my z800 was hitting insane temps.. 90c+ at under who knows under load I didn’t want to try it out seeing as I was already unhappy with 90. It all seems to still be running fairly hot.. idling around 70c. Also CPU0 is about 10c hotter than CPU1, I’m guessing that’s because CPU0 gets the exhaust air from the first cpu. I’m using some aftermarket heatsinks and it may be them not helping with my high temps, would love to water cool it one day. Thanks again.

          • Core idle temperatures for me are 25-30C with Intel turbo boost enabled and reducing the core frequency to some idle level. Is the TDP rating of your cooler at least the same as the TDP of the CPUs? Sometimes you have to hunt around to find a cooler’s TDP rating and I’ll never buy one unless I can find it and make sure it’s a match for the CPU.

          • grantts7

            I also have intel turbo boost enabled, although there is another turbo option under the first one (I can’t remember what it is now), but that one is disabled. My cpus are x5560s which are 3.2ghz and at idle they mostly run anywhere from 1700 to about 2600, but for the most part I see them around around 2-2.5ghz range which does seem very high for idle also the coolers I got are rated at 95w which is the same as the cpus.

  • Dave

    Hello, just curious. What are the exact screws and mounting screw retainers that are used on that model? I am trying to find them. Any assistance would be appreciated. They seem to be T15 but the thread is so hard to find at that small size…

  • Alejandro Hernandez Aburto

    Thanks friend, I worked very well

  • David K

    hey Andy, grate read. havent u chalanged z820 yet? ive gone through all available manuals for that board – nothing in regard power pinouts/voltage could be found. the bord has diff power plugins for mem/cpuo/cpu1 etc. although my Sonic1200Platinum does fit all of those connections, am suspecting the z820boardspecific stuff going on – with 2670 and ECC ram installed (tested working) the board shown no led lights no signals, feels dead.. advise pls. cheers, david.

  • Aleix Novell Blasco

    hi
    Andy… may u can help me a Little.. your ideas of using that mobo on other chase sounds great for me, but my chase is a strange idea.
    i bought an ml350 g6 from eBay a year ago… incomplete but functional, a lighting storm reaches the pone line and fried my mobo from the eth port (still crying), but still have all parts operational.
    heres my idea: use the redundant psu system on a atx tower and the sas hhd 8 ports jail on a tower homemade pc. but need all info u can pass me to bridge power connectors to get it working. still have the ilo2 front panel but dont want to use it for now. can u help me with some photos and guide . all are hp parts and i’m spanish and got very low lvl electronics. ass i seen at eBay there are a high aviability of parts aviable at very reasonable Price. contact me plzz
    att Aleix
    pd: very low english lvl sry, idea is convert proliant ml 350 redundant psu sistem to any at to atx single or dual cpu motherboar. can send u photos but i think that all is in inet in ur language

  • kilinb69

    Hi just go all the part to do this build so I wired up the power supply and check and rechecked one think I notices was the keying is different than what on my board. Any way got it wired up and with just the cpus and RAM and a old pci video card install. I can
    not get it to start ? All most like their no load on power supply Any idea’s

    • Hi, if you could post pics and some detail in the forum thread I’m sure the readers (including me) can try to help.

    • kilinb69

      O sorry I got it to start. 650 watt power supply only able to get it to boot with 1 cpu one stick of 4 MB ram and a pic GeForce fx5500 lol need more power Scotty

  • ujt 80

    Just in case somebody was wanting to know if they could put a nice gpu in this mobo, it seems you can. So far, i’ve tested an R7 370 and a GTX 950 SSC. They both work flawlessly and i’m going to test an R9 380x soon. This has been my daily driver/Gaming rig since I built it. I’m not sure if other people here have done this yet (I’m sure somebody has) but, I want to know if anyone has done crossfire or SLI. Does anyone here know if the GPU’s would then run down to 8x or run some other configuration?

    • Chris

      Are you using *fingers crossed* the 850W power supply in your machine?

      • ujt 80

        I am using a Corsair RM 850 watt power supply.

    • ujt 80

      So, I have now tested the R9 380X and it works very well! Everything runs beautifully and smooth. The only problem I am having is odd texture problems in GTAV. However, I don’t think it is due to the card. (Even though it sounds directly related). All of my other games are perfect. seems odd. I’ll figure it out though. Now my only remaining problem is HEAT on the CPU’s! I have NO IDEA why I’m having heat issues! The only solution i have is to crank up my cpu fans to the point where they are way too loud to be at a comfortable noise level. Ugh!

  • Greg

    GREAT article! I was going to do the same BUT I found out that Dell T7500 board uses standard ATX power supply BUT it uses daughter card for second CPU and RAM so it might be even worse to try to fit into regular ATX case. But it you are willing to stay with dell case it will be easier to replace PSU in case of a failure.
    I decided to buy used server board and I was lucky enough to get two TYAN boards for dirty cheap (150 GBP!!!!!, NEW in box) . My first CPU and 64gb of RAM are waiting and during this weekend I will assemble everything.

    I would strongly recommend for people to think through: you can get new, in a box TYAN board for 260usd or for example supermicro X8DTH for 199 USD (or 179GBP NEW in Europe). This means: standard ATX PSU, standard mounting (MORE or less: SSI EEB), standard bios with cpu support etc. Cost is higher BUT it is working without any changes.
    I will mount mine in Phantex Enthoo Primo with custom water cooling. Without hassle 🙂 Just a thought.

  • ujt 80

    Update: Not happy with cooling performance of hyper 212 evo’s on this board. I don’t know what the problem is. I know that these coolers perform well normally but, I guess not in this match-up. I’ve been looking into the Noctua NH-U12DXi4. Has anybody here used them before or had experience with them? Or, has anyone here had success with the 212 evo? Thanks.

    • What exactly is the issue? I too have two hyper 212 with this setup.
      I’m curious

      • ujt 80

        The CPU’s get hotter than I would like. How did you go about mounting them? I really don’t want to have to buy new coolers if I can get this figured out. I’ve re-seated the coolers already. I have a feeling it’s the mounting method I’m using.

  • Alejandro Hernandez Aburto

    Funcionando al 100% gracias

    • Davit Marmarashvili

      what case are you using ?

      • ALEJANDRO HERNANDEZ ABURTO

        AEROCOOL Gabinete XPREDATOR Black-Black Edition

      • ALEJANDRO HERNANDEZ ABURTO

        AEROCOOL Gabinete XPREDATOR Black-Black Edition

  • Jordan Bettcher

    Would really be nice to just play with the multipliers and voltage a little bit on these boards, but they definitely get the job done. I haven’t really hacked the board but I’ve definitely hacked my Z800, luckily found a proper revision board. Running 2 X5680’s and a couple GTX 970’s in SLI (using different SLI in Windows). Got some Noctua NH-U9DXi4 that fit in the unit quite well, haven’t modded the fan cables yet but the system runs stable and very very cool. Haven’t seen a cpu temp above 60 degrees yet under load. Anyways here is a picture of the first boot with the rig. Gonna find a more permanent solution for the Memory fans and do a little cable management, but it works. Done a lot of bargain hunting for this build, bought the z800 with a X5504 for $140 (CAD everything Canadian dollar), the two cpu’s locally for $120 a piece, the GTX 970’s for $440 for the pair. Have 48gb DDR3 1333 ECC on the way from an ebay seller $80. Just have the figure out a more permanent harddrive solution since I have a 1TB Seagate SSHD in there, but I may throw a couple of my SSD’s at in just to play with the RAID controller.

    • Nice build, bro. I have X5650’s, but those X5680s would be super crispy.
      Those 970 SLI is gorgeous as well.

    • Davit Marmarashvili

      but ! that mb isn’t sli compatible yes?

  • Scott Free

    What’s your passmark on this rig? What exactly over say just using supermicro X8DTi-F does this rig give you?
    Supermicro X8DTi-F, 2 X5680’s, 48gb ecc, GTX 760, Visiontek Pci-e 240gb ssd..
    Passmark 4000, Cpu mark 14000, Disk mark 5000..
    https://s11.postimg.io/paep8h4ap/image.jpg

  • Hey man, I know this post is two years old, but I’m just now looking into this. I bought a z600 Mobo and got two 6-core X5650.
    My main issue is the PSU. My PSU thankfully has a 20+4 pin, so I can slip it in without worrying about rewiring (I think at least, during the test it fit perfectly)

    However, will a PCIE 6+2 connector work for the memory? It also fit when I tested it, but since I didn’t have a heatsink I never tried turning the machine on.
    I also couldnt put my 4+4 CPU connector in that easily so I’m not sure if I just need to do the modding (I’m using a corsair 650W 80 Plus Bronze)

    I see your charts and the mods look relatively easy, but I’d like to avoid some of them if I can. Any thoughts here?

    EDIT: I have the rev 03 of the Mobo so thankfully no worries there.

  • Andrew

    Just found your article, thanks for all the great information! I’m lucky enough to have a complete Z800 but still curious about upgrading the CPU and/or adding a second one, and you answered a lot of my questions! One thing you might consider for flashing the BIOS is an in-circuit programmer known as a DediProg, we use them at work for flashing firmware, and they are fairly inexpensive. The Dediprog SF-100 runs about $80US and the SF600 runs about $300US, but for BIOS flashing you’d really only need the SF100, and you can get a clip that will attach directly to the flash chip that will work with the programmer, as well as a cable with the proper connector to use the SFI Recovery header on the motherboard. (Note that the retail prices on these are quite higher if you end up having to order a new one, but I’m sure you could make your money back unbricking motherboards and/or flashing the older Z800 boards to support the 56xx Xeon processors 😉

  • josh

    Hello, Nooby question sorry but how did you fit two cpu fans as I can only find one power slot? Unless im looking in the wrong place or its a simple part i need i dont know but if you could let me know thanks 🙂

    • josh

      I found that you can purchase a fan power splitter cable. Would this work using two of the same fans and connecting them into the same power slot using this splitter?

  • Dennis Johnson

    Can this RAM be used HP 500666-B21 in lieu of the one mentioned in the manual? All the specs seem exactly the same. Just a different part #.

  • Serge Ochre

    Hi Andy,

    Thank you for this article! It was very helpful to me while upgrading my build.

    My build is: 003 board with 2x 5680 xeon, 48gb ram, 240gb ssd on Asmedia sata 3 controller & 4x 2tb sata drives. OS Windows 7 Ult x64 SP1.
    The trouble is that I can not run ssd drive simultaneously with 4 sata drives! OS was installed on ssd only with disconnected sata drives. I tried different things in BIOS, not helpful.
    When all 4 sata drives were running I was not able to finish installation of the OS. Actually installation begins but after the first reboot the system shows that windows can not find winload.exe / error 0xc000000e / file lost or damaged.

    Would be very thankful to you for any help with this issue!

    • Your configuration is quite close to mine. I have SSDs (including the boot SSD) on both ports of the external controller and another SSD on a main board controller. The obvious difference is that you have much greater capacity drives on the main board. I’m running Windows 10 and if I look under the ‘Storage Controllers’ section of the device manager I see:

      Intel(R) Desktop/Workstation/Server Express Chipset SATA RAID Controller
      LSI Adapter, SAS 3000 series, 8-port with 1068E
      Microsoft Storage Spaces Controller

      What do you see?
      Which of the two on-board controllers are you plugging the 2TB drives into?
      Does it work with just one 2TB drive + SSD?

      • Serge Ochre

        Solved!
        Thank you very much, Andy.
        The problem was that all 4x 2TB drives were connected to SAS ports & finally the system was not running after installing sata 3 controller. Now I connected all the drives to SATA ports & all is running perfectly! I was thinking before that they were connected to the wrong ports. But before when Windows was installed on ssd which was connected to the normal SATA II port, all 4 drives were running well. & as soon as I put in the system SATA III controller I got a trouble.
        Now all is ok & also it boots properly without F1.
        Great!

  • Davit Marmarashvili

    we need list of pc cases where this badboy fits…
    I’m thinking about cooler master masterbox 5, bc my friend managed to fit asus Z8PE-D12X inside, so I guess those mb’s are similar…

  • Edgar Juarez

    could you put a diagram or a more detailed photo of the connections of the power supply adapter to the motherboard? please, i mean for the connections that u did.

  • Helgaiden

    I’ve got a Z620 im trying to hack into a regular case and getting all those F1 to boot errors. Are you still just ignoring them and pressing f1 or did you bypass them at all? I can get around some but not all, currently i need to figure out how to get past the rear chassis fan errors and memory fan errors. Front chassis fan is an easy one. Any tips? Do you know where i can find the pinouts to these?

    • I’m ignoring them, that is I just press F1. Since I use this as an interactive desktop PC it doesn’t bother me at all. There are some people in the forum thread that have eliminated all the messages.

  • Ahrix Gameinger

    Is there any posibility to remove the cpu backplates? The coolers I wanna use have push pins to hold them in place.

  • Kent Hinson

    Are the ram slots blocked by the heat sink you used? So you have to remove the heat sink to change the ram? or Are you able to squeeze the sticks in that small gap? thanks!

    • Hi, I can squeeze the RAM under the heatsink but only just and if I want to remove the stick nearest the CPU then I’d have to take out a couple of adjacent ones first.

      • Kent Hinson

        Thanks for the info! I’ll be picking up the same cooler then as it’s a lot cheaper then the original cooler that came with the Z800. One more question if you have time. Is there a way to turn off the bios warning that the Ram fans were removed? thanks!

        • Some of the guys in the very long forum thread have managed to eliminate all warnings so it might be worth checking there. You might be able to ground one of the pins to do it.

  • JDTractorz

    What’s odd though is that I have z600 motherboard that I am trying to convert, but the power cable is mirrored upside down. Is that how it should be wired? I am currently setting mine up that way.

  • Vitus Petrus

    Hi Andy THIS IS VERY NICE ARTICLE!!.. I want to ask u about HP Z600. Do u think the arrangement of pins connector power switch, hdd led, pwr led, same with this z800 ? I m now trying to hack the HP z600 into normal atx case.

    • Hi Vitus. I’ve never owned a Z600 so I couldn’t comment. Perhaps someone else can help.

  • DarthKegRaider

    I have twin 5690’s running in mine. They do get quite toasty with the stock cooling setup. I have been wanting to water-cool this beast for a few years now, but cannot seem to track down the genuine HP cooling kit. I was hoping someone may have done such a thing, but yet to find anything online either. I’m still running the stock Z800 case, as I think it looks great. I don’t want to chop holes in the side to allow for the world’s obsession with 120-140mm radiators either. The 80mm ones I have found don’t have the hoses in the right spot either. Ugh. I may end up heading down your route of transplanting the guts into another, water capable case 🙁

  • DarthKegRaider

    https://uploads.disquscdn.com/images/3f6bdf19a786a82a67efc4104962a2f11294598d7bbbdd867cc7d4992e99ae13.png

    Version 003. with the latest BIOS from HP (3.60 RevA). Nvidia 980TI, although I did have a Radeon R290x running in it for almost a year before the Nvidia.
    Thought I better share that info too.

  • I apologise if this necromancing is unwanted but this post is still very valuable and useful.
    I’m about to get a Z800 with dual X5675’s and 96GB of ram.
    I suspect the workstation will be way too noisy for my taste and standards so I will most likely rebuild it in a Fractal Design XL R2 case and change the CPU coolers, PSU and stuff…
    So I have a question that I haven’t managed to find the answer to:
    What are the measurements with regards to the layout of the CPU slots, RAM and the height of the latter in relation to the CPU?
    Thanks in advance.
    And thank you for a great post!

  • MALCOL LOWERY

    WOULD THE EVGA SuperNOVA 750w G2 80+ GOLD POWER SUPPLY BE COMPATIBLE WITH YOUR MOTHERBOARD? I AM LOOKING TO ORDER IT TODAY. THANKS!

    • Probably. It’s a high quality power supply from a top brand. Of course you’ll need an adaptor cable as described in this blog post.

  • Bradut Suciu

    Don’t you happen to have a schematic/diagram for the original power supply unit? Mine has an electronic issue and my electronist can’t figure out the fault without a diagram.

    • Sorry no, I only have what you can find with google on the net.

  • Jeff Gagnon

    Hi there ! i just bought this awesome machine ! It came with 002 revision and a X5650 CPU, 24GB Ram. I just ordered a new X5650 with a Rosewill ROCC-16003 Heatsink and 24GB of RAM. Using the actual 002 Rev, will it work with 2x X5650 ? If no, i will have to change (solder) the BIOS chip or is it flashable? Thanks !

    • 2x Westmere CPUs in the 002 revision is the combination that has given people problems. There is a post in this thread where someone claims to have done a bootblock upgrade but doesn’t go into enough detail for others to replicate the process.

      • Jeff Gagnon

        My board came with rev002 but BIOS version 3.60. Its already working with one x5650. Is that make sense to think that it will work with 2 x5650 CPU? I’m still waiting for the second one, ordered Saturday.

        • Hi Jeff. The bootblock is the key and unfortunately updating the BIOS does not update the bootblock which appears to be hardware write-protected. You *may* be OK with your 2nd CPU. Users in the forum have reported that the main issue is during reset. That is, if you pass reset your machine is 100% stable but you may need to reset your machine several times to get it to boot. It would be great to hear how it works out for you when you receive your second CPU.

          • Jeff Gagnon

            I will keep you posted for sure! I also ordered a power supply cable adapter to install the system on my custom server setup. (I will post picture when completed!). BTW, this blog is exactly what I was looking for. You answered almost all my concern by writing this page. Thank you very much.

  • Davit Marmarashvili

    confirmed, it fits in cougar panzer max full atx case, neets a bit of modification and double sided tape on upper side of mb, some holes on lower side and it fits…
    also I got rid of all those stupid bios messages about fans and other things not connected by attaching one fans pwm to all fan headers

    https://uploads.disquscdn.com/images/52998b9a09cf5b0add23f713246a6ed351a00027fbb2e6ee0da39736430e699e.jpg https://uploads.disquscdn.com/images/3dc31801d505feafec038fd89de048d869af15ef2684e272ec6f77a4b92afa47.jpg https://uploads.disquscdn.com/images/22ae2cbfe48484ccd651591b892cc0e3cfff38cd68023ad63088f29eb127c04c.jpg

    • New holes and double-sided tape… that’s what I call a real hack. I also like the trick you used to get rid of all the BIOS messages. I still press F1 on power-on.

  • Team das3Dstudio

    Hey Andy,

    I tried already the forum.
    But maybe I have more success here.

    I have a Z800 and would like to add a second external (ATX) power supply only to power the graphic cards.
    To do this I need to supply the ATX “power good” signal to that psu unit so that it fires up. The Z800 will continue to be driven by the existing internal power pack.
    Which pins should I use for the ATX signal? Is pin 8 and any of the black ones on the main power supply correct?
    Or could I use two pins from the memory power cable which is easier accessible?
    I’d solder 2 wires to the cables so that the connectors can stay in place. At the other end would be an ATX connector for the power supplies ATX connection.

    Thanks for a suggestion,

    Pretty

  • You could have just bought a good used 2009 Mac Pro with dual Xeon CPU sockets, they sell for about 400 dollars right now, and can be upgraded to dual Xeon 5690 six core CPU”s easily.

    • This was 2014, I require PC hardware for all my jobs, and the HP board cost me $100. Those Mac Pro’s are very nice, but they’re not for me.

      • Thank you for the reply Andy, I have built hundreds of Compaq Proliant and HP Proliant servers at Intel, Cisco Systems, LSI Logic, and a few startups I worked in IT for. I run Windows 10, Linux and Mac OS X on my Mac Pro with the same CPUs. What was the total cost of your HP board system with your dual six core 3.33 ghz Xeon CPU’s , Ram, and Video Card? Also your link to the PC Case is no longer working

  • Ts2 Channel

    if my z800 as#460838-002 dont have BIOS bootblock. so it find when i update to x5670 doul ?

  • Gammax Fuxfuri

    hi. obnauticus, i´m starting with a z600. can you give a schematic of psu adaptation?
    use x5670 xeon processors.

  • It was a mesmerizing article, I really owe to you,
    keep writing such staff which helps readers to evaluate themselves, Thankyou.
    How To Fix Canon Printer Error Code b300? Contact on +1-877-760-6111 for steps to Fix Canon Printer Error b300. Troubleshoot Canon Error b300 Online.

    For more Info do visit us: canon printers error code b300

  • Jason Roales Jarantilla

    i love this article about z800.. i also have this motherboard mine have aversion 03 and it works great.. by the way i use x5687 dual xeon processor and psu i use is zalman m700-tx, the only problem is i cannot find casing for my board its to huge for a normal casing..

  • Enfermo mares

    if i put a PCIe NVMe adapter on this motherboard… it will work?
    I want boot windows from it.

    • You will be able to fit the adapter and have the drive recognised in software (the OS) but you will not be able to boot directly from it because the Z800 BIOS is too old to have the functionality to go looking for storage devices in PCIe slots. If you Google around you’ll see that if you have another bootable drive or USB stick you can configure a grub bootloader on that disk to “chain load” the OS on your NVME disk.

  • Niall Bonner

    Hi Andy,

    I have a Z800 and I’m trying to replace the proprietary PSU with a 1200W ATX one. I have the adapter cable and have connected it up to the board, cpu and memory sockets. The board won’t boot. It boots straight away when power is applied to the original psu, and boots straight away if I hot-wire the replacement PSU and connect it to the CPU and memory sockets, so there seems to be some issue with the main motherboard connection. Any ideas? Am I missing a jumper somewhere, or should I be shorting some pins to get it to boot?

    Thanks.

  • Aidan S

    Hi! Ive been wandering the web while trying to design a custom case for this board. My friend has the workstation and has issues with thermals currently. Since I want this to be a Christmas present surprise for him I dont want to ask too much info from him (Hope that makes sense). I cant find anywhere that had the mounting screws like marked down on distance from each other or the side of the board, I just need some way to be able to tell where on earth to put these mounting points. Thanks in advance to anyone who finds this and can give a handy response! If at all possible a drawing or something with board + mounting hole measurements but any help is help!

  • Jose Kiefer

    https://uploads.disquscdn.com/images/c2e679a641acf6ce85be136d4d657df1d3b0133b8f80d161b98e48c0b247e8ce.jpg

    1x Raid Controller PCIe 16
    12x 500GB Hy/SSD Raid 10
    1x 1TB Sys-Backup
    4x 256 GB SSD Raid 10 Boot Drive
    1x 120GB Cache drive
    96GB Ram Triple Channel.
    (32GB Drive Cache)
    2000 Watt power Supply
    2 x Grafik Card

    My Steam Game Stream Server

  • Mathieu Vtec CL

    Can you run cpu in right-side only or it will not run?