


Debouncing buttons in AVR C++
On the face of it, reading the open/closed state of a button should be straightforward. You would just wire up the button circuit and tap the current flow into one of the Arduino digital pins configured for input.
Unfortunately you will soon discover that it’s just not that simple. At the point when a button’s contacts are being physically closed or opened the state of the electrical circuit is momentarily noisy. This means that your program will receive a rapid sequence of random HIGH/LOW signals which will certainly confuse it.
You could spend money and solve the problem in hardware with some circuitry around your buttons but it’s far easier to just write some code to do it. The technique is straightforward enough; when a button state change is detected we do not act upon it unless the state change lasts for longer than a preset short period of time, known as the debounce delay.
A C++ class solves the problem
I’ve written a reusable C++ class to do the debouncing for you. Here’s the header file.
#ifndef __99AC969B_B0C0_4ddb_BEDD_BF59AA339234
#define __99AC969B_B0C0_4ddb_BEDD_BF59AA339234

#include <stdint.h>

//
// Button implementation that does software debouncing
//

class DebouncedButton
{
private:
	// time to wait for bounce to clear
	static const uint32_t DEBOUNCE_DELAY_MILLIS=50;

  // Internal button state
  enum InternalState
  {
    Idle,													// nothing happening
    DebounceDelay,								// delaying...
  };

  // The digital pin where the button is connected
  uint8_t _digitalPin;

  // The pressed state (HIGH/LOW)
  uint8_t _pressedState;

  // Internal state of the class
  InternalState _internalState;

  // The last time we sampled our button
  uint32_t _lastTime;

public:

		// Possible button states
    enum ButtonState
    {
      NotPressed,						// button is up
      Pressed,							// button is down
    };

  // Setup the class
  void setup(uint8_t digitalPin_,uint8_t pressedState_);

  // Get the current state of the button
  ButtonState getState();
};

#endif
DebouncedButton.h
To use this class you must first declare an instance of DebouncedButton for each button in your project. For example:
DebouncedButton theButton;
theButton.setup(2,HIGH);
This would declare a button to be on digital pin 2 and that its pressed state reads HIGH. This feature allows you to handle normally open and normally closed buttons in this same class.
Next you simply poll the class whenever you want to know the current state of the button, for example:
if(theButton.getState()==DebouncedButton::Pressed)
{
  // do something
}
The getState() member function is asynchronous and will not block the caller at all, even for the duration of the debounce delay.
Source Code
Here’s the full source code to DebouncedButton.cpp so you can just copy and paste into your own project:
#include <wiring.h>
#include "DebouncedButton.h"


/*
 * Setup the class
 */

void DebouncedButton::setup(
  uint8_t digitalPin_,uint8_t pressedState_
)
{
  _digitalPin=digitalPin_;
  _pressedState=pressedState_;
  _internalState=Idle;

// set up the pin

  pinMode(digitalPin_,INPUT);

// activate the internal pull-up resistor

  digitalWrite(digitalPin_,HIGH);
}


/*
 * Get the current state
 */

DebouncedButton::ButtonState DebouncedButton::getState()
{
  uint32_t newTime;
  uint8_t state;

// read the pin and flip it if this switch reads high when open

  state=digitalRead(_digitalPin);
  if(_pressedState==LOW)
  	state^=HIGH;

// if state is low then wherever we were then
// we are now back at not pressed

  if(state==LOW)
  {
    _internalState=Idle;
    return NotPressed;
  }

// sample the clock

  newTime=millis();

// act on the internal state machine

  switch(_internalState)
  {
    case Idle:
      _internalState=DebounceDelay;
      _lastTime=newTime;
      break;

    case DebounceDelay:
      if(newTime-_lastTime>=DEBOUNCE_DELAY_MILLIS)
      {
      // been high for at least the debounce time

        return Pressed;
      }
      break;
  }

// nothing happened at this time

  return NotPressed;
}
DebouncedButton.cpp
Test Project
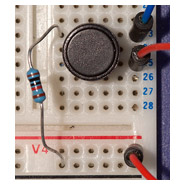
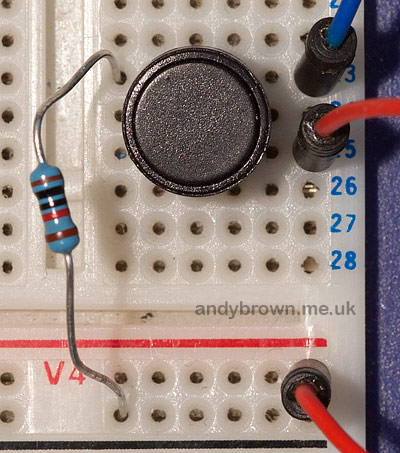
For our test, let’s wire up the following simple circuit.
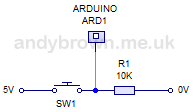
On the breadboard it looks like this. The red wire goes to +5V, blue to Arduino digital #2 and the 10K resistor is going to ground. This breadboard connects horizontal holes together as a strip.
Here’s some test code to demonstrate the button class. This example will flash the LED on the Arduino pin 13 when the button is pressed. The layout of this code is designed for Eclipse users. If you are using the Arduino IDE then you should just be able to copy and paste the setup() and loop() functions into the IDE Window.
#include <wiring.h>
#include <avr/wdt.h>
#include "DebouncedButton.h"


// Compatibility stub for undefined pure virtual

extern "C" void __cxa_pure_virtual() { for(;;); }


// the button class

DebouncedButton theButton;


/*
 * Main entry point
 */

int main(void)
{
	init();
	setup();

	for(;;)
		loop();
}


/*
 * Setup before loop
 */

void setup()
{
// setup the LED

	pinMode(13,OUTPUT);
	digitalWrite(13,LOW);

// setup the button on pin 2 (active LOW)

	theButton.setup(2,HIGH);
}


/*
 * Main loop
 */

void loop()
{
	uint8_t i;

// check if the button is pressed

	if(theButton.getState()==DebouncedButton::Pressed)
	{
	// flash it 3 times

		for(i=0;i<=6;i++)
		{
			digitalWrite(13,i & 1);
			delay(200);
		}
	}
}
main.cpp
Download the test project
The above test project is available for download, click here to go to the downloads page to get it.
The test project has a dependency on the Arduino libraries for Eclipse that you can also get from my downloads page. You may have to adjust the Eclipse compiler C++ include and link settings to reflect the location of the Arduino libraries on your PC.