


stm32plus 2.0.0: a major release

|
The latest release is now 3.0.0. Be sure to check out the announcement here. |
I’m excited to announce that version 2.0.0 of stm32plus, the C++ library for STM32
devices has been released including lots of new features most significant of which is full support for the STM32F4 series of devices. Download it now from my downloads page.
Version 2.0.0 represents a major milestone in the development of stm32plus and this article will help you to understand what’s changed, what’s new and how you can get started.
Requirements
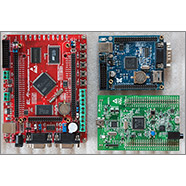
You will need an STM32F103 HD series or STM32F4 series development board. I use boards based on the STM32F103ZET6, STM32F103VET6 and STM32F407VGT6 running at 72MHz for the F103 and 168MHz for the F4, respectively.

The library makes no assumptions regarding your core clock speed and uses calculations based on the peripheral bus speeds and multipliers in the few cases where it needs to know a frequency.
You will need a toolchain for building ARM projects. The only toolchain that I can support is the ‘Sourcery G++ Lite’ edition from CodeSourcery, who have been bought by Mentor Graphics. I support Linux builds (my own distro is Debian) and Windows builds through a Unix-alike system such as Cygwin or mingw. At the time of writing I use the 2012-09 release on both Windows and Linux. The library is known to build on Mac OS/X but since I don’t have a Mac I cannot offer support for that platform.
I strongly recommend a hardware debugger. If you’re using an F1 board then you’ll need an external debugger such as the ARM-USB-TINY-H from Olimex. Users of the STM32F4DISCOVERY board are somewhat more fortunate in that there is an onboard STLINK debugger that is now fully compatible with OpenOCD 0.6.1. An external debugger is not required.
If you’re considering proceeding without a debugger then I urge you to reconsider. The ARM devices are complex MCUs far in advance of the 8 bit AVRs that people typically graduate from. The ability to single step your code in the Eclipse IDE is invaluable and saves hours of frustration.
Some library features
- STM32F103 and STM32F4 support with no code change required by you. This of course assumes that you stick to using peripherals present on both the devices.
- FSMC-based drivers for many TFT LCD controllers, including ILI9325, ILI9327, ILI9481, HX8347A, MC2PA8201 and LDS285. The latter two are designed to support the Nokia QVGA LCDs that you can find on this site.
- Graphics library supports drawing primitives, bitmaps, jpegs and multiple fonts (font converter included). TrueType fonts and compressed PNG-style graphics are supported.
- Drivers for HD44780 character based LCD displays.
- Full featured FAT16 and FAT32 drivers for any block device, including SDIO SD cards. Supported features include long filename read/write, directory create/delete and device formatting.
- USART polling, interrupt and DMA modes.
- SPI polling, interrupt and DMA modes.
- I2C polling and DMA modes.
- I2S audio support.
- External SRAM support via the FSMC peripheral.
- All timers supported including direct support for many of the common usage patters. Timing utilities for millisecond and microsecond level delays and timings.
- DAC support including the on-chip peripheral and the CS43L22 device on the STM32F4DISCOVERY board.
- Real-time clock support.
- CRC peripheral support.
- Stream IO, observer patterns for interrupt handling.
- The standard template library (STL) is included.
- Full error-handing is supported throughout the library.
- More than 45 examples illustrating every aspect of the library.
Installation
You can download the zip file containing the library from my downloads page. The README.txt file in the package provides a brief introduction and the INSTALL.txt file gives you detailed instructions on how to build and install the library.
Library design policies
Here’s a list of a few of the core stm32plus policies.
-
Simplified #include rules
Previous versions of stm32plus required you to find and include all the headers that you needed. This was a pain. I have made significant improvements this area. Now you just need to include stm32plus.h and one header for each major feature that you’re using.
For example, suppose that you’re writing a program that uses the USART peripheral. Your includes would look like this:
#include "config/stm32plus"
#include "config/usart.h"
See the examples for the peripherals that you want to use for more information.
-
Object and memory ownership.
As a general rule if an stm32plus object receives an object by reference then you own that object and you are responsible for not letting it go out of scope until you’re done using the stm32plus object that receives it.
If an stm32plus object gives you back a pointer then you are responsible for releasing the memory allocated for that object. In all cases it’s assumed that the delete operator can be used to de-allocate objects.
Where there are unavoidable exceptions to the above rules they will be noted in the documentation.
File *file;
FileSystem *fileSystem;

// create filesystem omitted for brevity
if(!fileSystem->openFile("/320x240_landscape.64",file))
  handleError();
The file pointer returned by openFile is owned by you and must be deleted when you’re done with it.
-
Object construction
The development world is split over the use of getters and setters versus constructor arguments for initialising objects. stm32plus uses constructor arguments. The advantage of this approach is that you can’t fail to set something because the constructor won’t let you.
-
Error handing
Where it’s possible for something to go wrong then the stm32plus member function signature will be declared to return a bool type and it will return false if there is a problem. A nested failure will be propagated up the stack to you with the original cause of the problem intact.
There is a class called ErrorProvider that is used to encapsulate the source and cause of the error. There is one global instance of ErrorProvider called errorProvider that can be examined to find problem causes.
#include "config/stm32plus.h"

void handleError() {
  uint32_t errorCode=errorProvider.getLast();
// [...] display or interpret error
}
Where a constructor can result in an error condition it will be noted in the documentation. After the constructor has returned the caller should call errorProvider.hasError() to determine if the constructor failed.
A first project
It seems to be traditional in the embedded world to create an example program that blinks an LED on the development board to prove that the basics are working and I’m going to follow that tradition here.
My example will go through the steps required to create a new Eclipse project, add the settings required to build with stm32plus and then build the sample project. If you’re not using an Eclipse/CodeSourcery toolchain then you will need to make the necessary changes to fit your environment.
This example will target the SM32F103 board with an 8MHz external oscillator (HSE). You will need to have installed the GNU ARM Eclipse plugin.
Create the project
In Eclipse, select File->New->C++ Project. This will get you the screen shown below.
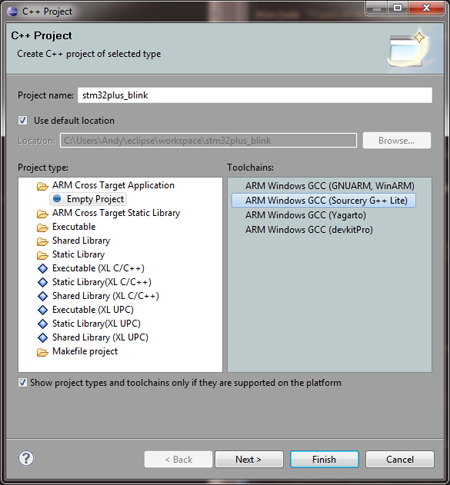
Ensure that you’ve selected ARM Cross Target Application and that the toolchain you’re using is selected. Enter a name for the project and hit Finish. You can hit Next if you want to modify the default build configurations (Debug and Release) but you can do that later so I’m not going to bother.
Eclipse will have created the project for you, and now we have to modify the build settings so that it picks up stm32plus, sets the required macros and has appropriate optimisation settings.
Select Project->Properties from the main menu. A large form with sections down the left will appear. Make the following changes.
C/C++ build -> Settings -> ARM Sourcery Windows GCC C++ Compiler -> Preprocessor
Add the following two symbols.
STM32PLUS_F1_HD
HSE_VALUE=8000000
Modify the 8000000 (8Mhz) constant to fit whatever value your external oscilator is set to.
C/C++ build -> Settings -> ARM Sourcery Windows GCC C++ Compiler -> Directories
Two additional directories are required. The base stm32plus library directory and its ‘include’ subdirectory. Here’s an example, adjust to fit your installation location:
C:\src\stm32plus-2.0.0\stm32plus
C:\src\stm32plus-2.0.0\stm32plus\include
C/C++ build -> Settings -> ARM Sourcery Windows GCC C++ Compiler -> Optimization
Check the function sections and data sections boxes. These settings cause the compiler to create a uniquely named code or data section for every function and data item in your code. Then, when the linker comes to assemble the program we tell it to discard unused sections, thus making your output binary as small as it can be.
Now go back and repeat the above project settings steps for the ARM Sourcery Windows GCC C Compiler section. Heaven forbid I won’t be writing any C code but the ST firmware library is C and we must ensure that it compiles correctly.
C/C++ build -> Settings -> ARM Sourcery Windows GCC C++ Compiler -> Miscellaneous
Version 2.1.0 and above of stm32plus requires that you select ISO 2009 C++ with GNU Extensions (-std=gnu++0x) from the Language Standard dropdown.
C/C++ build -> Settings -> ARM Sourcery Windows GCC C++ Linker -> General
Check Remove unused sections and enter the file name of the linker script for your project.
Hang on a minute, what’s a linker script? A linker script tells the linker how to assemble the different parts of your program, which order they should go in and at what memory locations. If this is the first time that you’ve done embedded development then the chances are you’ve never seen one before. They’ve always existed it’s just that they’re usually hidden from you by your tools.
Unfortunately because devices like the STM32 come in such a myriad of memory configurations it’s necessary for us to supply our own script. The following example shows the linker script that I use for my 512Kb/64Kb STM32F103ZET6. You can customise the FLASH and RAM sections of you have a different memory configuration. All the examples supplied with the stm32plus distribution have F1 and F4 linker scripts that you can copy and modify for your own use.
ENTRY(Reset_Handler)

_estack = 0x2000FFFF;     /* end of $(RAM_LENGTH) RAM */

_Min_Heap_Size = 0;       /* required amount of heap  */
_Min_Stack_Size = 4K;     /* required amount of stack */

MEMORY
{
  FLASH (rx)      : ORIGIN = 0x08000000, LENGTH = 512K
  RAM (xrw)       : ORIGIN = 0x20000000, LENGTH = 64K
  MEMORY_B1 (rx)  : ORIGIN = 0x60000000, LENGTH = 0K
}

SECTIONS
{
  /* The startup code goes first into FLASH */
  .isr_vector :
  {
    . = ALIGN(4);
    KEEP(*(.isr_vector))
    . = ALIGN(4);
  } >FLASH

  /* The program code and other data goes into FLASH */
  .text :
  {
    . = ALIGN(4);
    *(.text)           /* .text sections (code) */
    *(.text*)          /* .text* sections (code) */
    *(.rodata)         /* .rodata sections (constants, strings, etc.) */
    *(.rodata*)        /* .rodata* sections (constants, strings, etc.) */
    *(.glue_7)         /* glue arm to thumb code */
    *(.glue_7t)        /* glue thumb to arm code */
  *(.eh_frame)

    KEEP (*(.init))
    KEEP (*(.fini))

    . = ALIGN(4);
    _etext = .;        /* define a global symbols at end of code */
  } >FLASH


   .ARM.extab   : { *(.ARM.extab* .gnu.linkonce.armextab.*) } >FLASH
    .ARM : {
    __exidx_start = .;
      *(.ARM.exidx*)
      __exidx_end = .;
    } >FLASH

  .preinit_array     :
  {
    PROVIDE_HIDDEN (__preinit_array_start = .);
    KEEP (*(.preinit_array*))
    PROVIDE_HIDDEN (__preinit_array_end = .);
  } >FLASH
  .init_array :
  {
    PROVIDE_HIDDEN (__init_array_start = .);
    KEEP (*(SORT(.init_array.*)))
    KEEP (*(.init_array*))
    PROVIDE_HIDDEN (__init_array_end = .);
  } >FLASH
  .fini_array :
  {
    PROVIDE_HIDDEN (__fini_array_start = .);
    KEEP (*(.fini_array*))
    KEEP (*(SORT(.fini_array.*)))
    PROVIDE_HIDDEN (__fini_array_end = .);
  } >FLASH

  /* used by the startup to initialize data */
  _sidata = .;

  /* Initialized data sections goes into RAM, load LMA copy after code */
  .data : AT ( _sidata )
  {
    . = ALIGN(4);
    _sdata = .;        /* create a global symbol at data start */
    *(.data)           /* .data sections */
    *(.data*)          /* .data* sections */

    . = ALIGN(4);
    _edata = .;        /* define a global symbol at data end */
  } >RAM

  /* Uninitialized data section */
  . = ALIGN(4);
  .bss :
  {
    /* This is used by the startup in order to initialize the .bss secion */
    _sbss = .;         /* define a global symbol at bss start */
    __bss_start__ = _sbss;
    *(.bss)
    *(.bss*)
    *(COMMON)

    . = ALIGN(4);
    _ebss = .;         /* define a global symbol at bss end */
    __bss_end__ = _ebss;
  } >RAM

  PROVIDE ( end = _ebss );
  PROVIDE ( _end = _ebss );

  /* User_heap_stack section, used to check that there is enough RAM left */
  ._user_heap_stack :
  {
    . = ALIGN(4);
    . = . + _Min_Heap_Size;
    . = . + _Min_Stack_Size;
    . = ALIGN(4);
  } >RAM

  /* MEMORY_bank1 section, code must be located here explicitly            */
  /* Example: extern int foo(void) __attribute__ ((section (".mb1text"))); */
  .memory_b1_text :
  {
    *(.mb1text)        /* .mb1text sections (code) */
    *(.mb1text*)       /* .mb1text* sections (code)  */
    *(.mb1rodata)      /* read-only data (constants) */
    *(.mb1rodata*)
  } >MEMORY_B1

  /* Remove information from the standard libraries */
  /DISCARD/ :
  {
    libc.a ( * )
    libm.a ( * )
    libgcc.a ( * )
  }

  .ARM.attributes 0 : { *(.ARM.attributes) }
}
C/C++ build -> Settings -> ARM Sourcery Windows GCC C++ Linker -> Libraries
Add ‘stm32plus-{version}-f1hd-debug’ to the ‘Libraries (-l)’ box. Replace {version} with the version of stm32plus that you are using. Add the stm32plus installation directory to the ‘Library search path (-L)’ box. This is the directory in which you will find libstm32plus-2.0.0-f1hd-debug.a.
C++ tweaks
The default GNU C++ compiler that ships with CodeSourcery g++ is not optimised for embedded development. By default it will pull in 10’s of K of un-necessary code as well as not having default support for the essential new and delete operators. We solve all these problems with one source code file.
Add a new C++ file to your project and call it LibraryHacks.cpp. Here’s what to put in it:
#include <cstdlib>
#include <sys/types.h>


/*
 * The default pulls in 70K of garbage
 */

namespace __gnu_cxx {

  void __verbose_terminate_handler() {
    for(;;);
  }
}


/*
 * The default pulls in about 12K of garbage
 */

extern "C" void __cxa_pure_virtual() {
  for(;;);
}


/*
 * Implement C++ new/delete operators using the heap
 */

void *operator new(size_t size) {
  return malloc(size);
}

void *operator new[](size_t size) {
  return malloc(size);
}

void operator delete(void *p) {
  free(p);
}

void operator delete[](void *p) {
  free(p);
}


/*
 * sbrk function for getting space for malloc and friends
 */

extern int  _end;

extern "C" {
  caddr_t _sbrk ( int incr ) {

    static unsigned char *heap = NULL;
    unsigned char *prev_heap;

    if (heap == NULL) {
      heap = (unsigned char *)&_end;
    }
    prev_heap = heap;
    /* check removed to show basic approach */

    heap += incr;

    return (caddr_t) prev_heap;
  }
}
System startup files
Two more boilerplates and we’re ready to write some real code! The ST framework needs an assembly language file ‘Startup.S’ that contains the code that will be executed straight after reset that does some basic initialisation before calling the ‘SystemInit’ function in ‘System.c’. System.c contains the code that starts the stm32 core clocks.
Startup.S (note the upper-case .S, eclipse won’t recognise it as an assembly code file if the case is not correct). This file is taken straight from the ST standard peripheral library and is appropriate for the HD (high-density) line of MCUs
[expand title=”Click to show Startup.S” swaptitle=”Click to hide Startup.S”]
/**
******************************************************************************
* @file startup_stm32f10x_hd.s
* @author MCD Application Team
* @version V3.3.0
* @date 04/16/2010
* @brief STM32F10x High Density Devices vector table for RIDE7 toolchain.
* This module performs:
* - Set the initial SP
* - Set the initial PC == Reset_Handler,
* - Set the vector table entries with the exceptions ISR address
* - Configure the clock system and the external SRAM mounted on
* STM3210E-EVAL board to be used as data memory (optional,
* to be enabled by user)
* - Branches to main in the C library (which eventually
* calls main()).
* After Reset the Cortex-M3 processor is in Thread mode,
* priority is Privileged, and the Stack is set to Main.
*******************************************************************************
* @copy
*
* THE PRESENT FIRMWARE WHICH IS FOR GUIDANCE ONLY AIMS AT PROVIDING CUSTOMERS
* WITH CODING INFORMATION REGARDING THEIR PRODUCTS IN ORDER FOR THEM TO SAVE
* TIME. AS A RESULT, STMICROELECTRONICS SHALL NOT BE HELD LIABLE FOR ANY
* DIRECT, INDIRECT OR CONSEQUENTIAL DAMAGES WITH RESPECT TO ANY CLAIMS ARISING
* FROM THE CONTENT OF SUCH FIRMWARE AND/OR THE USE MADE BY CUSTOMERS OF THE
* CODING INFORMATION CONTAINED HEREIN IN CONNECTION WITH THEIR PRODUCTS.
*
* <h2><center>© COPYRIGHT 2010 STMicroelectronics</center></h2>
*/
.syntax unified
.cpu cortex-m3
.fpu softvfp
.thumb
.global g_pfnVectors
.global Default_Handler
/* start address for the initialization values of the .data section.
defined in linker script */
.word _sidata
/* start address for the .data section. defined in linker script */
.word _sdata
/* end address for the .data section. defined in linker script */
.word _edata
/* start address for the .bss section. defined in linker script */
.word _sbss
/* end address for the .bss section. defined in linker script */
.word _ebss
/* stack used for SystemInit_ExtMemCtl; always internal RAM used */
.equ BootRAM, 0xF1E0F85F
/**
* @brief This is the code that gets called when the processor first
* starts execution following a reset event. Only the absolutely
* necessary set is performed, after which the application
* supplied main() routine is called.
* @param None
* @retval : None
*/
.section .text.Reset_Handler
.weak Reset_Handler
.type Reset_Handler, %function
Reset_Handler:
/* Copy the data segment initializers from flash to SRAM */
movs r1, #0
b LoopCopyDataInit
CopyDataInit:
ldr r3, =_sidata
ldr r3, [r3, r1]
str r3, [r0, r1]
adds r1, r1, #4
LoopCopyDataInit:
ldr r0, =_sdata
ldr r3, =_edata
adds r2, r0, r1
cmp r2, r3
bcc CopyDataInit
ldr r2, =_sbss
b LoopFillZerobss
/* Zero fill the bss segment. */
FillZerobss:
movs r3, #0
str r3, [r2], #4
LoopFillZerobss:
ldr r3, = _ebss
cmp r2, r3
bcc FillZerobss
/* Call the clock system intitialization function.*/
bl SystemInit
/* Call the application's entry point.*/
bl main
bx lr
.size Reset_Handler, .-Reset_Handler
/**
* @brief This is the code that gets called when the processor receives an
* unexpected interrupt. This simply enters an infinite loop, preserving
* the system state for examination by a debugger.
* @param None
* @retval None
*/
.section .text.Default_Handler,"ax",%progbits
Default_Handler:
Infinite_Loop:
b Infinite_Loop
.size Default_Handler, .-Default_Handler
/******************************************************************************
*
* The minimal vector table for a Cortex M3. Note that the proper constructs
* must be placed on this to ensure that it ends up at physical address
* 0x0000.0000.
*
*******************************************************************************/
.section .isr_vector,"a",%progbits
.type g_pfnVectors, %object
.size g_pfnVectors, .-g_pfnVectors
g_pfnVectors:
.word _estack
.word Reset_Handler
.word NMI_Handler
.word HardFault_Handler
.word MemManage_Handler
.word BusFault_Handler
.word UsageFault_Handler
.word 0
.word 0
.word 0
.word 0
.word SVC_Handler
.word DebugMon_Handler
.word 0
.word PendSV_Handler
.word SysTick_Handler
.word WWDG_IRQHandler
.word PVD_IRQHandler
.word TAMPER_IRQHandler
.word RTC_IRQHandler
.word FLASH_IRQHandler
.word RCC_IRQHandler
.word EXTI0_IRQHandler
.word EXTI1_IRQHandler
.word EXTI2_IRQHandler
.word EXTI3_IRQHandler
.word EXTI4_IRQHandler
.word DMA1_Channel1_IRQHandler
.word DMA1_Channel2_IRQHandler
.word DMA1_Channel3_IRQHandler
.word DMA1_Channel4_IRQHandler
.word DMA1_Channel5_IRQHandler
.word DMA1_Channel6_IRQHandler
.word DMA1_Channel7_IRQHandler
.word ADC1_2_IRQHandler
.word USB_HP_CAN1_TX_IRQHandler
.word USB_LP_CAN1_RX0_IRQHandler
.word CAN1_RX1_IRQHandler
.word CAN1_SCE_IRQHandler
.word EXTI9_5_IRQHandler
.word TIM1_BRK_IRQHandler
.word TIM1_UP_IRQHandler
.word TIM1_TRG_COM_IRQHandler
.word TIM1_CC_IRQHandler
.word TIM2_IRQHandler
.word TIM3_IRQHandler
.word TIM4_IRQHandler
.word I2C1_EV_IRQHandler
.word I2C1_ER_IRQHandler
.word I2C2_EV_IRQHandler
.word I2C2_ER_IRQHandler
.word SPI1_IRQHandler
.word SPI2_IRQHandler
.word USART1_IRQHandler
.word USART2_IRQHandler
.word USART3_IRQHandler
.word EXTI15_10_IRQHandler
.word RTCAlarm_IRQHandler
.word USBWakeUp_IRQHandler
.word TIM8_BRK_IRQHandler
.word TIM8_UP_IRQHandler
.word TIM8_TRG_COM_IRQHandler
.word TIM8_CC_IRQHandler
.word ADC3_IRQHandler
.word FSMC_IRQHandler
.word SDIO_IRQHandler
.word TIM5_IRQHandler
.word SPI3_IRQHandler
.word UART4_IRQHandler
.word UART5_IRQHandler
.word TIM6_IRQHandler
.word TIM7_IRQHandler
.word DMA2_Channel1_IRQHandler
.word DMA2_Channel2_IRQHandler
.word DMA2_Channel3_IRQHandler
.word DMA2_Channel4_5_IRQHandler
.word 0
.word 0
.word 0
.word 0
.word 0
.word 0
.word 0
.word 0
.word 0
.word 0
.word 0
.word 0
.word 0
.word 0
.word 0
.word 0
.word 0
.word 0
.word 0
.word 0
.word 0
.word 0
.word 0
.word 0
.word 0
.word 0
.word 0
.word 0
.word 0
.word 0
.word 0
.word 0
.word 0
.word 0
.word 0
.word 0
.word 0
.word 0
.word 0
.word 0
.word 0
.word 0
.word 0
.word 0
.word BootRAM /* @0x1E0. This is for boot in RAM mode for
STM32F10x High Density devices. */
/*******************************************************************************
*
* Provide weak aliases for each Exception handler to the Default_Handler.
* As they are weak aliases, any function with the same name will override
* this definition.
*
*******************************************************************************/
.weak NMI_Handler
.thumb_set NMI_Handler,Default_Handler
.weak HardFault_Handler
.thumb_set HardFault_Handler,Default_Handler
.weak MemManage_Handler
.thumb_set MemManage_Handler,Default_Handler
.weak BusFault_Handler
.thumb_set BusFault_Handler,Default_Handler
.weak UsageFault_Handler
.thumb_set UsageFault_Handler,Default_Handler
.weak SVC_Handler
.thumb_set SVC_Handler,Default_Handler
.weak DebugMon_Handler
.thumb_set DebugMon_Handler,Default_Handler
.weak PendSV_Handler
.thumb_set PendSV_Handler,Default_Handler
.weak SysTick_Handler
.thumb_set SysTick_Handler,Default_Handler
.weak WWDG_IRQHandler
.thumb_set WWDG_IRQHandler,Default_Handler
.weak PVD_IRQHandler
.thumb_set PVD_IRQHandler,Default_Handler
.weak TAMPER_IRQHandler
.thumb_set TAMPER_IRQHandler,Default_Handler
.weak RTC_IRQHandler
.thumb_set RTC_IRQHandler,Default_Handler
.weak FLASH_IRQHandler
.thumb_set FLASH_IRQHandler,Default_Handler
.weak RCC_IRQHandler
.thumb_set RCC_IRQHandler,Default_Handler
.weak EXTI0_IRQHandler
.thumb_set EXTI0_IRQHandler,Default_Handler
.weak EXTI1_IRQHandler
.thumb_set EXTI1_IRQHandler,Default_Handler
.weak EXTI2_IRQHandler
.thumb_set EXTI2_IRQHandler,Default_Handler
.weak EXTI3_IRQHandler
.thumb_set EXTI3_IRQHandler,Default_Handler
.weak EXTI4_IRQHandler
.thumb_set EXTI4_IRQHandler,Default_Handler
.weak DMA1_Channel1_IRQHandler
.thumb_set DMA1_Channel1_IRQHandler,Default_Handler
.weak DMA1_Channel2_IRQHandler
.thumb_set DMA1_Channel2_IRQHandler,Default_Handler
.weak DMA1_Channel3_IRQHandler
.thumb_set DMA1_Channel3_IRQHandler,Default_Handler
.weak DMA1_Channel4_IRQHandler
.thumb_set DMA1_Channel4_IRQHandler,Default_Handler
.weak DMA1_Channel5_IRQHandler
.thumb_set DMA1_Channel5_IRQHandler,Default_Handler
.weak DMA1_Channel6_IRQHandler
.thumb_set DMA1_Channel6_IRQHandler,Default_Handler
.weak DMA1_Channel7_IRQHandler
.thumb_set DMA1_Channel7_IRQHandler,Default_Handler
.weak ADC1_2_IRQHandler
.thumb_set ADC1_2_IRQHandler,Default_Handler
.weak USB_HP_CAN1_TX_IRQHandler
.thumb_set USB_HP_CAN1_TX_IRQHandler,Default_Handler
.weak USB_LP_CAN1_RX0_IRQHandler
.thumb_set USB_LP_CAN1_RX0_IRQHandler,Default_Handler
.weak CAN1_RX1_IRQHandler
.thumb_set CAN1_RX1_IRQHandler,Default_Handler
.weak CAN1_SCE_IRQHandler
.thumb_set CAN1_SCE_IRQHandler,Default_Handler
.weak EXTI9_5_IRQHandler
.thumb_set EXTI9_5_IRQHandler,Default_Handler
.weak TIM1_BRK_IRQHandler
.thumb_set TIM1_BRK_IRQHandler,Default_Handler
.weak TIM1_UP_IRQHandler
.thumb_set TIM1_UP_IRQHandler,Default_Handler
.weak TIM1_TRG_COM_IRQHandler
.thumb_set TIM1_TRG_COM_IRQHandler,Default_Handler
.weak TIM1_CC_IRQHandler
.thumb_set TIM1_CC_IRQHandler,Default_Handler
.weak TIM2_IRQHandler
.thumb_set TIM2_IRQHandler,Default_Handler
.weak TIM3_IRQHandler
.thumb_set TIM3_IRQHandler,Default_Handler
.weak TIM4_IRQHandler
.thumb_set TIM4_IRQHandler,Default_Handler
.weak I2C1_EV_IRQHandler
.thumb_set I2C1_EV_IRQHandler,Default_Handler
.weak I2C1_ER_IRQHandler
.thumb_set I2C1_ER_IRQHandler,Default_Handler
.weak I2C2_EV_IRQHandler
.thumb_set I2C2_EV_IRQHandler,Default_Handler
.weak I2C2_ER_IRQHandler
.thumb_set I2C2_ER_IRQHandler,Default_Handler
.weak SPI1_IRQHandler
.thumb_set SPI1_IRQHandler,Default_Handler
.weak SPI2_IRQHandler
.thumb_set SPI2_IRQHandler,Default_Handler
.weak USART1_IRQHandler
.thumb_set USART1_IRQHandler,Default_Handler
.weak USART2_IRQHandler
.thumb_set USART2_IRQHandler,Default_Handler
.weak USART3_IRQHandler
.thumb_set USART3_IRQHandler,Default_Handler
.weak EXTI15_10_IRQHandler
.thumb_set EXTI15_10_IRQHandler,Default_Handler
.weak RTCAlarm_IRQHandler
.thumb_set RTCAlarm_IRQHandler,Default_Handler
.weak USBWakeUp_IRQHandler
.thumb_set USBWakeUp_IRQHandler,Default_Handler
.weak TIM8_BRK_IRQHandler
.thumb_set TIM8_BRK_IRQHandler,Default_Handler
.weak TIM8_UP_IRQHandler
.thumb_set TIM8_UP_IRQHandler,Default_Handler
.weak TIM8_TRG_COM_IRQHandler
.thumb_set TIM8_TRG_COM_IRQHandler,Default_Handler
.weak TIM8_CC_IRQHandler
.thumb_set TIM8_CC_IRQHandler,Default_Handler
.weak ADC3_IRQHandler
.thumb_set ADC3_IRQHandler,Default_Handler
.weak FSMC_IRQHandler
.thumb_set FSMC_IRQHandler,Default_Handler
.weak SDIO_IRQHandler
.thumb_set SDIO_IRQHandler,Default_Handler
.weak TIM5_IRQHandler
.thumb_set TIM5_IRQHandler,Default_Handler
.weak SPI3_IRQHandler
.thumb_set SPI3_IRQHandler,Default_Handler
.weak UART4_IRQHandler
.thumb_set UART4_IRQHandler,Default_Handler
.weak UART5_IRQHandler
.thumb_set UART5_IRQHandler,Default_Handler
.weak TIM6_IRQHandler
.thumb_set TIM6_IRQHandler,Default_Handler
.weak TIM7_IRQHandler
.thumb_set TIM7_IRQHandler,Default_Handler
.weak DMA2_Channel1_IRQHandler
.thumb_set DMA2_Channel1_IRQHandler,Default_Handler
.weak DMA2_Channel2_IRQHandler
.thumb_set DMA2_Channel2_IRQHandler,Default_Handler
.weak DMA2_Channel3_IRQHandler
.thumb_set DMA2_Channel3_IRQHandler,Default_Handler
.weak DMA2_Channel4_5_IRQHandler
.thumb_set DMA2_Channel4_5_IRQHandler,Default_Handler
/******************* (C) COPYRIGHT 2010 STMicroelectronics *****END OF FILE****/
[/expand]
System.c. This contains the startup code that initialises the clocks. The following file is appropriate for 72MHz devices.
#include "config/stdperiph.h"

static volatile ErrorStatus HSEStartUpStatus=SUCCESS;

uint32_t SystemCoreClock=72000000;

void SystemInit() {
  // SYSCLK, HCLK, PCLK2 and PCLK1 configuration
  // RCC system reset(for debug purpose) */
  RCC_DeInit();

  /* Enable HSE */
  RCC_HSEConfig(RCC_HSE_ON);

  /* Wait till HSE is ready */
  HSEStartUpStatus=RCC_WaitForHSEStartUp();

  if(HSEStartUpStatus == SUCCESS) {
    /* Enable Prefetch Buffer */
    FLASH_PrefetchBufferCmd(FLASH_PrefetchBuffer_Enable);

    /* Flash 2 wait state */
    FLASH_SetLatency(FLASH_Latency_2);

    /* HCLK = SYSCLK */
    RCC_HCLKConfig(RCC_SYSCLK_Div1);

    /* PCLK2 = HCLK */
    RCC_PCLK2Config(RCC_HCLK_Div1);

    /* PCLK1 = HCLK/2 */
    RCC_PCLK1Config(RCC_HCLK_Div2);

    /* PLLCLK = 8MHz * 9 = 72 MHz */
    RCC_PLLConfig(RCC_PLLSource_HSE_Div1,RCC_PLLMul_9);

    /* Enable PLL */
    RCC_PLLCmd(ENABLE);

    /* Wait till PLL is ready */
    while(RCC_GetFlagStatus(RCC_FLAG_PLLRDY) == RESET) {
    }

    /* Select PLL as system clock source */
    RCC_SYSCLKConfig(RCC_SYSCLKSource_PLLCLK);

    /* Wait till PLL is used as system clock source */
    while(RCC_GetSYSCLKSource() != 0x08) {
    }
  }
}
The blink source file
Finally we’re ready to create the source file that will execute the blink test. Create a new C++ source file in eclipse, call it ‘blink.cpp. Here it is:
/*
 * This file is a part of the open source stm32plus library.
 * Copyright (c) 2011,2012 Andy Brown <www.andybrown.me.uk>
 * Please see website for licensing terms.
 */

#include "config/stm32plus.h"
#include "config/gpio.h"
#include "config/timing.h"

using namespace stm32plus;

/**
 * This is the most basic example that uses GPIO and the Systick timer
 * to blink a LED on PF6 at 1Hz.
 *
 * If the STM32F4DISCOVERY board is your target then change the GPIO declation to...
 *
 *  GpioD<DefaultDigitalOutputFeature<13> > pd
 *
 * ... and change 2 of "pf[6]" to "pd[13]" to blink the orange led on the discovery board.
 *
 * Compatible MCU:
 *   STM32F1
 *   STM32F4
 *
 * Tested on devices:
 *   STM32F103ZET6
 *   STM32F407VGT6
 */

class Blink {

  public:

    void run() {

      // initialise the pin for output

      GpioF<DefaultDigitalOutputFeature<6> > pf;

      // loop forever switching it on and off with a 1 second
      // delay in between each cycle

      for(;;) {

        pf[6].set();
        MillisecondTimer::delay(1000);

        pf[6].reset();
        MillisecondTimer::delay(1000);
      }
    }
};


/*
 * Main entry point
 */

int main() {

  // set up SysTick at 1ms resolution
  MillisecondTimer::initialise();

  Blink blink;
  blink.run();

  // not reached
  return 0;
}
This sample introduces a few core stm32plus features:
The MillisecondTimer class. Use the static methods on this class to perform millisecond resolution timings. You must call the initialise static member function once so that the cortex SysTick timer is started.
GPIO port and pin manipulation through the GpioF and DefaultDigitalOutputFeature templates. Note how you can address the pins using the convenient [] array operator. The example configures GpioF with a digital output pin on #6. This is a very simple example that can be easily extended. For example you can configure DefaultDigitalOutputFeature with a list of pin numbers to configure many in one go.
You can also configure input pins and alternate function pins by adding more parameters to the template, for example:
GpioF<
  DefaultDigitalOutputFeature<0>,
  DigitalOutputFeature<GPIO_Speed_10MHz,Gpio::OPEN_DRAIN,Gpio::PUPD_NONE,1,2,3>,
  DefaultDigitalInputFeature<4,5,6>,
  DefaultAlternateFunctionFeature<GPIO_AF_FSMC,11>
  > pf;
This contrived example shows how you can initialise lots of pins in different configurations, all in one statement. What you get on port F from this configuration is:
- Output pin 0 at 50MHz, push-pull, no pull-up/down.
- Output pins 1,2,3 at 10MHz, open-drain, no pull-up/down.
- Input pins 4,5,6 at 50MHz, no pull-up.
- FSMC alternate function pin 11, push-pull, no pull-up/down.
The concept of feature templates being used to construct a mixin object is heavily re-used throughout stm32plus so that the only code that is generated is the code that is specific to your application. This is good for both efficiency and code size.
Reporting bugs
If you think you’ve found a bug then I’ll certainly fix it. Please use my bugzilla installation to submit a bug report. You can also use bugzilla to browse the status of other bugs that have been found and enhancements that I’m planning.
Browse the example code online
Click here to browse all the example code in one easy to search web page.
License
Copyright (c) 2011, 2012, 2013 Andrew Brown. All rights reserved.
Redistribution and use in source and binary forms, with or without
modification, are permitted provided that the following conditions are met:
-
Redistributions of source code must retain the above copyright notice, this list of conditions and the following disclaimer.
-
Redistributions in binary form must reproduce the above copyright notice, this list of conditions and the following disclaimer in the documentation and/or other materials provided with the distribution.
-
Neither the name of stm32plus nor the names of its contributors may be used to endorse or promote products derived from this software without specific prior written permission.
THIS SOFTWARE IS PROVIDED BY THE COPYRIGHT HOLDERS AND CONTRIBUTORS “AS IS” AND ANY EXPRESS OR IMPLIED WARRANTIES, INCLUDING, BUT NOT LIMITED TO, THE IMPLIED WARRANTIES OF MERCHANTABILITY AND FITNESS FOR A PARTICULAR PURPOSE ARE DISCLAIMED. IN NO EVENT SHALL ANDREW BROWN BE LIABLE FOR ANY DIRECT, INDIRECT, INCIDENTAL, SPECIAL, EXEMPLARY, OR CONSEQUENTIAL DAMAGES (INCLUDING, BUT NOT LIMITED TO, PROCUREMENT OF SUBSTITUTE GOODS OR SERVICES; LOSS OF USE, DATA, OR PROFITS; OR BUSINESS INTERRUPTION) HOWEVER CAUSED AND ON ANY THEORY OF LIABILITY, WHETHER IN CONTRACT, STRICT LIABILITY, OR TORT (INCLUDING NEGLIGENCE OR OTHERWISE) ARISING IN ANY WAY OUT OF THE USE OF THIS SOFTWARE, EVEN IF ADVISED OF THE POSSIBILITY OF SUCH DAMAGE.