


512Kb SRAM expansion for the Arduino Mega (design)
Often when prototyping with an Arduino you run into the memory limitations inherent in a microcontroller programming environment. The Arduino Mega series goes a long way to solving the program size issues, offering as it does 128Kb and 256Kb formats. But what about the SRAM? Even the mega only comes with a very small 8Kb allocation.
Thankfully the mega series comes with the ability to add additional SRAM that your programs can seamlessly access as if it were internal to the microcontroller itself. This article will explain the hardware side of the memory expansion project. The next in the series will present the software tweaks that you can use to exploit your new-found freedom to code.
xmem
The ATmega1280 datasheet [warning: PDF] contains all the documentation that an engineer needs to expand the memory. It’s in chapter 9: ‘external memory interface’.
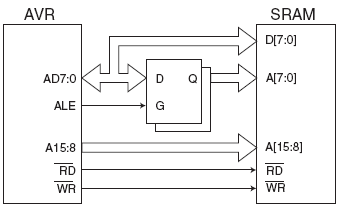
Block diagram of the xmem interface. The block in the center is a high-speed 8-bit latch.
The above diagram is lifted from the datasheet and shows how the microcontroller interfaces with an external memory. The most interesting part about the above diagram is the block in the center which represents a high-speed 8-bit latch.
Multiplexing and the latch
The Arduino Mega can address 64K of external memory with 8-bit data transfers. Ordinarily this would require a lot of pins: 16 for the address lines, 8 for the data lines plus another 2 at least for the control lines.
To cut down on this requirement the ATmega multiplexes the lower 8 address lines with the 8 data lines, saving on 8 pins. It does this by using an 8-bit latch that you supply, and it works because the memory transactions look like this:
![]()
The memory transaction timing
The time period indicated in red shows the gap in between the address lines being valid (valid data on A0..A15) and the data transfer starting (valid data on D0..D7). The logic in the ATmega starts a memory transaction by asserting a valid address on A0..A15. The multiplexed lines A0..A7 pass straight through the latch which is set to transparent mode. Then the latch is placed into hold mode where it ignores its inputs and continues to assert the last data it saw on its outputs. The ATmega then sets valid data on the multiplexed lines and bingo, we have successfully set up all the lines for the memory transaction and saved 8 pins in the process.
When choosing a latch we must ensure that it is fast enough to cope with the 16Mhz core clock of the Arduino. 74HC series latches are too slow. The datasheet recommends that we use the 74AHC series.
Addressing more than 64K
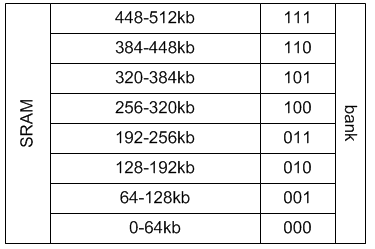
If you’ve got this far you’re probably wondering how I’m going to squeeze 512Kb into a 64Kb address space. The answer is to split the 512Kb into 8 banks of 64Kb and control which bank is visible at any one time by using 3 Arduino GPIO pins.
512Kb requires 19 bits of address space mapped to address lines A0..A18. I will connect A0..15 through the xmem interface and control the high bits A16..A18 using Arduino digital pins
Memory banks and the SRAM
A further limitation of the ATmega memory map is that the lower 8Kb of SRAM will always be occupied by the internal memory on the MCU. That means that we will be addressing external memory only in the range 0x2200 to 0xFFFF. This represents a total loss of 69632 bytes from the theoretical total of 524288 held by the SRAM. The datasheet does explain a method of making this ‘lost’ 8Kb addressable but it’s a bit of a hack and not really worth it IMHO.
Pin mappings
Here’s how the Arduino maps the xmem pins. As you can see they’re all conveniently placed in a block at the end of the board. That will make it easy for me to design a PCB that just plugs straight in. Thanks go out from me to the Arduino designers for thinking of this.
| Arduino | AVR | SRAM | 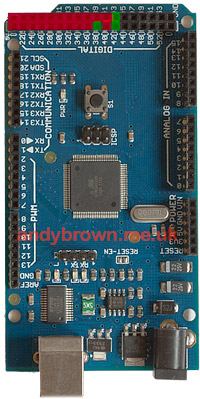 |
|---|---|---|---|
| 22 | AD0/PA0 | D0 | |
| 23 | AD1/PA1 | D1 | |
| 24 | AD2/PA2 | D2 | |
| 25 | AD3/PA3 | D3 | |
| 26 | AD4/PA4 | D4 | |
| 27 | AD5/PA5 | D5 | |
| 28 | AD6/PA6 | D6 | |
| 29 | AD7/PA7 | D7 | |
| 30 | A15/PC7 | A15 | |
| 31 | A15/PC6 | A14 | |
| 32 | A15/PC5 | A13 | |
| 33 | A15/PC4 | A12 | |
| 34 | A15/PC3 | A11 | |
| 35 | A15/PC2 | A10 | |
| 36 | A15/PC1 | A9 | |
| 37 | A15/PC0 | A8 | |
| 38 | PD7/T0 | BANK0 | |
| 39 | ALE | latch enable | |
| 40 | /RD/PG1 | /RD | |
| 41 | /WR/PG0 | /WR | |
| 42 | PL7 | BANK1 | |
| 43 | PL6 | BANK2 |
The pins overlaid in red are used by the xmem interface, those in green will be used by me to control the active memory bank.
External Memory Registers
The datasheet documents two external memory registers in section 9.4, XMCRA and XMCRB.
Bit 7 (SRE) of XMCRA enables the external memory function. When you set this bit the external memory interface becomes active and the respective data and address pins are no longer available for GPIO. The other bits in XMCRA allow us to define wait states if our memory is too slow for the processor clock. I have specifically selected 12ns SRAM for this design so that we can run at maximum speed with zero wait states.
The main function of XMCRB is to allow us to release some of the address pins for GPIO if we are adding less than 64K expanded memory. That’s a nice function to have and shows foresight on the part of the ATmel designers, but we’re clearly going to need all those address lines!
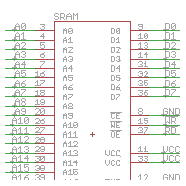
Eagle schematic
Here’s the full schematic that I created using the free version of the Eagle PCB CAD design program.
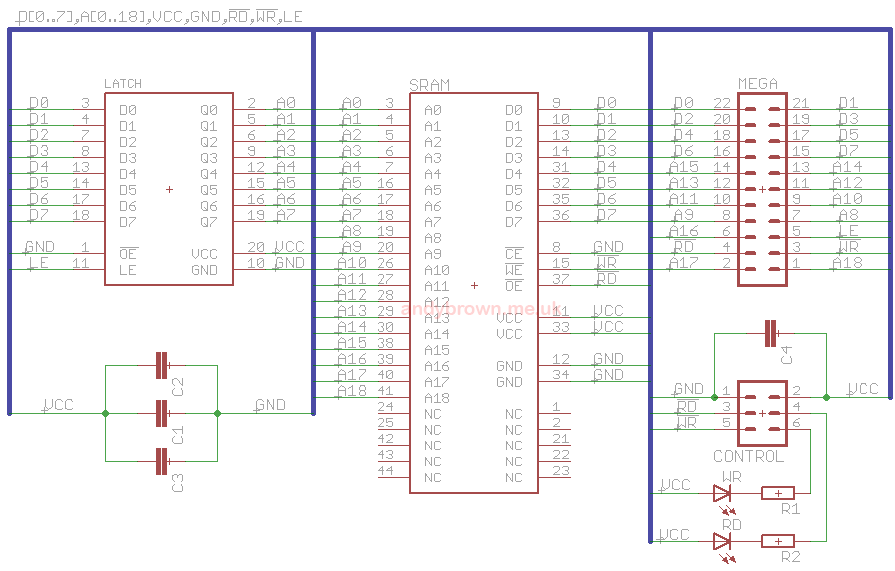
Eagle schematic. Click for larger.
The schematic reflects the block diagram in the datasheet with the addition of 100nF capacitors around the power pins of the ICs and one 1µF across the board supply.
I have also added a LED each to the active-low /WR and /RD control lines so that reads and writes to the SRAM will be visible if enough happen in succession – a single read/write is so fast that the LED will not flash for long enough to be visible. These LEDs can be enabled with a jumper or disabled if I feel that I can’t afford the 7mA of current that they consume while active.
Other articles in this series
| 512Kb SRAM expansion for the Arduino Mega (build) |
| 512Kb SRAM expansion for the Arduino Mega (software) |
Schematics, PCB CAD and Gerbers
I don’t have any more boards left to sell, but you can now print and build your own by downloading the package from my downloads page. Good luck!
Pingback: Expanded Memory For The Teensy++ 2.0()
Pingback: Expanded Memory For The Teensy++ 2.0 | Hack The Planet()