


From zero to a C++ STM32 development environment
It’s been a while since I wrote an article about my stm32plus C++ library for the STM32 series of MCUs so I thought I’d combine a long overdue catchup with a step-by-step tutorial that will show you how to set up a completely free and unrestricted STM32 development environment from scratch. I’ll cover setting up the graphical Eclipse IDE as well as a command line environment. The development environment will include an installation of my stm32plus library that makes it easier to access the STM32 peripherals using C++ programming techniques.
I’ll be covering Windows 7 in this article and Ubuntu Linux in a followup. I’ll be running the tutorials myself inside a fresh installation of each of the operating systems to ensure that no steps are missed and by the time we’re done you’ll have a free and modern development system ready to write and debug code for the STM32 MCU family.
I’m using the 64-bit version of Windows in this tutorial but the same steps apply if you’re using the 32-bit version and where a choice exists between installing a 32 or 64 bit version of something I’ll make it clear which one I’m using.
Step 1: Install Cygwin
Cygwin is an ambitious open-source project designed to replicate a Posix command-line environment as close as can be done on Windows. I’ve used it for as long as I can remember and, although it’s not without it’s limitations, I could not do without it. The first thing I do after powering up my Windows system is to open up a cygwin xterm.
Visit the Cygwin website and download and run the setup executable. I’ll be running the 32-bit version which works just as well on 64-bit Windows.
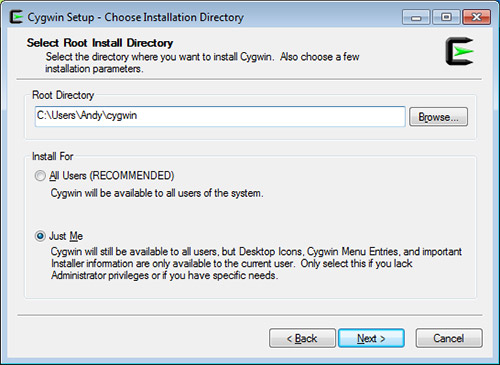
At the first screen I chose the options that don’t require Admin rights. The cygwin package will be installed into my home directory and it’ll be set up for my use only.
Click through the installer until you get to the page that asks you which packages you want to install. We need to add a few extra packages to the default so that we can get a coherent and comfortable development environment. To install a package, click on the little rotating arrows icon next to the name. Change the following packages to be installed:
Devel/git
Devel/scons
Net/openssh
Net/inetutils
Net/curl
Archive/zip
Archive/unzip
Archive/pbzip2
Archive/p7zip
Archive/xz
X11
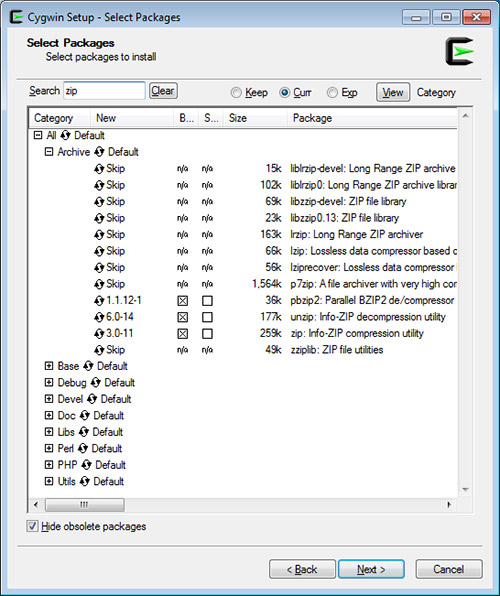
Be careful if using the ‘Search’ box at the top of the screen because it seems to have a bug that causes it to clear the installed status of any top level packages such as ‘X11’.
You’ll get the ‘vim’ editor by default and I deliberately haven’t specified any additional editors in the above package list because editors are a very personal preference. Cygwin does offer a selection of additional editors so if ‘vim’ isn’t your cup of tea then have a look at the alternatives. You can of course use any of your Windows-based editors as long as they support Unix (LF) line endings. My personal favourite is currently Sublime Text.
When you’ve got all of the above selected, continue with the installation. It’ll take quite a while to download and install. The great thing about the installer is that you can re-run it at any time afterwards to add or remove packages and it’ll automatically upgrade any components for you as well.
Prepare and personalize cygwin
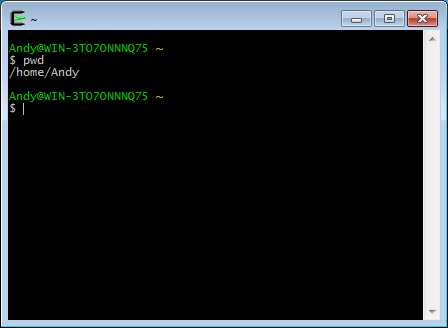
Cygwin’s basic installation will plonk a ‘Cygwin Terminal’ icon on your desktop. Go ahead and run it. You’ll get a fairly decent terminal that looks like this:
I prefer the X-Windows system and its ‘xterm’ terminal and I’m going to show you how to get that working.
- Navigate an explorer to the cygwin ‘bin’ directory. For me that’s ‘c:\Users\Andy\cygwin\bin’.
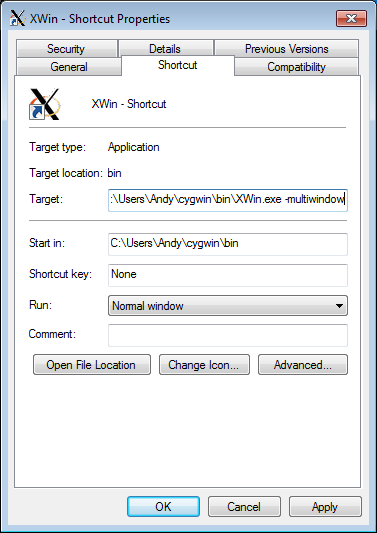
- Locate ‘XWin.exe’ and drag it to the desktop with the right mouse button. Choose ‘Create shortcut here’ from the menu that appears when you let go of the mouse button.
- Right-click on the new shortcut and choose ‘Properties’. Append ‘-multiwindow’ to the text in the ‘Target’ field.
Double-click on your new ‘XWin’ shortcut. Nothing will appear to happen except that you should now see a little ‘XWin’ icon down in the taskbar tray area that indicates that XWin is running. XWin must be running in the background like this before you can start any client programs such as ‘xterm’.
![]()
Now we’ll create a shortcut to the xterm terminal program. Right-click on the desktop and choose ‘New -> Shortcut’. In the box that appears paste this line, changing the pathname of ‘run.exe’ to match your system:
C:\Users\Andy\cygwin\bin\run.exe /bin/xterm.exe -display :0 -ls -sb +tb -fg cornsilk -bg #404040
Click through the rest of the wizard and give the shortcut any name you like. Now run the shortcut and you should see something like this.
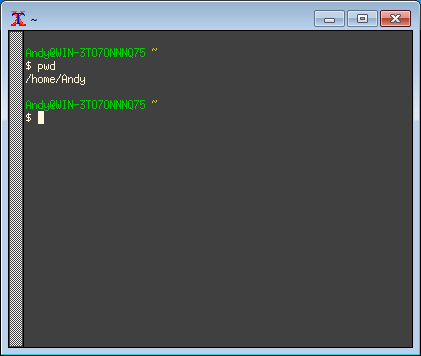
If you don’t like the colour scheme then simply change the ‘fg’ (foreground) and ‘bg’ (background) options in the shortcut.
Step 2: Install the ARM EABI g++ compiler
Some enterprising engineers at ARM have decided to maintain a free distribution of the gcc/g++ compiler package for ARM EABI. It contains everything you need to compile STM32 programs and is very up-to-date so we’re going to use it. Navigate to the website and download the Windows zip package.
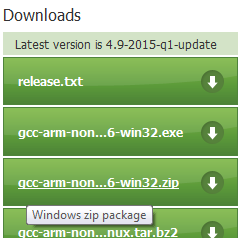
When it’s finished downloading we’ll unzip it using our new cygwin xterm:
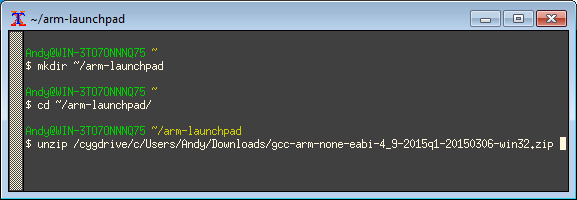
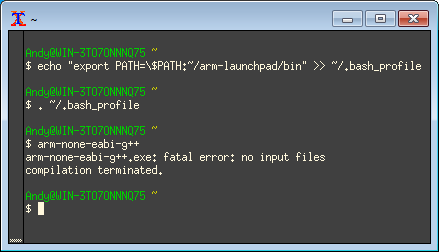
Note the /cygdrive/c/ prefix. That’s how cygwin converts drive letters into paths that are useable by the Unix tools. Now we’ll add the compiler tools to our PATH environment variable so that it’s always there when we need it.
Step 3: Install java
The Eclipse IDE is written in Java so we need to install the runtime environment (JRE). Head to the java website and install the latest version that’s on offer. Note that the big button on the javasoft home page will install the 32-bit edition. If you’re running 64-bit windows then you need to download and run the offline installer. You can find it on this page. This is important because the bitness of java must match the bitness of Eclipse that we’ll install in the next step.
Warning! A poor commercial decision made by Sun in the early days and inherited by Oracle means that the java installer is bundled with some crapware that will interfere with your web browser and downgrade your search engine. Be careful when you navigate through the installer and come across this page.
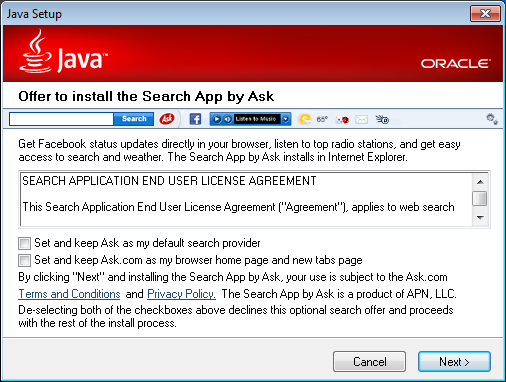
Be sure to uncheck the two options that are of course checked by default to trap the unwary.
Step 4: Install the Eclipse CDT
Eclipse is a powerful IDE that will allow us to edit, compile and debug all in one place with syntax highlighting, code refactoring and intelligent navigation. Navigate to the Eclipse downloads page and choose the latest version for ‘Eclipse Kepler’. The reason for choosing Kepler over the newer versions is that we need to stay compatible with the plugins that we’re going to use and at the time of writing the GNU ARM Plugin is most compatible with Kepler.
This is the link for the Windows x64 version and this is the link for the Windows 32-bit version.
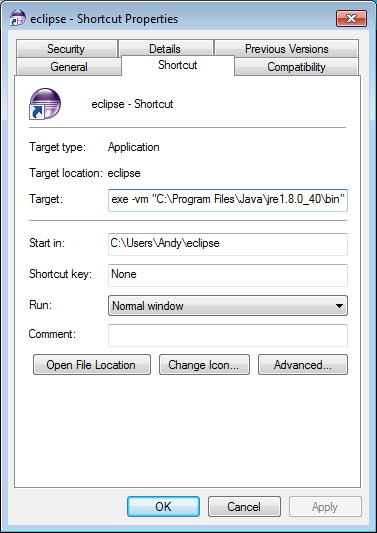
Eclipse is delivered in a large zip file. When it’s downloaded, extract it to your Windows profile home directory. When it’s complete I have a new ‘c:\Users\Andy\eclipse’ directory. Navigate an explorer to your equivalent of ‘C:\Users\Andy\eclipse’ and locate ‘eclipse.exe’. Drag it with the right mouse button to your desktop and choose ‘Create shortcut here’. Right-click on the shortcut and choose ‘Properties’. Append a ‘-vm’ option that points to your java installation like this:
Now you can double-click on the eclipse shortcut and it will load up. The first time it loads you’ll get asked where you want the workspace location to be.
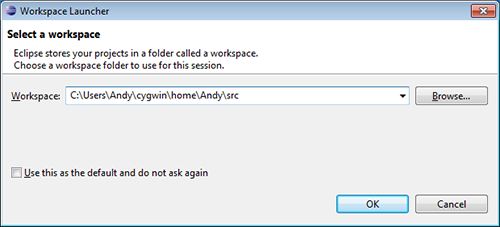
The workspace directory is where eclipse will search for all your projects. This is the root directory for your source code so I’m changing it to a location within my cygwin home.
We’re now ready to install the GNU ARM Eclipse plugin.
Step 5: Install the GNU ARM Eclipse plugin
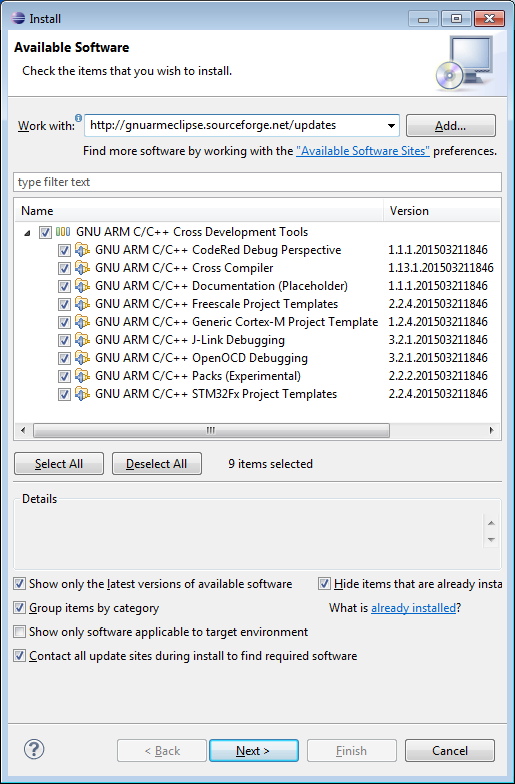
Select the ‘Help/Install new software’ menu option. In the form that appears, paste this URL into the ‘Work with’ box and press enter:
http://gnuarmeclipse.sourceforge.net/updates
The dialog box will update itself with the contents of the plugin.
Click your way through the installer and wait for it to finish. Eclipse will want to restart itself when the plugin is installed.
Now we need to install the ‘Build Tools’ package for Windows. We need this because the plugin uses the ‘make’ and ‘rm’ commands to build projects and neither of these are available in Windows. The current location of the tools is here. Follow the instructions on that page to install the package. In keeping with our Cygwin-based setup I changed the installation directory to ‘C:\Users\Andy\cygwin\home\Andy\install\build-tools’.
Now go to the Project menu and uncheck “Build Automatically”. That’s a useful option for java development but less so for C++ and it’ll just annoy you by attempting a build each time you save a file.
Finally we need to tell Eclipse where the toolchain files are. Go to ‘Window/Preferences’ and open up ‘C/C++/Build/Global Tools Paths’. Fill in the directory containing the build tools in the first field and the directory containing ‘arm-none-eabi-g++’ and others in the second field.

Click for larger
Your development environment is now complete and the next steps will walk you through getting started with the stm32plus library.
Step 6: Create an stm32plus project
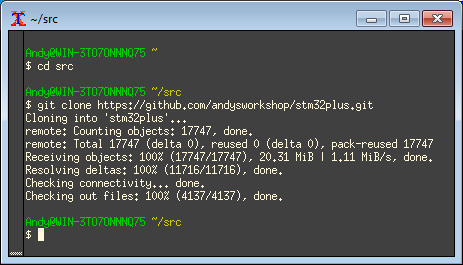
In this project I’m going to help you to create a classic ‘blink’ project that will run on the STM32 F4 Discovery board. The first step is to check out and build the stm32plus library. If you haven’t already got an xterm open then do that now and enter the following commands:
cd ~/src
git clone https://github.com/andysworkshop/stm32plus.git
It’ll look like this:
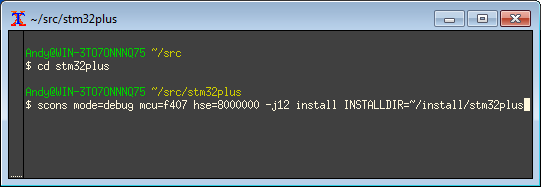
Before getting into the Eclipse setup let’s build stm32plus inside the terminal for the F4. This build that we’ll perform using ‘scons’ is independent from the build that we’ll use in Eclipse. This is the command line that we’ll use for the build:
scons mode=debug mcu=f407 hse=8000000 -j12 install INSTALLDIR=~/install/stm32plus
Change into the stm32plus subdirectory and run the command. The options we use specify that we’re doing a debug build targetting the STM32F407 MCU with an 8MHz external oscillator and we’d like the output from the build installed into ~/install/stm32plus. The -j12 option tells scons to execute a parallel build using a maximum of 12 jobs. You should change the number 12 to be approximately the number of cores that you have in your computer.
After a few minutes of building you’ll be left with the stm32plus library and examples installed into the ~/install/stm32plus directory. Now we’ll move on to the process of building and editing your projects in Eclipse.
Run Eclipse if you haven’t already done so and navigate to the ‘File/Import…’ option. Select ‘General/Existing Projects into Workspace’ Click ‘Next’ and you’ll be presented with the ‘Import Project’ dialog. Click ‘Browse’ and choose the ‘stm32plus’ subdirectory from your Cygwin ‘src’ directory. Eclipse will automatically find all the stm32plus project files. There’s one for the library and one each for the many, many example projects.
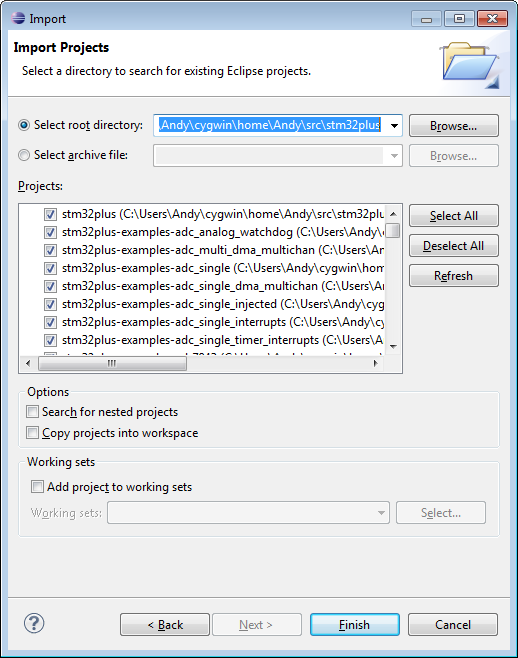
Click ‘Finish’ and Eclipse will do its thing and import all the projects. You can see them in the ‘Project Explorer’.
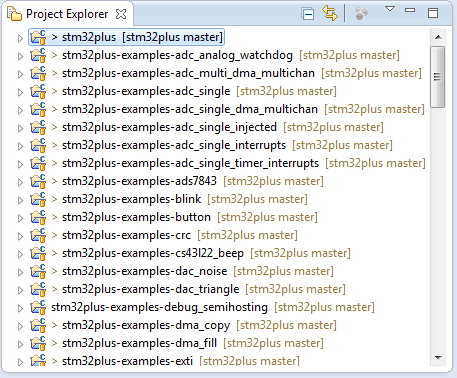
We’ll build the library first. It’s the first in the project explorer list (highlighted in the image above). Right-click on the project and select ‘Build Configurations/Set Active/Debug_f407_168_8’. This ensures that we’ll target the STM32F407 that’s included on the discovery board.
Right-click on the project again and choose ‘Build Project’. The build will start and a progress dialog will appear. I recommend that you choose ‘Run in background’ and select the ‘Always run in background’ option. You can then select the ‘Console’ tab at the bottom of the IDE to see the build output. This is where any errors will be reported so it’s a very important view to have open.
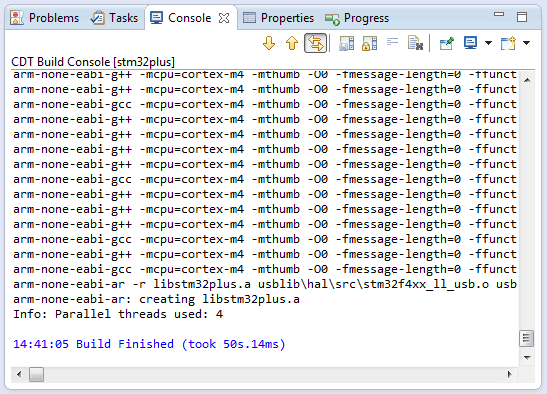
A successful build will result in console output similar to the image above. Now that you’ve built the stm32plus library, let’s build the blink example just to round things off. Locate the ‘stm32plus-examples-blink’ project in the project explorer, right-click and change the build configuration to ‘Debug_f407_168_8’ just like you did for the main library. Again, right click on the project and choose ‘Build Project’. You’ll see output like this:
16:54:31 **** Build of configuration Debug_f407_168_8 for project stm32plus-examples-blink ****
make all
Building file: ../system/f407_168_8/Startup.asm
Invoking: Cross ARM GNU Assembler
arm-none-eabi-gcc -mcpu=cortex-m4 -mthumb -O0 -fmessage-length=0 -ffunction-sections -fdata-sections -Werror -Wall -Wextra  -g3 -x assembler-with-cpp -DSTM32PLUS_F407 -DHSE_VALUE=8000000 -I"C:\Users\Andy\cygwin\home\Andy\src\stm32plus\lib" -I"C:\Users\Andy\cygwin\home\Andy\src\stm32plus\lib\include" -I"C:\Users\Andy\cygwin\home\Andy\src\stm32plus\examples\blink" -MMD -MP -MF"system/f407_168_8/Startup.d" -MT"system/f407_168_8/Startup.o" -c -o "system/f407_168_8/Startup.o" "../system/f407_168_8/Startup.asm"
Finished building: ../system/f407_168_8/Startup.asm

Building file: ../system/f407_168_8/System.c
Invoking: Cross ARM C Compiler
arm-none-eabi-gcc -mcpu=cortex-m4 -mthumb -O0 -fmessage-length=0 -ffunction-sections -fdata-sections -Werror -Wall -Wextra  -g3 -DSTM32PLUS_F407 -DHSE_VALUE=8000000 -I"C:\Users\Andy\cygwin\home\Andy\src\stm32plus\lib" -I"C:\Users\Andy\cygwin\home\Andy\src\stm32plus\lib\include" -I"C:\Users\Andy\cygwin\home\Andy\src\stm32plus\examples\blink" -std=gnu11 -MMD -MP -MF"system/f407_168_8/System.d" -MT"system/f407_168_8/System.o" -c -o "system/f407_168_8/System.o" "../system/f407_168_8/System.c"
Finished building: ../system/f407_168_8/System.c

Building file: ../system/LibraryHacks.cpp
Invoking: Cross ARM C++ Compiler
arm-none-eabi-g++ -mcpu=cortex-m4 -mthumb -O0 -fmessage-length=0 -ffunction-sections -fdata-sections -Werror -Wall -Wextra  -g3 -DSTM32PLUS_F407 -DHSE_VALUE=8000000 -I"C:\Users\Andy\cygwin\home\Andy\src\stm32plus\lib" -I"C:\Users\Andy\cygwin\home\Andy\src\stm32plus\lib\include" -I"C:\Users\Andy\cygwin\home\Andy\src\stm32plus\lib\include\stl" -I"C:\Users\Andy\cygwin\home\Andy\src\stm32plus\examples\blink" -std=gnu++0x -fabi-version=0 -fno-exceptions -fno-rtti -pedantic-errors -fno-threadsafe-statics -MMD -MP -MF"system/LibraryHacks.d" -MT"system/LibraryHacks.o" -c -o "system/LibraryHacks.o" "../system/LibraryHacks.cpp"
Finished building: ../system/LibraryHacks.cpp

Building file: ../blink.cpp
Invoking: Cross ARM C++ Compiler
arm-none-eabi-g++ -mcpu=cortex-m4 -mthumb -O0 -fmessage-length=0 -ffunction-sections -fdata-sections -Werror -Wall -Wextra  -g3 -DSTM32PLUS_F407 -DHSE_VALUE=8000000 -I"C:\Users\Andy\cygwin\home\Andy\src\stm32plus\lib" -I"C:\Users\Andy\cygwin\home\Andy\src\stm32plus\lib\include" -I"C:\Users\Andy\cygwin\home\Andy\src\stm32plus\lib\include\stl" -I"C:\Users\Andy\cygwin\home\Andy\src\stm32plus\examples\blink" -std=gnu++0x -fabi-version=0 -fno-exceptions -fno-rtti -pedantic-errors -fno-threadsafe-statics -MMD -MP -MF"blink.d" -MT"blink.o" -c -o "blink.o" "../blink.cpp"
Finished building: ../blink.cpp

Building target: stm32plus-examples-blink.elf
Invoking: Cross ARM C++ Linker
arm-none-eabi-g++ -mcpu=cortex-m4 -mthumb -O0 -fmessage-length=0 -ffunction-sections -fdata-sections -Werror -Wall -Wextra  -g3 -T "C:\Users\Andy\cygwin\home\Andy\src\stm32plus\examples\blink/system/f407_168_8/Linker.ld" -Xlinker --gc-sections -L"C:\Users\Andy\cygwin\home\Andy\src\stm32plus\lib\Debug_f407_168_8" -Wl,-Map,"stm32plus-examples-blink.map" -Wl,-wrap,__aeabi_unwind_cpp_pr0 -Wl,-wrap,__aeabi_unwind_cpp_pr1 -Wl,-wrap,__aeabi_unwind_cpp_pr2 -o "stm32plus-examples-blink.elf"  ./system/f407_168_8/Startup.o ./system/f407_168_8/System.o  ./system/LibraryHacks.o  ./blink.o   -lstm32plus
Finished building target: stm32plus-examples-blink.elf

Invoking: Cross ARM GNU Create Flash Image
arm-none-eabi-objcopy -O ihex "stm32plus-examples-blink.elf"   "stm32plus-examples-blink.hex"
Finished building: stm32plus-examples-blink.hex

Invoking: Cross ARM GNU Create Listing
arm-none-eabi-objdump --source --all-headers --demangle --wide -h -S "stm32plus-examples-blink.elf" > "stm32plus-examples-blink.lst"
Finished building: stm32plus-examples-blink.lst

Invoking: Cross ARM GNU Print Size
arm-none-eabi-size --format=berkeley "stm32plus-examples-blink.elf"
   text	   data	    bss	    dec	    hex	filename
   4612	   2128	   1116	   7856	   1eb0	stm32plus-examples-blink.elf
Finished building: stm32plus-examples-blink.siz


16:54:33 Build Finished (took 1s.606ms)
Your edit/build environment is complete. You can now build from a terminal using scons and you can build from Eclipse. Let’s move on to creating a project of your own that references the stm32plus library.
Step 7: Creating a project of your own
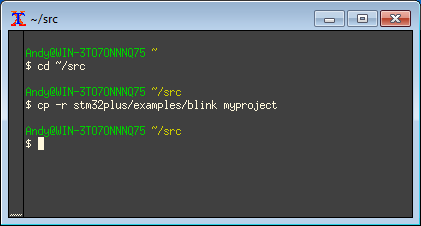
It’s possible to create a project from scratch in Eclipse using wizards and stuff like that but I’ll teach you a little shortcut that can have a new project up and running in seconds by cloning an existing project. We’ll create a project called ‘myproject’ by duplicating the ‘blink’ example and making a few basic edits.
From your terminal, duplicate the project like this:
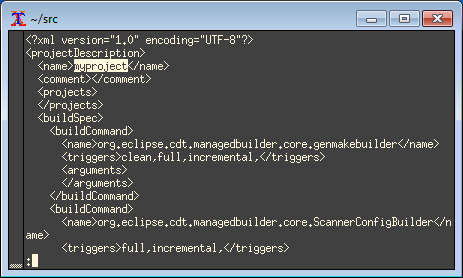
Now use your favourite text editor to edit ‘myproject/.project’ and change the name in the XML to ‘myproject’ as shown in the highlighted text below.
That’s all you need to do outside Eclipse. Save your changes and use the Eclipse ‘File/Import’ and ‘General/Existing project into workspace’ option to bring this new project into your workspace.
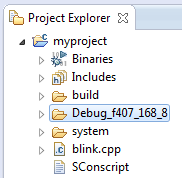
As a bit of housekeeping, you should delete any previous output directories that came over with the project copy. In the image above I highlighted the Debug_f407_168_8 directory and pressed the Del key to delete it from disk.
To prove that it works, right-click on the project in the project explorer, ensure that the ‘Debug_f407_168_8’ build configuration is active and then choose ‘Build project’. It should build with no errors.
Now we’ve got as far as creating a skeleton project that you can use as a springboard for building your own project let’s take it to the next level and do some integrated debugging.
Step 8: Install OpenOCD
Debugging a high-level language such as java, C# or even C++ in a modern IDE is a seamless experience and you’re probably unaware of how it’s done behind the scenes. Debugging an ARM binary that’s running outside your PC on a development board is not quite so integrated and it helps to understand the basics of what’s going on.
On the discovery board hardware debug support is provided by a peripheral called ‘ST-Link v2’ whose logic is burned into an STM32F103 that you can see on the board near the USB connector. The code in this MCU is able to issue the commands that halt the main processor and enable single stepping through instructions and reading register values.
Eclipse cannot talk directly to the ST-Link; it doesn’t know how, and nor does the GNU ‘gdb’ debugger. That magic is provided by a debug server called ‘OpenOCD’. OpenOCD is an open source server process that is able to receive commands from ‘gdb’ and convert them internally to the ST-Link Serial Wire Debug (SWD) protocol to send to the discovery board. Eclipse will run gdb. gdb will talk to OpenOCD and openOCD will talk to the ST-Link chip. If it sounds convoluted then you’re right, it is, but it’s easy to set up and work with.
Freddie Chopin, public spirited chap that he is, has made precompiled OpenOCD binaries available for Windows at his website. Download the prepackaged binary and use your terminal to extract it like this:
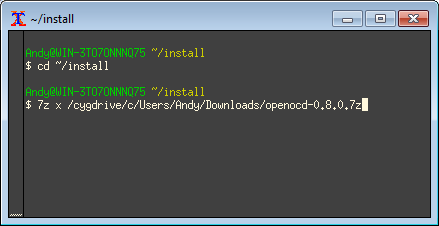
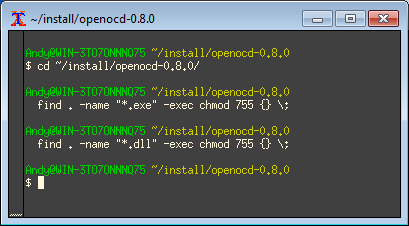
On my system the file extract did not set the executable bit on the ‘exe’ and ‘dll’ files in the archive so I had to correct that like this:
Now it’s time to plug your F4 discovery board into your PC. Attach it using the mini-B connector, not the micro-B connector. If this is the first time that you’ve done it then you’ll get the following unhappy message:
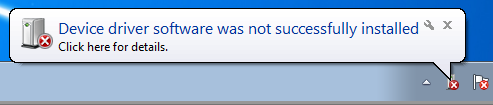
If at some time in the past you installed the official ST driver then you won’t get the fail message but the procedure is the same. What we need to do is replace the Windows driver with the open source ‘libusb’ driver. This process is completely reversible so don’t worry about not being able to go back to using ST’s client software.
The utility that we require is called ‘zadig’ and can be downloaded from the official website. It doesn’t have an installer, just download and run the binary.
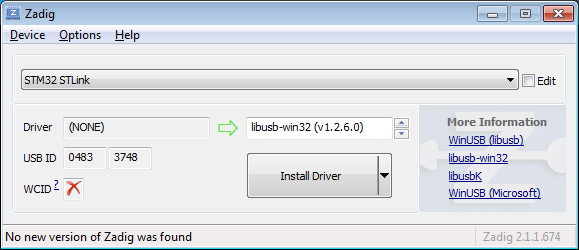
The image shows the options that you should select. Just hit ‘Install Driver’ and it’s done.
Optional: Run OpenOCD as a server
You can skip this step if you want to only debug in Eclipse. I just thought I’d explain how to start OpenOCD as a server process and how to connect to it and flash hex images from outside an IDE.
The package that you downloaded contains both the 64-bit and 32-bit versions. You must run the version that matches the bitness of your operating system. I’m going to run the server in a bog standard windows command prompt. You should automate this into a batch file so you can just double-click an icon to start OpenOCD.
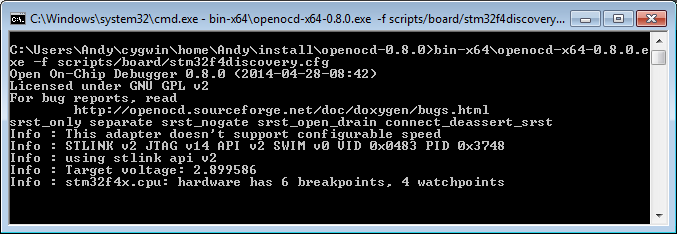
Windows firewall will probably ask if it’s OK to allow OpenOCD to start as a server. Say yes. OpenOCD will then just sit there waiting to be contacted and given orders. The command to start OpenOCD on a 64-bit system, when executed from the ‘openocd-0.8.0’ directory is:
bin-x64\openocd-x64-0.8.0.exe -f scripts/board/stm32f4discovery.cfg
For 32-bit users the command is almost the same, we just remove the ‘x64’ parts:
bin\openocd-0.8.0.exe -f scripts/board/stm32f4discovery.cfg
The server is listening on port 4444 for interactive sessions. If you’ve built yourself a hex file then you can flash it to the debugger with a telnet session. Here’s an example where I halt the processor, flash a new image and then reset the processor to make it run the new program.
$ telnet localhost 4444
Trying 127.0.0.1...
Connected to localhost.
Escape character is '^]'.
Open On-Chip Debugger
> reset init
target state: halted
target halted due to debug-request, current mode: Thread
xPSR: 0x01000000 pc: 0x080001e4 msp: 0x20020000
> flash write_image erase C:/Users/Andy/cygwin/home/Andy/src/myproject/build/debug-f407-8000000/blink.hex
auto erase enabled
wrote 16384 bytes from file C:/Users/Andy/cygwin/home/Andy/src/myproject/build/debug-f407-8000000/blink.hex in 5.881210s (2.721 KiB/s)
> reset
If you want to run a debug session from within the Eclipse IDE then you used to have to have an OpenOCD server session open like this in the background, but not any more…
Step 9: Debugging from within Eclipse
The GNU ARM plugin author has done some excellent work to integrate OpenOCD debugging into the IDE. Eclipse will take care of starting and stopping OpenOCD without you having to know about it. Let’s configure a debug session now.
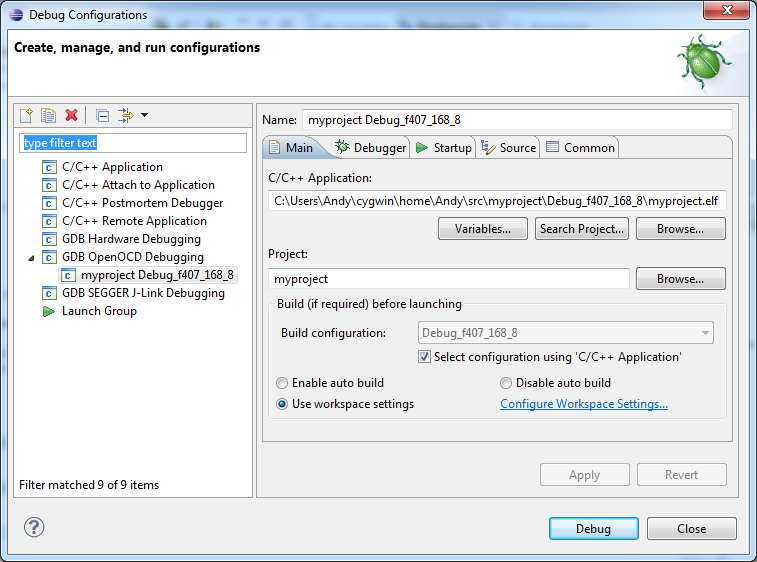
Select the ‘Run/Debug Configurations’ option. A form will appear. Right-click on the ‘GDB OpenOCD Debugging’ option and select ‘New’ from the menu that pops up.
Click for larger
There are a few tabs to deal with here. Firstly, on the ‘Main’ tab, fill in the ‘C/C++ Application’ field to point to the .elf file produced by building ‘myproject’. If the ‘Project’ field wasn’t already set to ‘myproject’ then make it so.
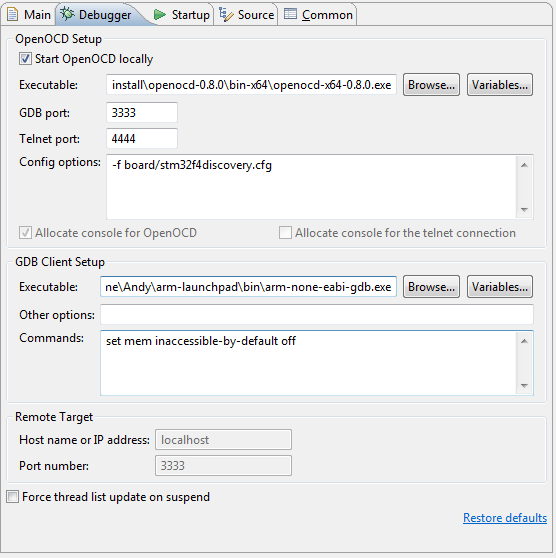
Here’s the ‘Debugger’ tab. Set it up like I’ve done in the image, adjusting the ‘Executable’ locations for OpenOCD and arm-none-eabi-gdb.exe to wherever you installed them. Be careful to get the 32/64 bit version of OpenOCD that matches your OS.
Note also the ‘Config options’. I’ve picked the correct options for the F4 discovery board. If you are working with a different board then explore the ‘board’ directory to find the correct .cfg file for you.
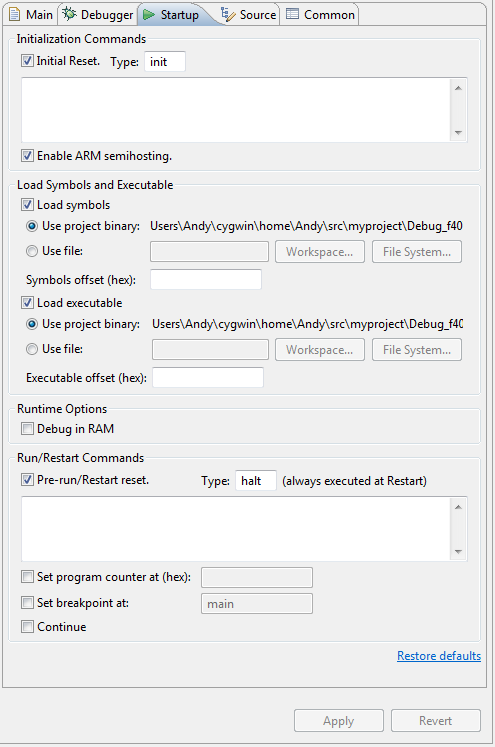
The last tab that we need to edit is the ‘Startup’ tab. Change yours to match the image above. Let’s get debugging! Hit the Debug button and wait a few seconds while Eclipse asks OpenOCD to flash your executable to the discovery board and start a debugging session. Eclipse will ask you whether you want to switch to the ‘Debug perspective’. Say yes to that and a debug session will be displayed.
Click for larger
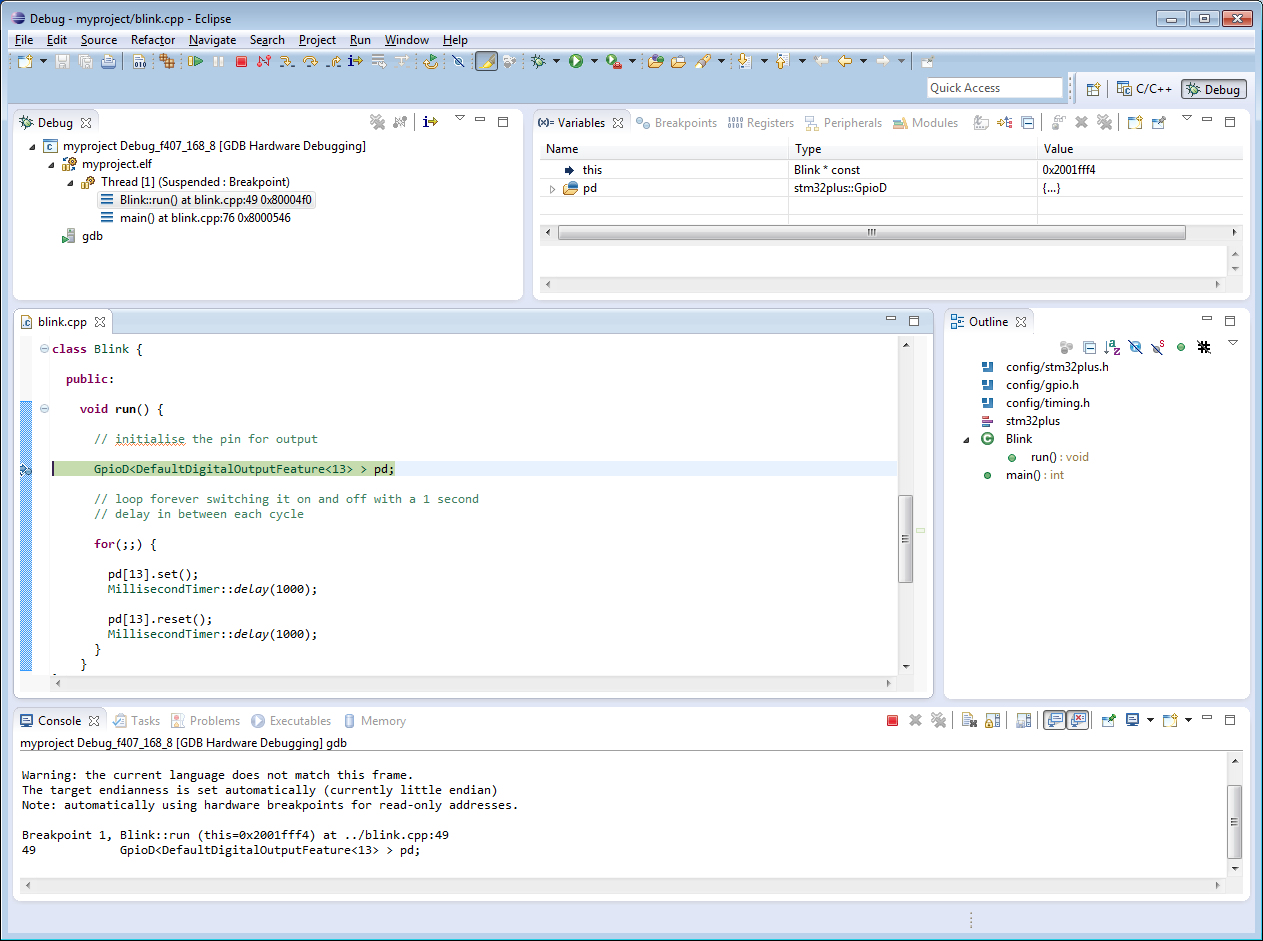
Upon startup your application will be halted ready for you to set breakpoints and prepare for debugging. Let’s set a breakpoint in the source code and let Eclipse run to it. Open the ‘blink.cpp’ file from ‘myproject’ and double-click in the margin to set a breakpoint. The breakpoint will be indicated by a blue circle (see image above).
When you’ve set the breakpoint, press ‘F8’ and your application will run and then stop at the breakpoint. It will look like the image above. You can use the variables window to drill down into your variables or you can just hover over a variable name in the source code. The memory window can be used to inspect the contents of memory addresses and the registers window lets you see what’s going on at CPU level.
Note that the hardware only supports a maximum of 6 breakpoints, something that you can see in the OpenOCD startup messages. Eclipse doesn’t know about this and will let you try and set more than that but if you do you’ll find it starts to behave very strangely, stopping at random places and missing your actual breakpoints.
Now that we’ve frozen our code we can single step through it using F6, step into method calls using F5 and out of methods using F7. When you’re ready to let it go just press F8, you can always suspend it again using the pause icon on the toolbar.
Finished!
That’s all for this tutorial. I hope I’ve helped you Windows users get up and running with a free and open source STM32 development environment in which you can develop from a Unix-like terminal or from a graphical IDE and debug using a user-friendly visual debugger. It’s about as close to writing and debugging native PC applications as you can make it.
Did I miss something? Want to leave feedback? Feel free to leave a comment below. If you’re struggling somewhere in the process then please feel free to start a thread over at the forum where you can post the details and screen shots that’ll help me to get you going.